| Sno |
Definitions |
Explanations |
| 1 |
Region |
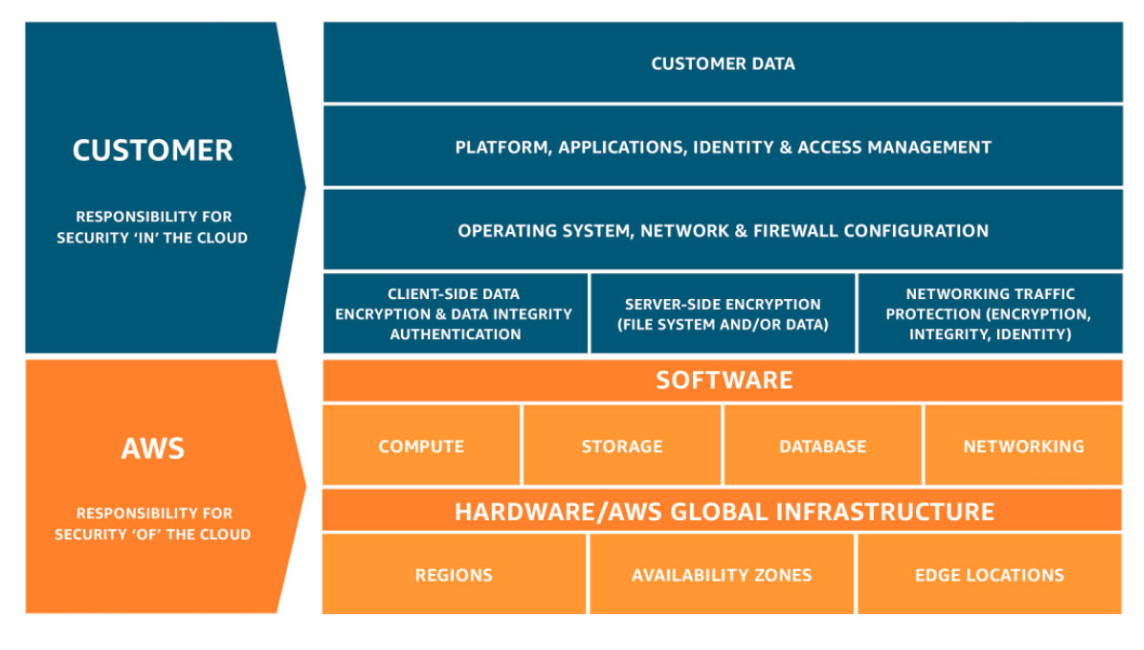
Global Infra – Geographic region where AWS located. |
| 2 |
AZ |
- Global Infra.
- Consist of one or more DCs.
- Isolated DC (from failure in other AZ), when grouped together multiple AZ’s (us-east-1a, 1b, 1c, 1d) forms Region (us-east-Virginia).
- Multiple AZs within Region are for High-Availability and Fault-Tolerant.
|
| 3 |
Edge Locations |
Global Infra – CDN – A site that CloudFront uses to cache copies of your content for faster delivery to users at any location. |
| 4 |
IAM Users |
Individuals |
| 5 |
IAM Groups |
Easy manage users and their access |
| 6 |
Resources |
S3, EC2, etc. |
| 7 |
Roles |
Manage resource and temporary authz to resource. |
| 8 |
Policies |
User/ resource access definitions. The policy is a JSON document that consists of:
- Actions: R/ W Ops
- Resources: RDS
- Effect: ALLOW/ DENY
- Conditions: SPECIFIC SCHEMA of RDS
|
| 9 |
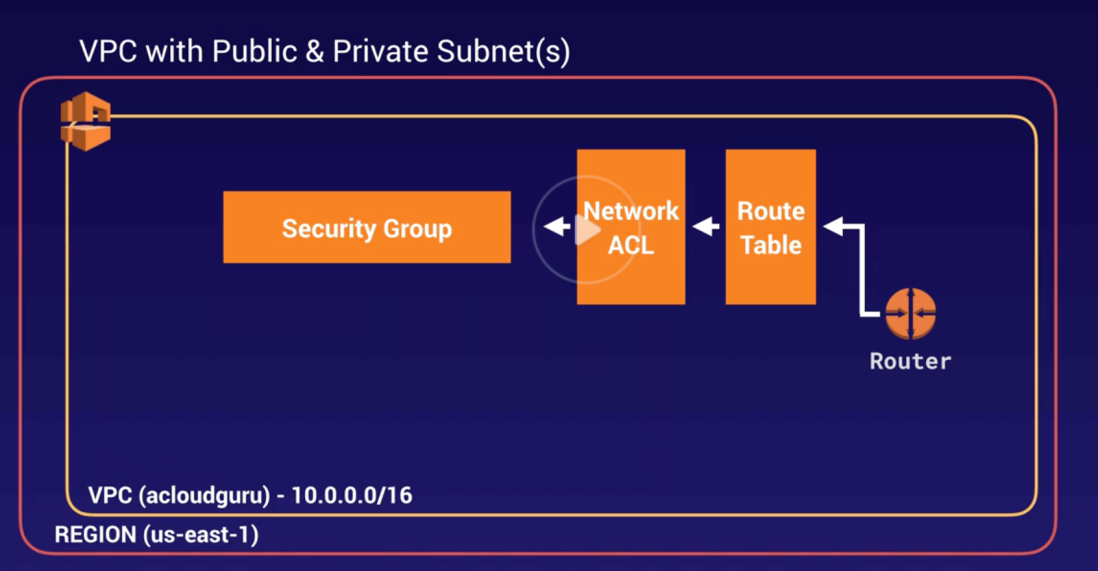
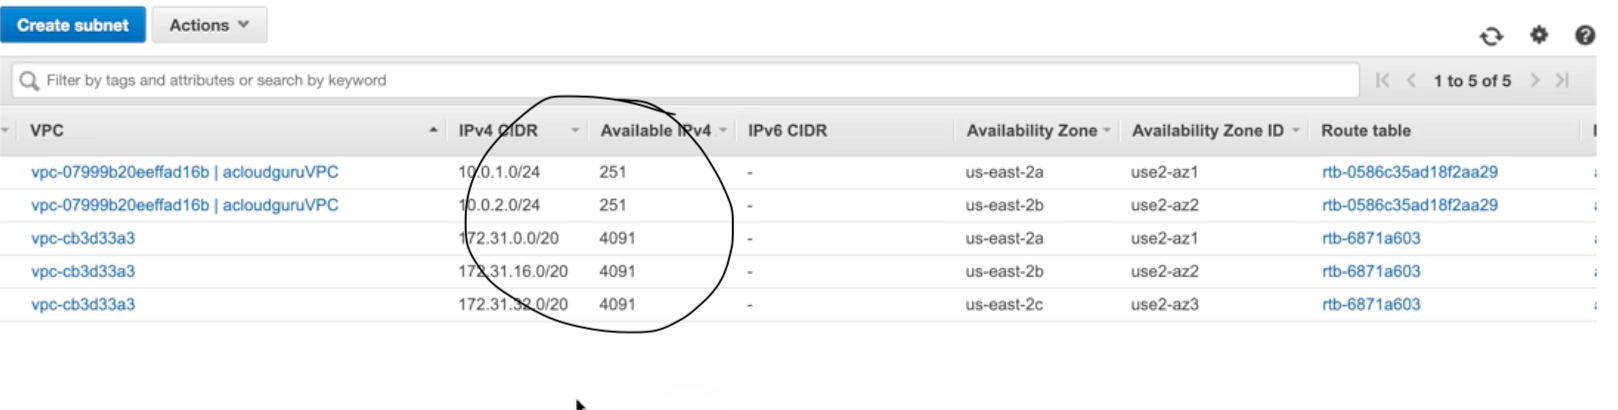
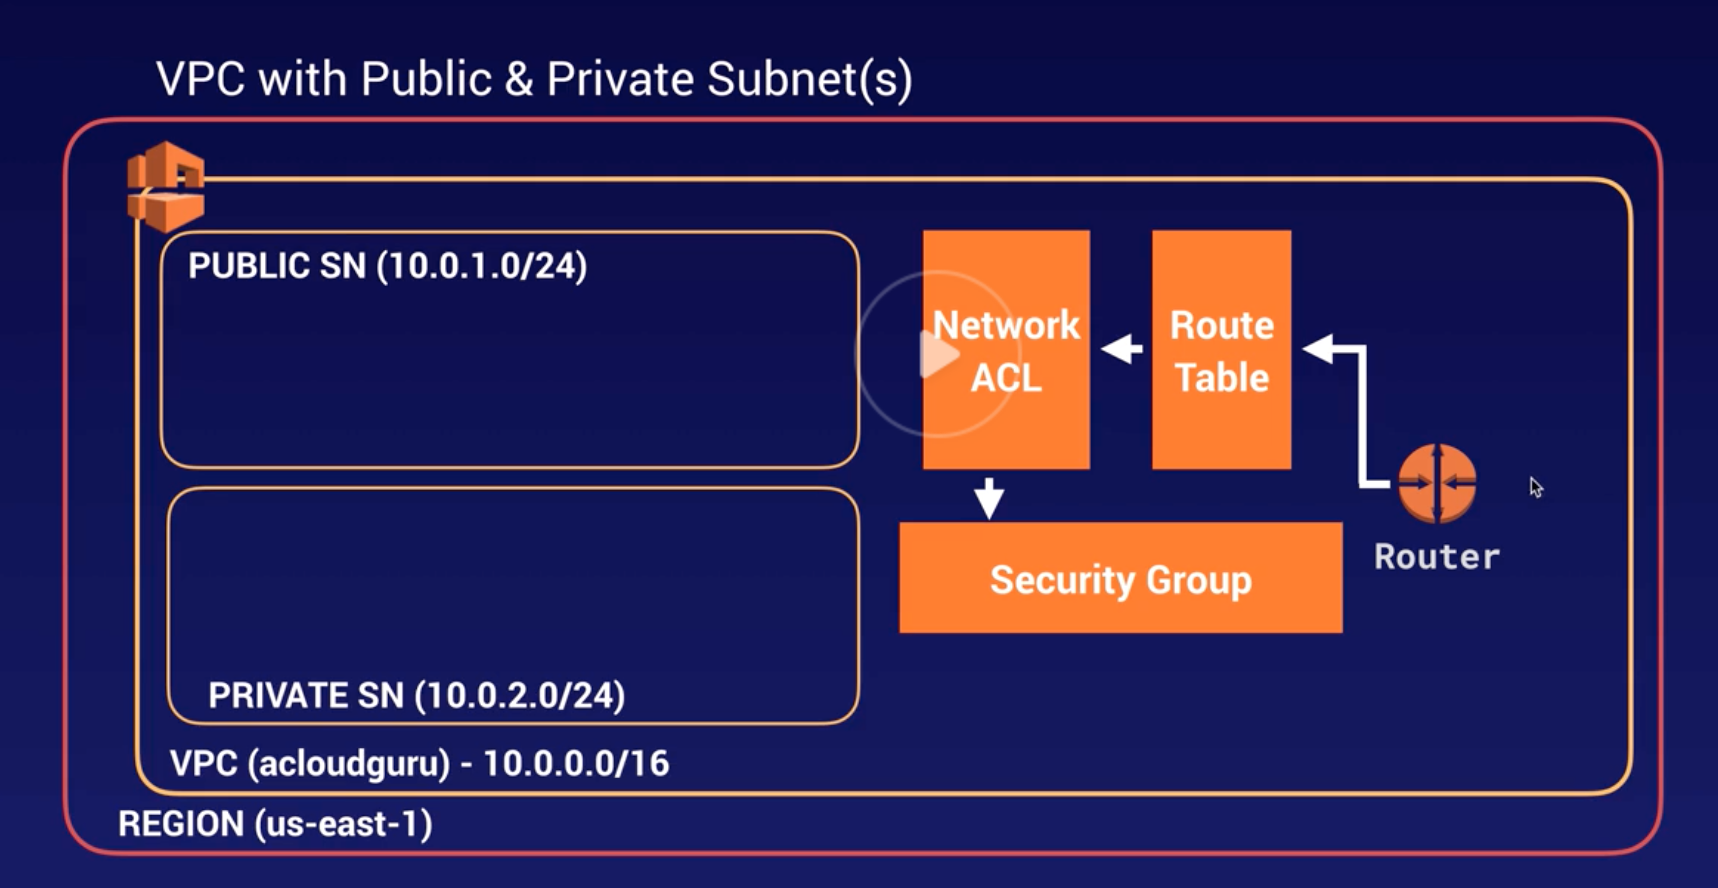
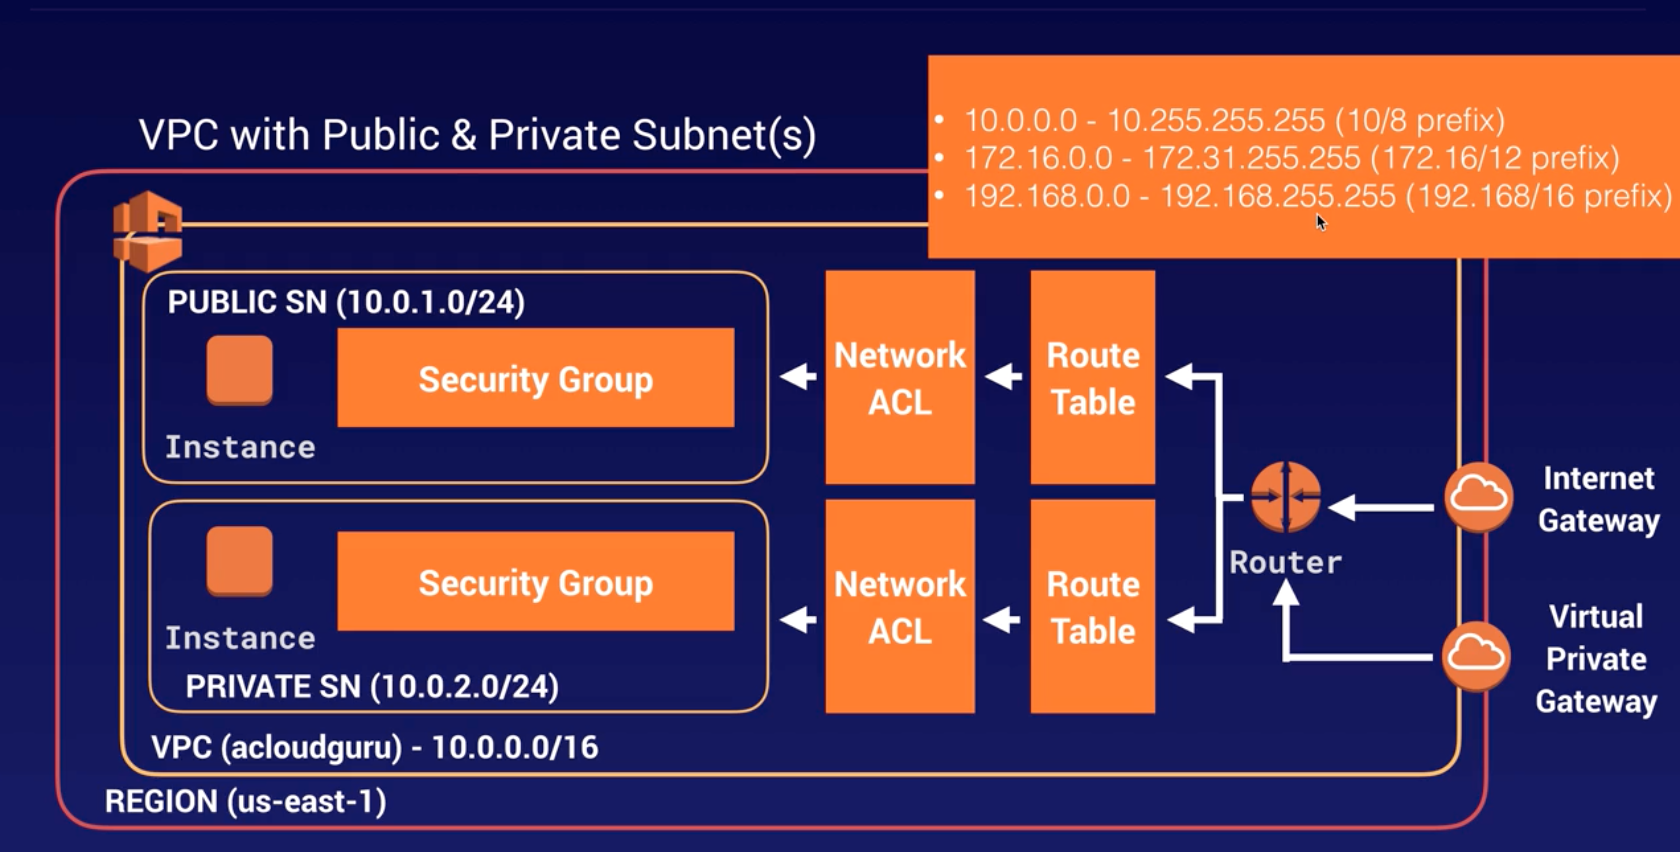
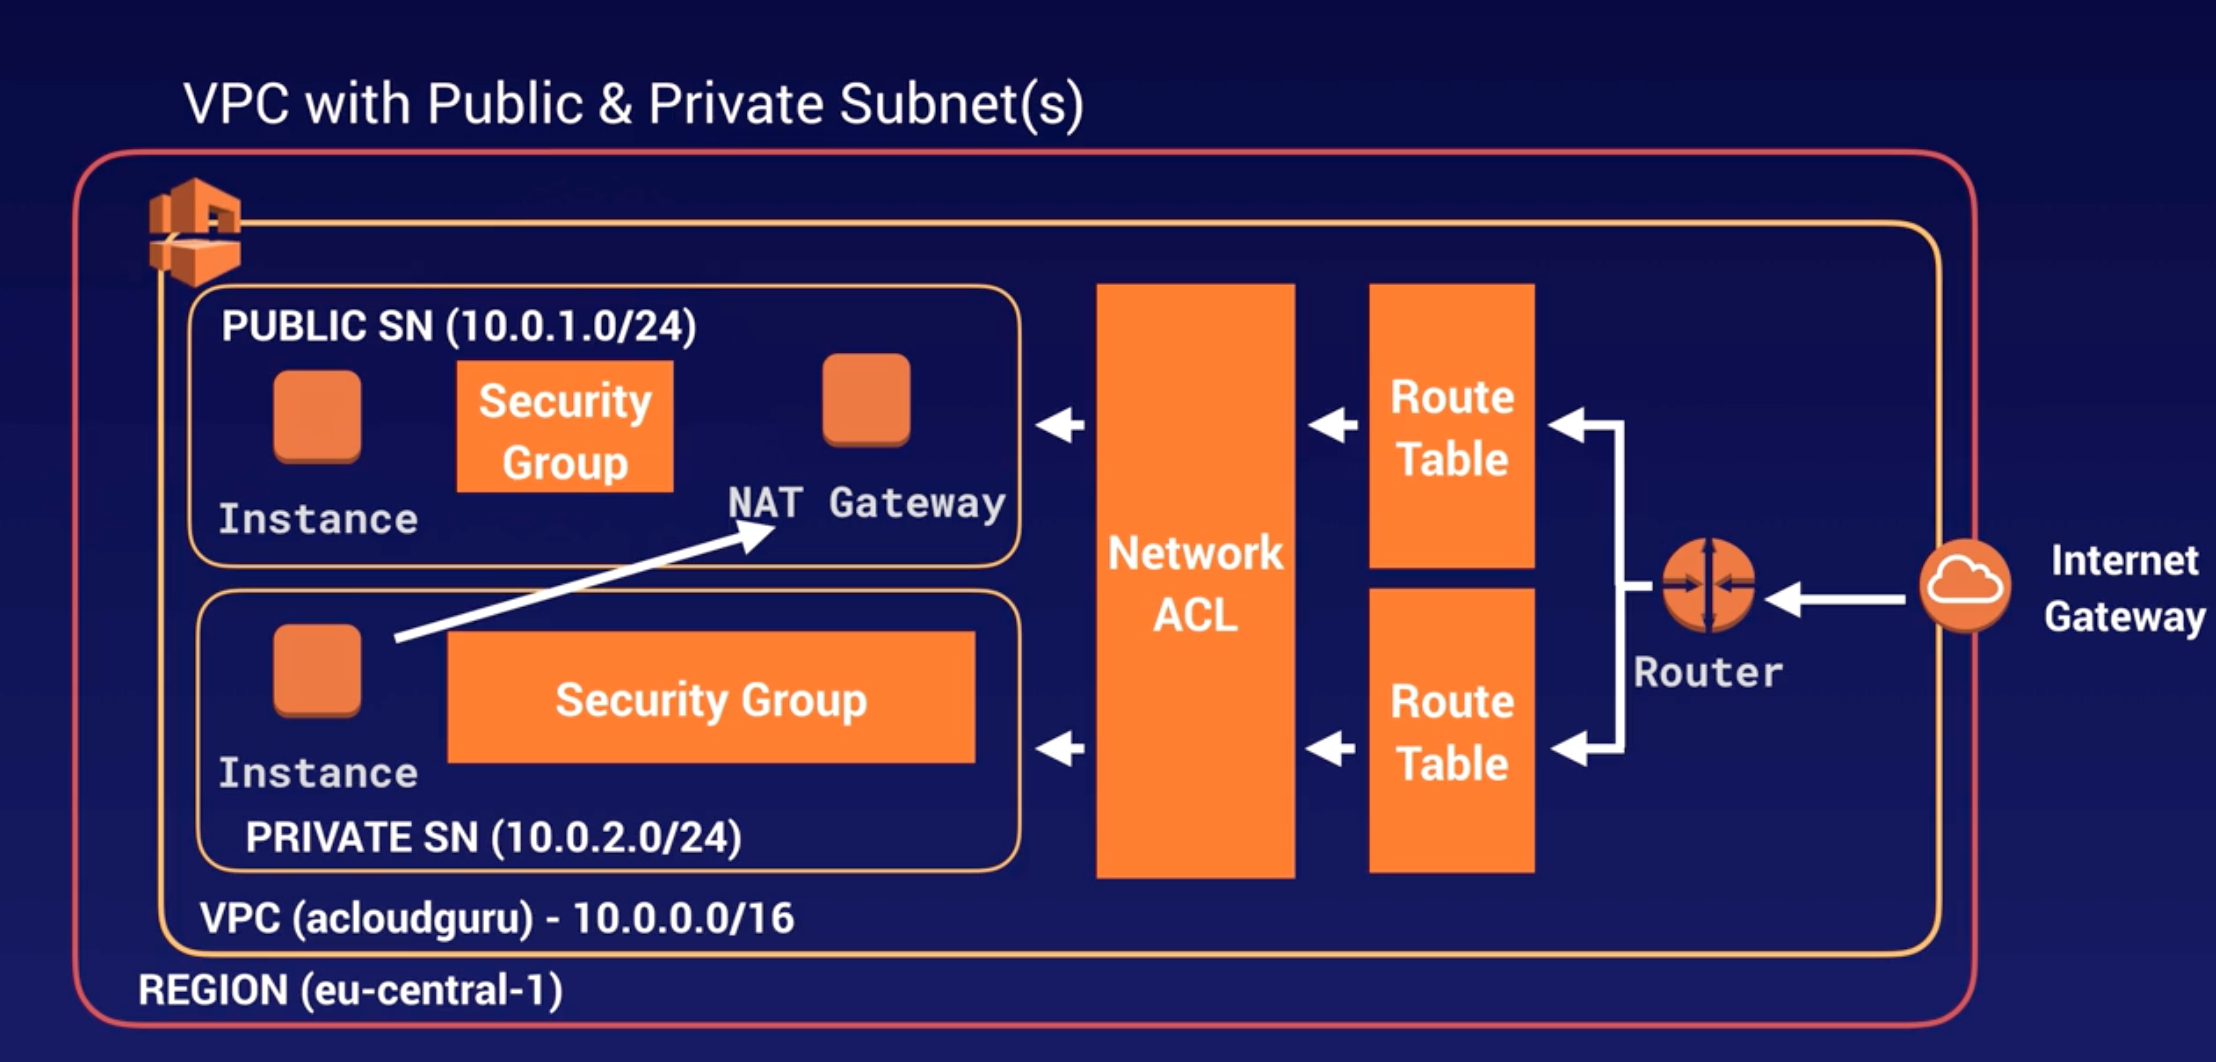
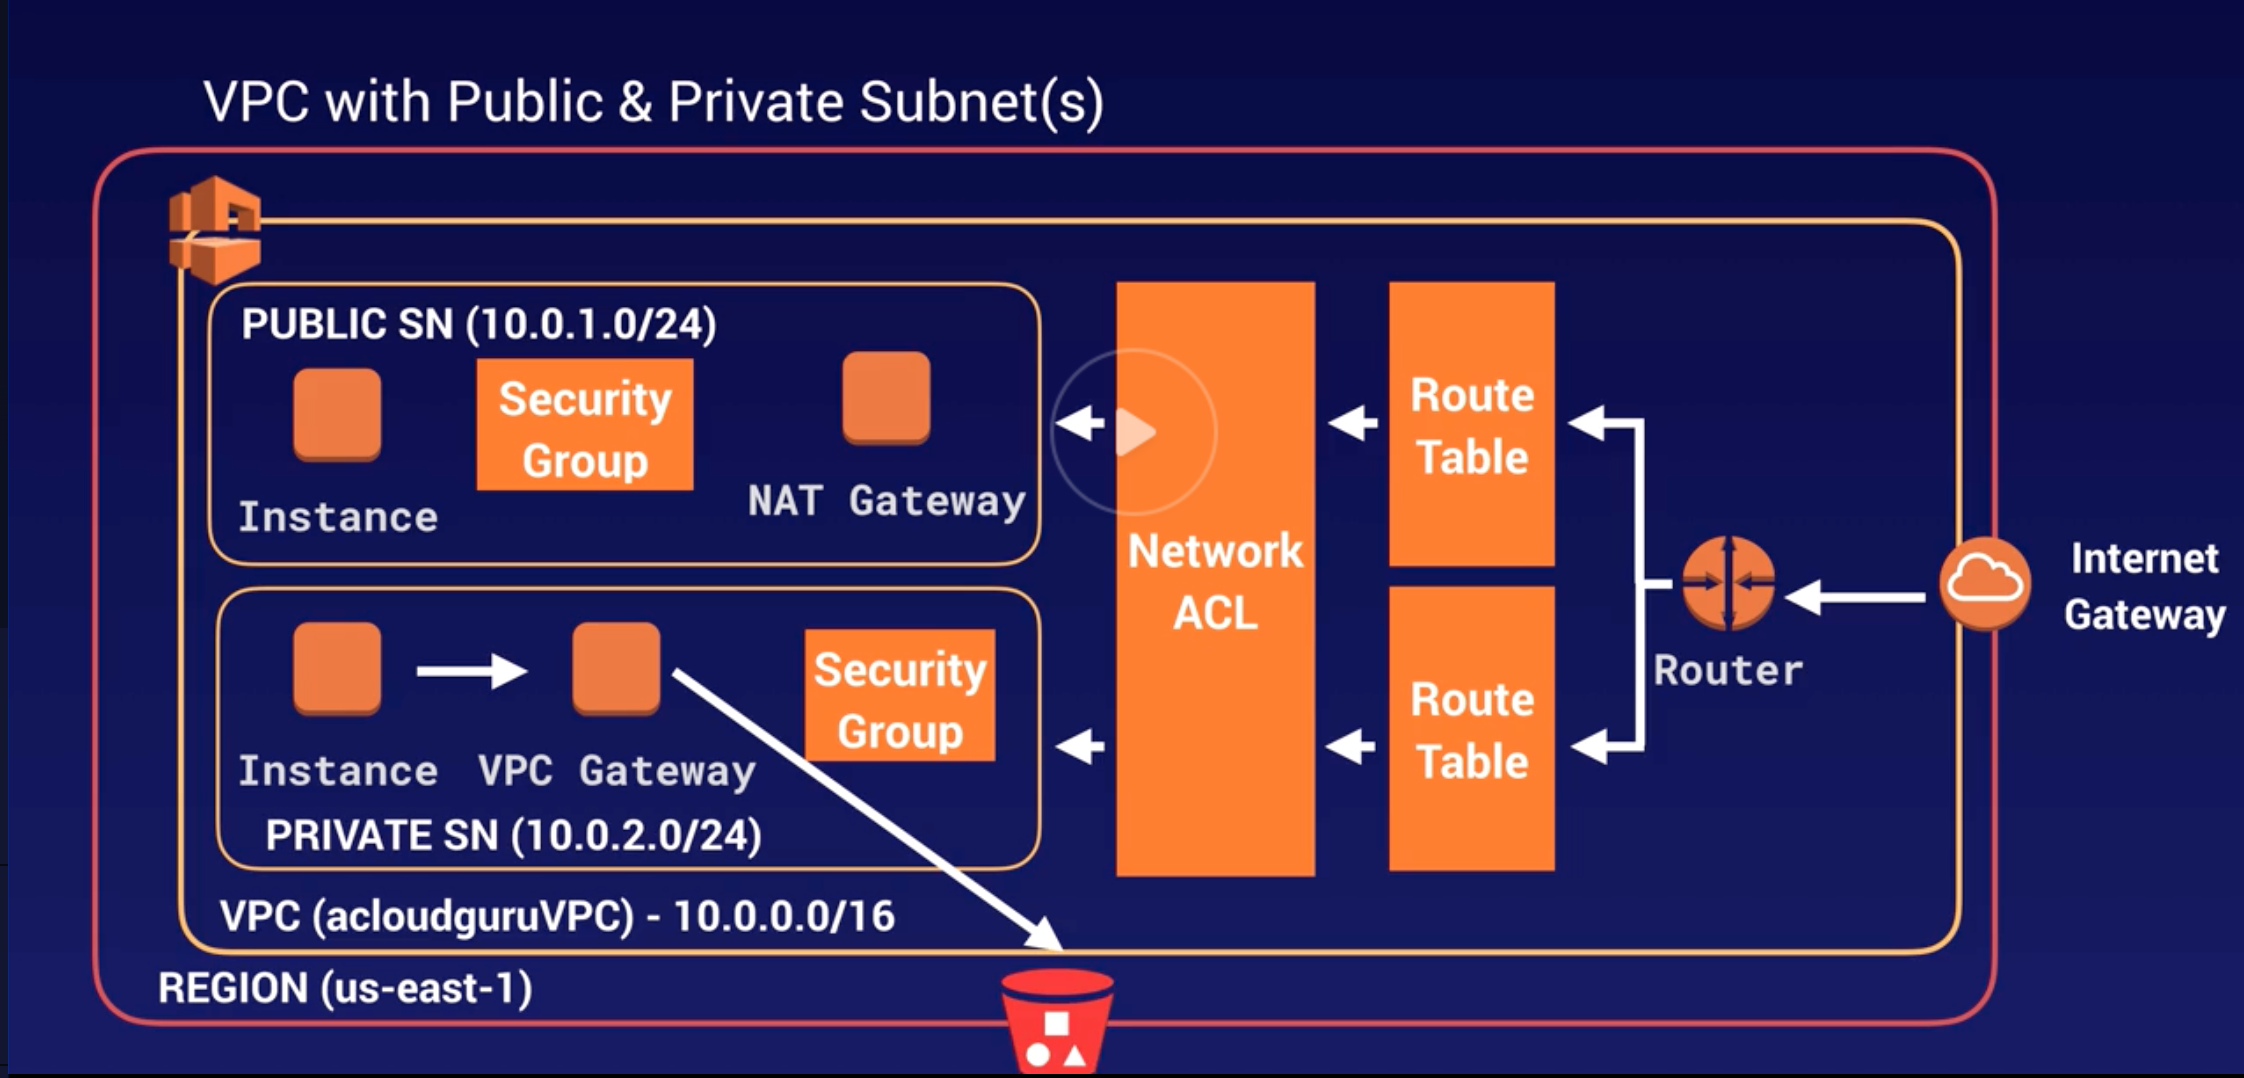
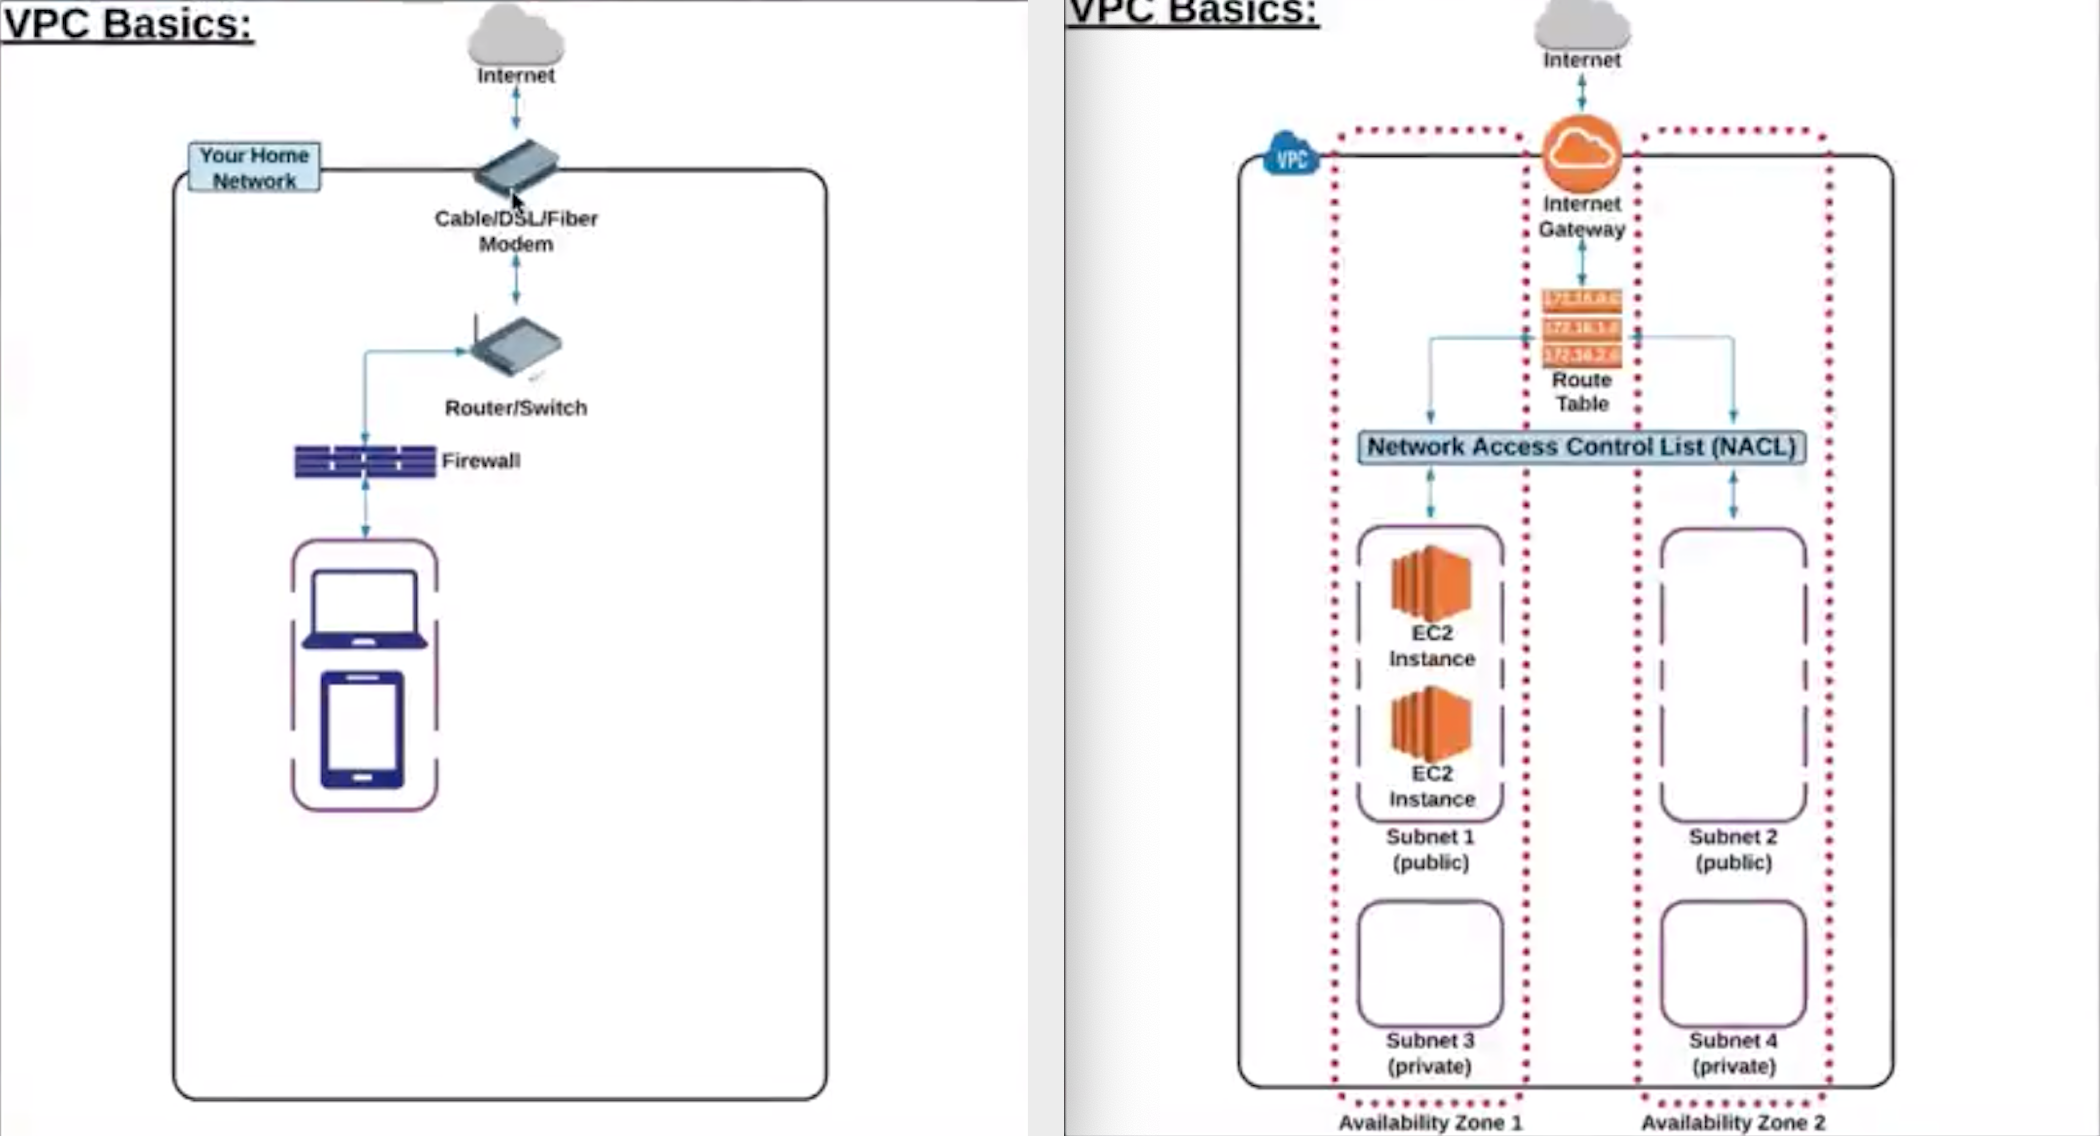
VPC |
- Logical isolated n/w section of AWS to places resources.
- Includes: virtual n/w, own IP range, subnets, route table, n/w gateways.
- VPC spans across AZs in particular region.
- When VPC gets created, it spans across multiple AZs (us-east-1a, 1b, 1c, 1d) within same Region (us-east-Virginia).
|
| 10 |
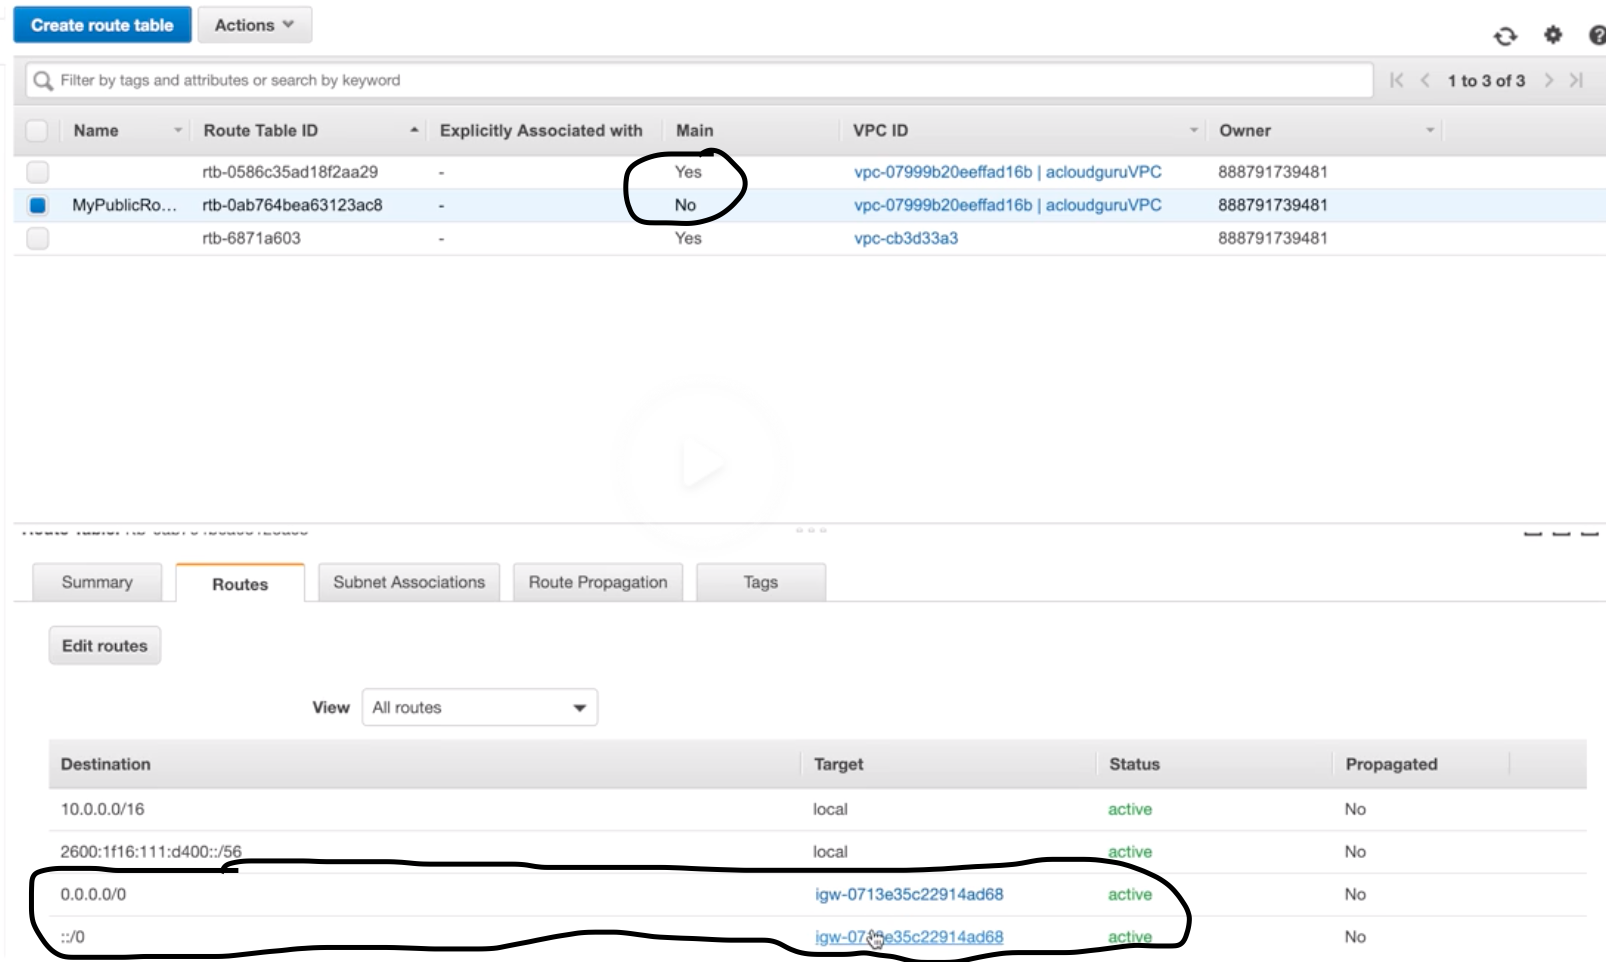
IGW
NAT Gateway |
H/W + S/W based gateway to interact b/w VPC and internet.
In public subnet, to allow private subnet resource to access internet. |
| 11 |
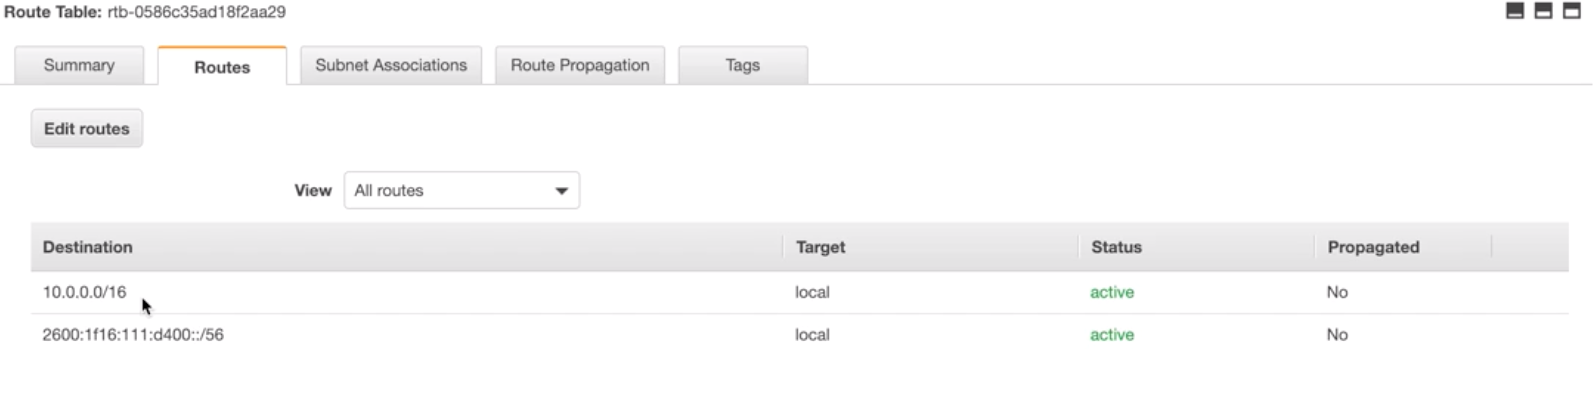
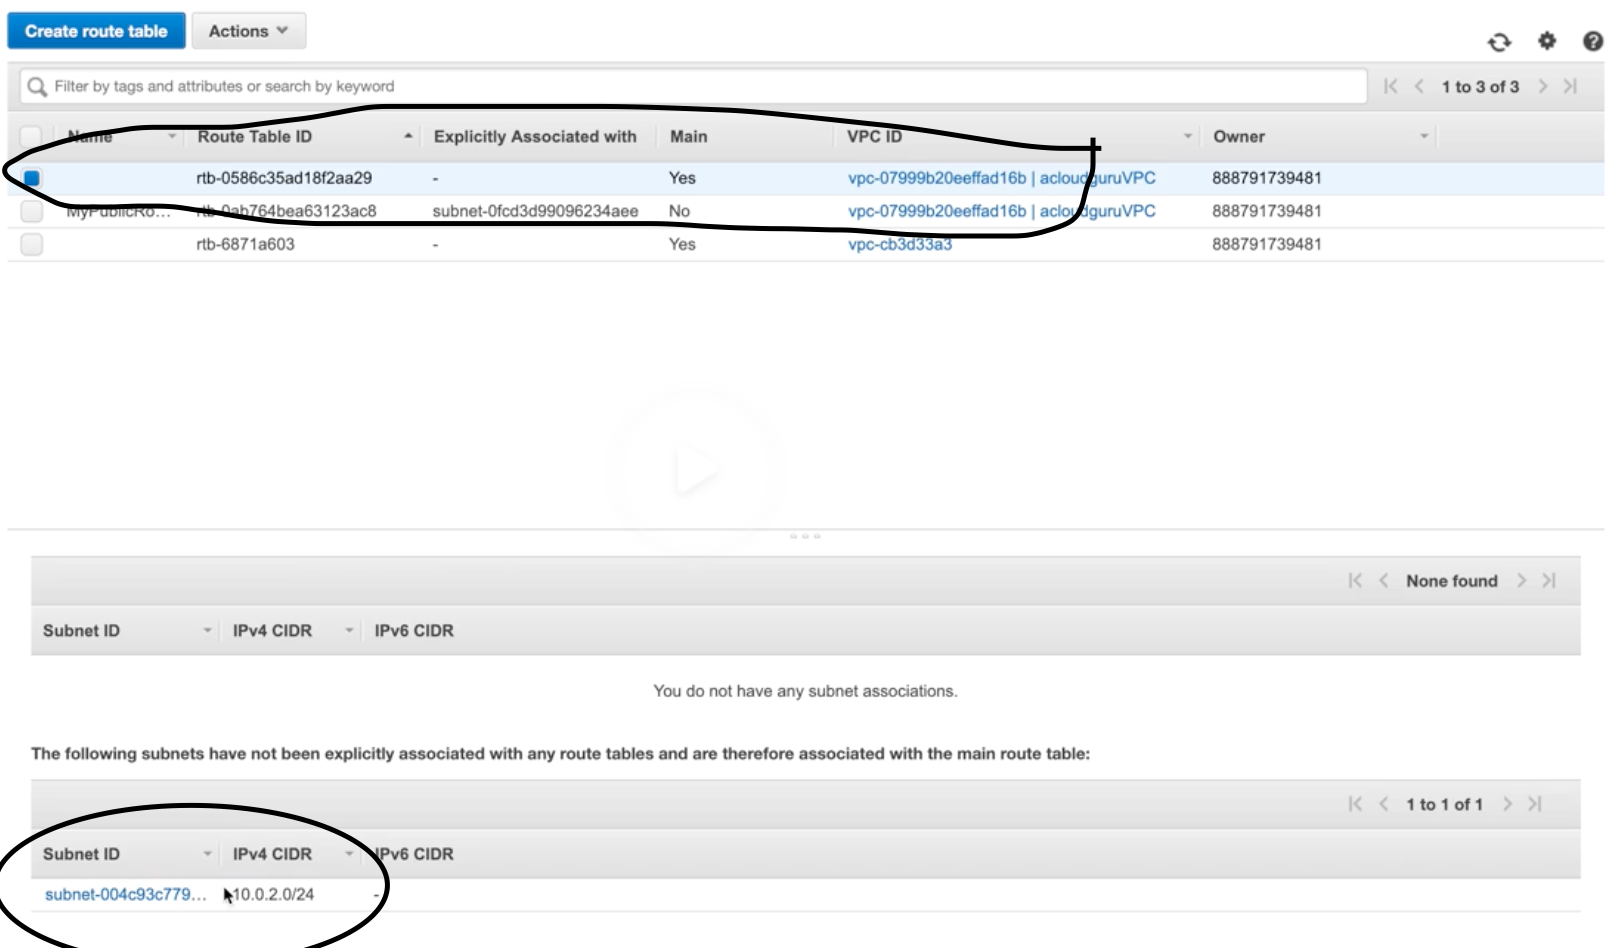
Route-Table |
- Set of rules called “routes” determines where n/w traffic is directed b/w IGW and subnets.
- There is a default “main” RT.
- RT can communicate with other RT.
- Work at VPC level.
|
| 12 |
NACL |
- Optional firewall to control traffic b/w route-table and subnets.
- EC2 creates Default InBound and OutBound “rules” allows all traffic.
- Evaluated from lowest to highest rule #. Rule * is deny (last rule).
- Stateless – newly created NACL is everything denied by default (both InBound and OutBound Rule *).
- Work at subnet level.
|
| 13 |
Security Groups |
- Allow/ deny traffic at EC2 instance.
- Same as firewall in the desktop.
- All rules will be evaluated before making decision to allow/ deny. (different from NACL – lowest rule # executed first and higher rule # is discarded).
- InBound traffic is denied and OutBound traffic is allowed by default.
- Traffic is denied unless there is a specific EXPLICIT ALLOW rule (i.e., no rule means, such traffic is DENIED).
- Works at EC2 instance level.
|
| 14 |
Subnet |
- Divide VPC.
- Within VPC, add one or more subnets in each AZ and each subnet must reside in particular AZ only and cannot span across AZs.
- us-east-Virginia region has 4 AZs (us-east-1a, 1b, 1c, 1d), so 4 subnets (for each AZ) gets created within one VPC when chose Virginia as a region.
- Subnet Groups: Grouping of subnets
|
| 15 |
Public and Private Subnet |
- Public: Route to internet via RT and IGW.
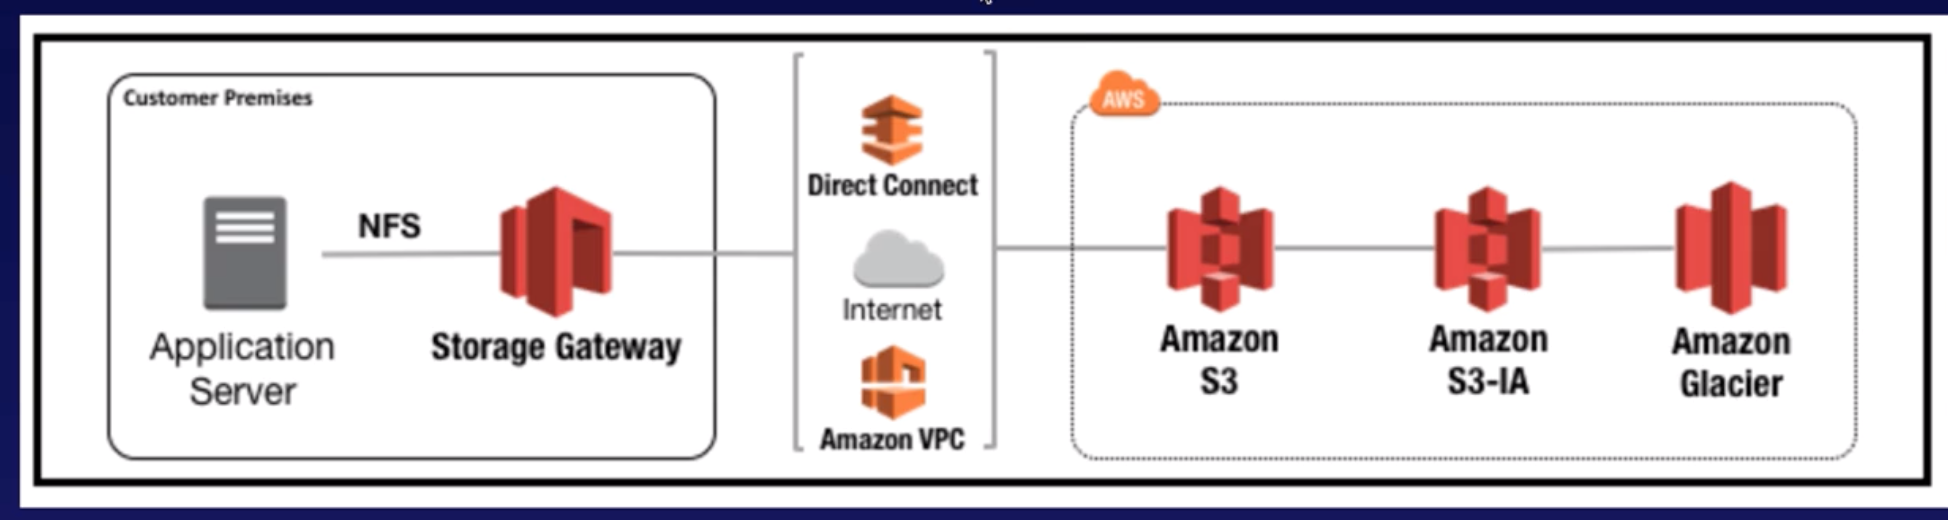
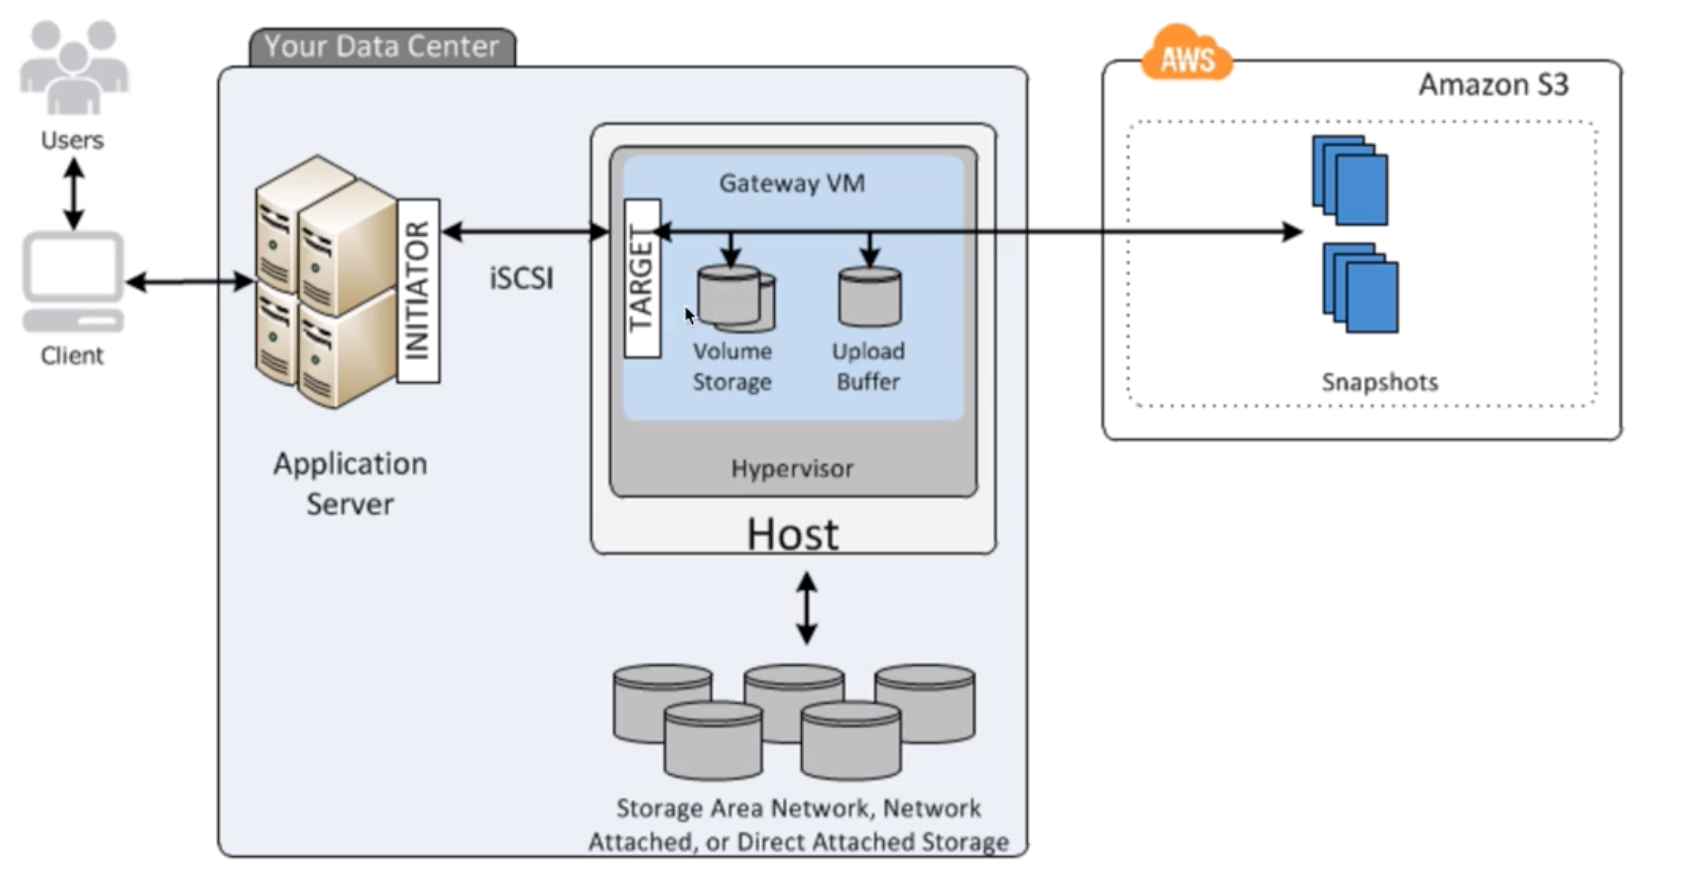
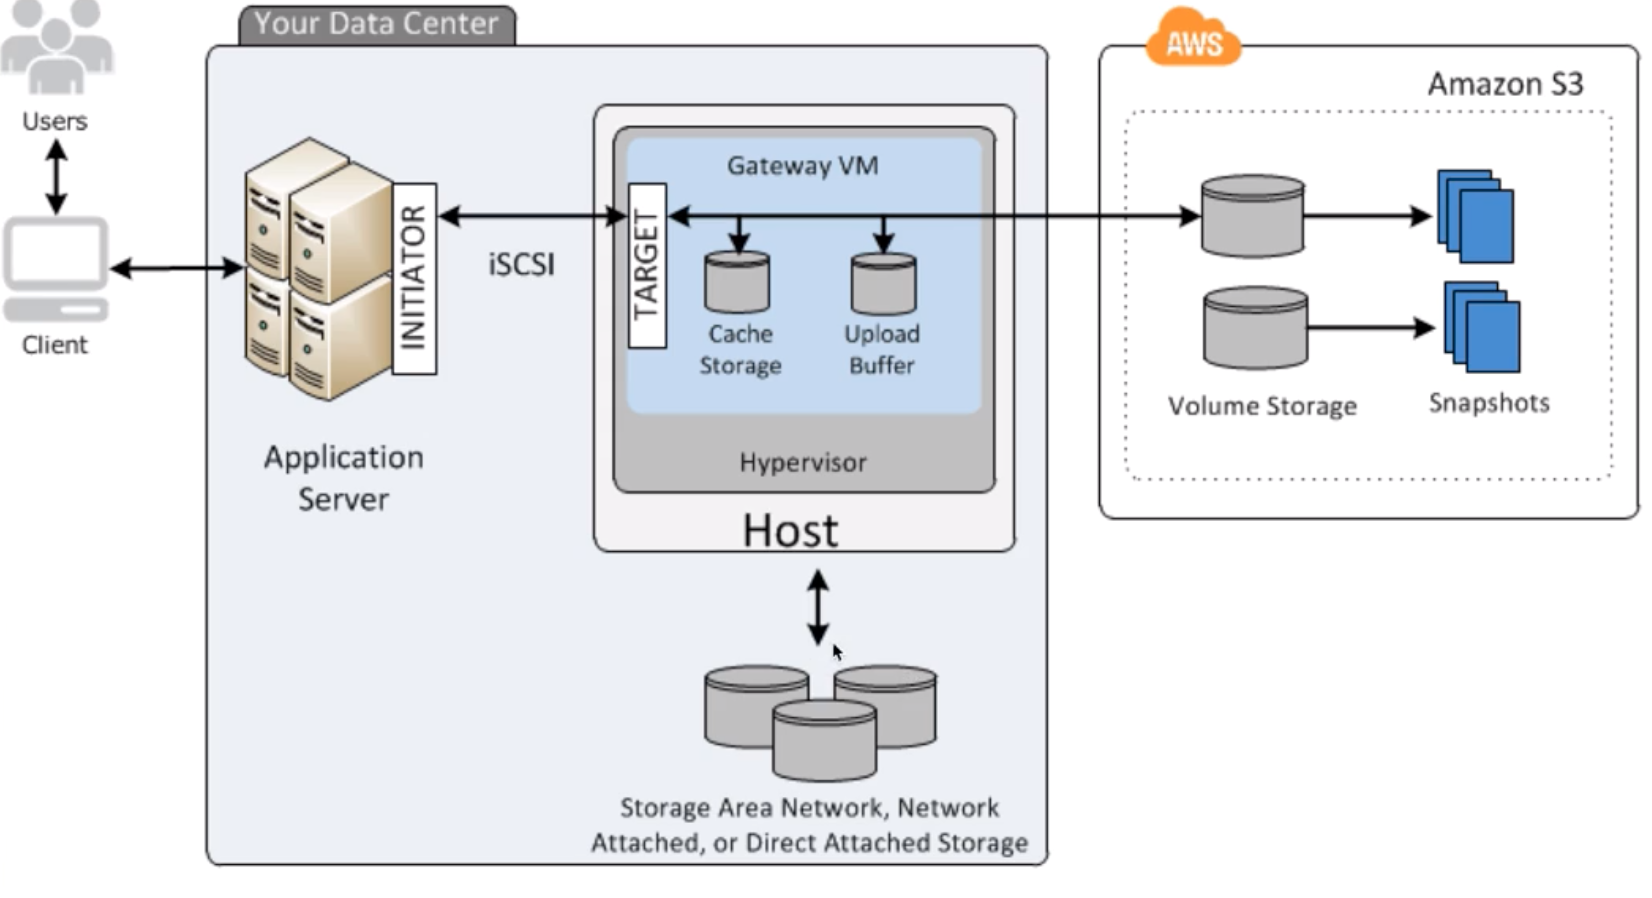
- Private: No route to internet via RT and IGW, but only RT with route to other subnets (can be Public or Private) within same VPC.
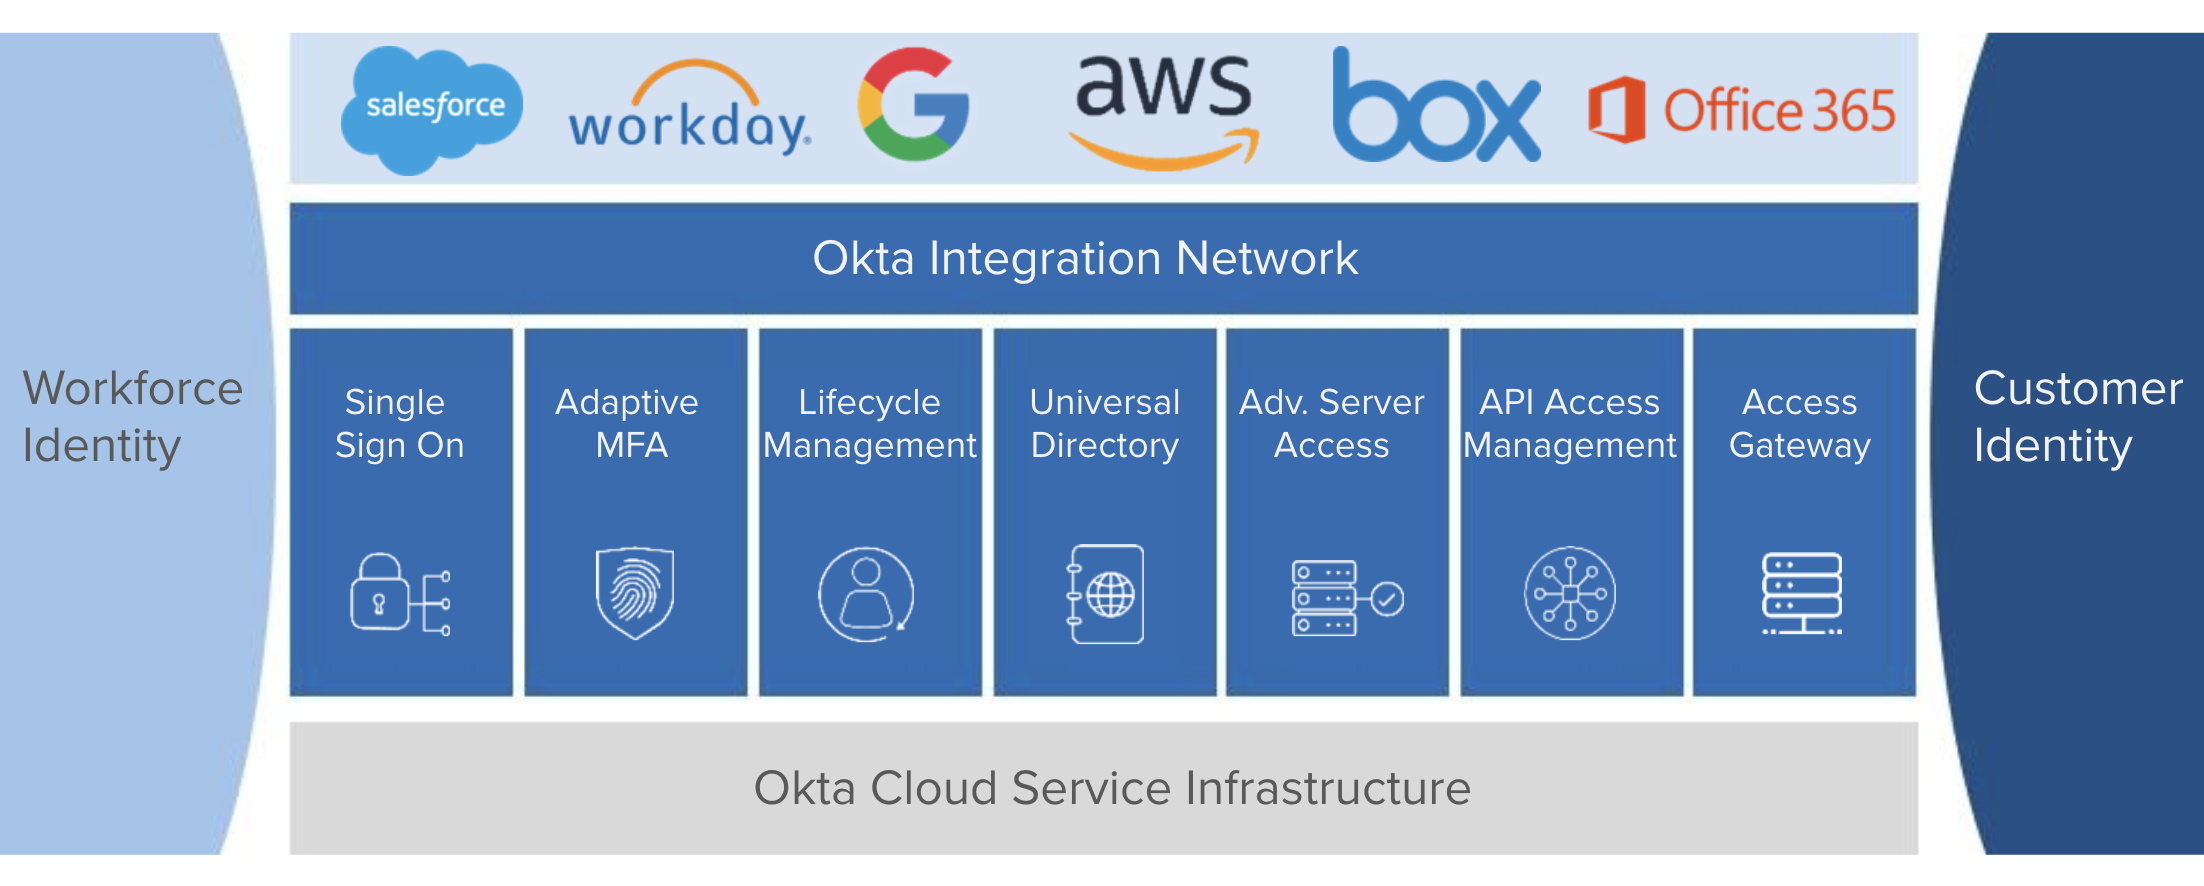
|
| 16 |
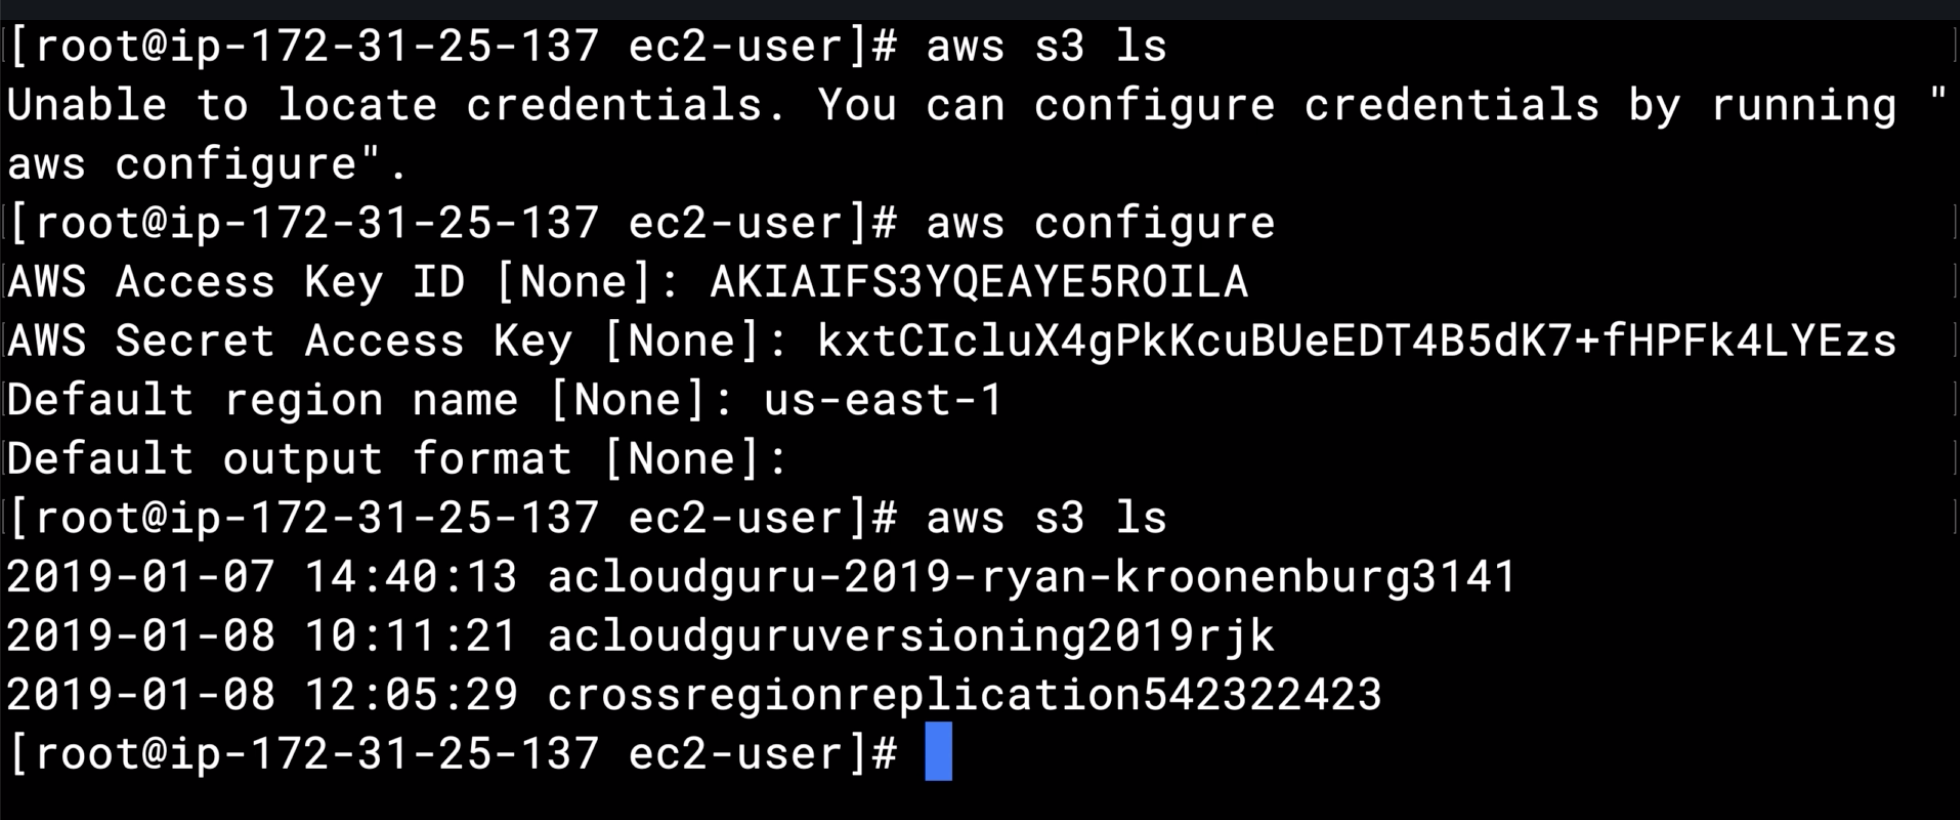
S3 Buckets |
- Root level folders.
- Buckets are located within region.
- Key -> Object -> BucketName.
- Filename -> Actual File -> Unique name across globe.
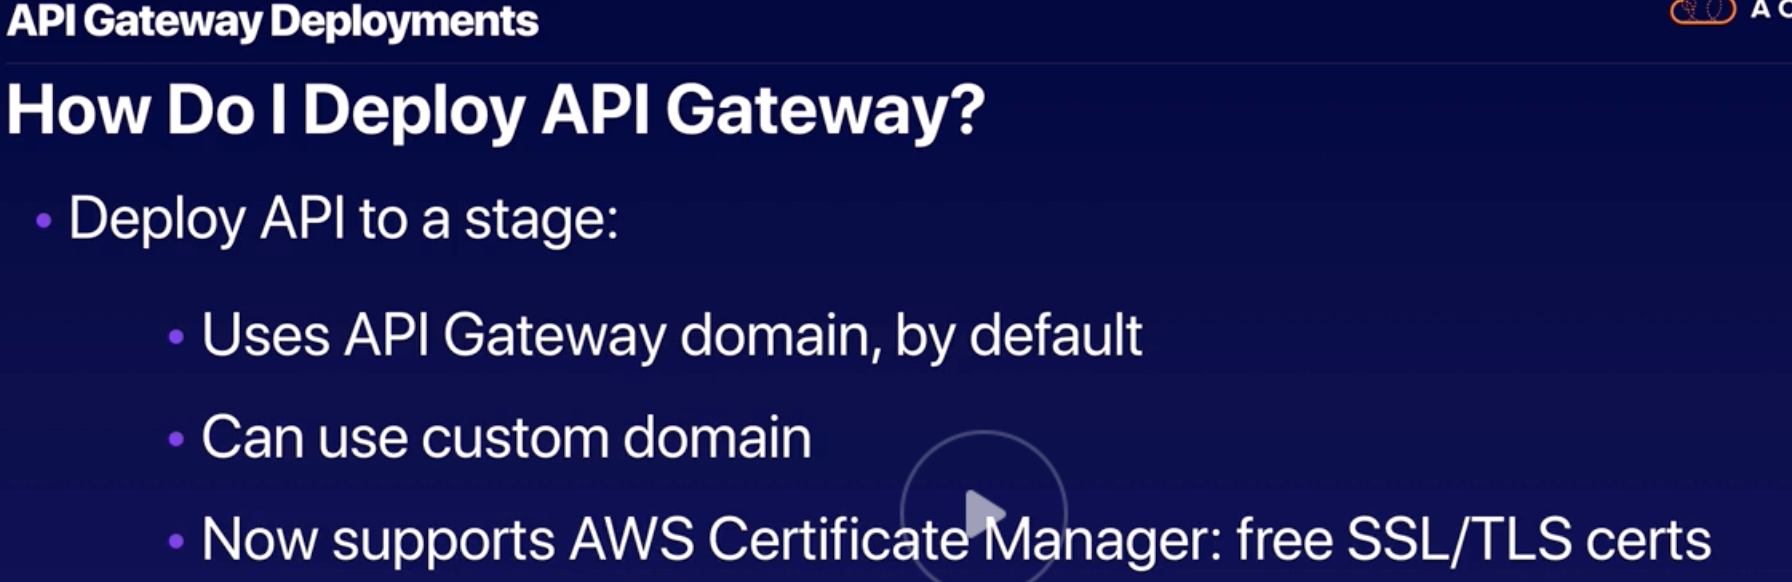
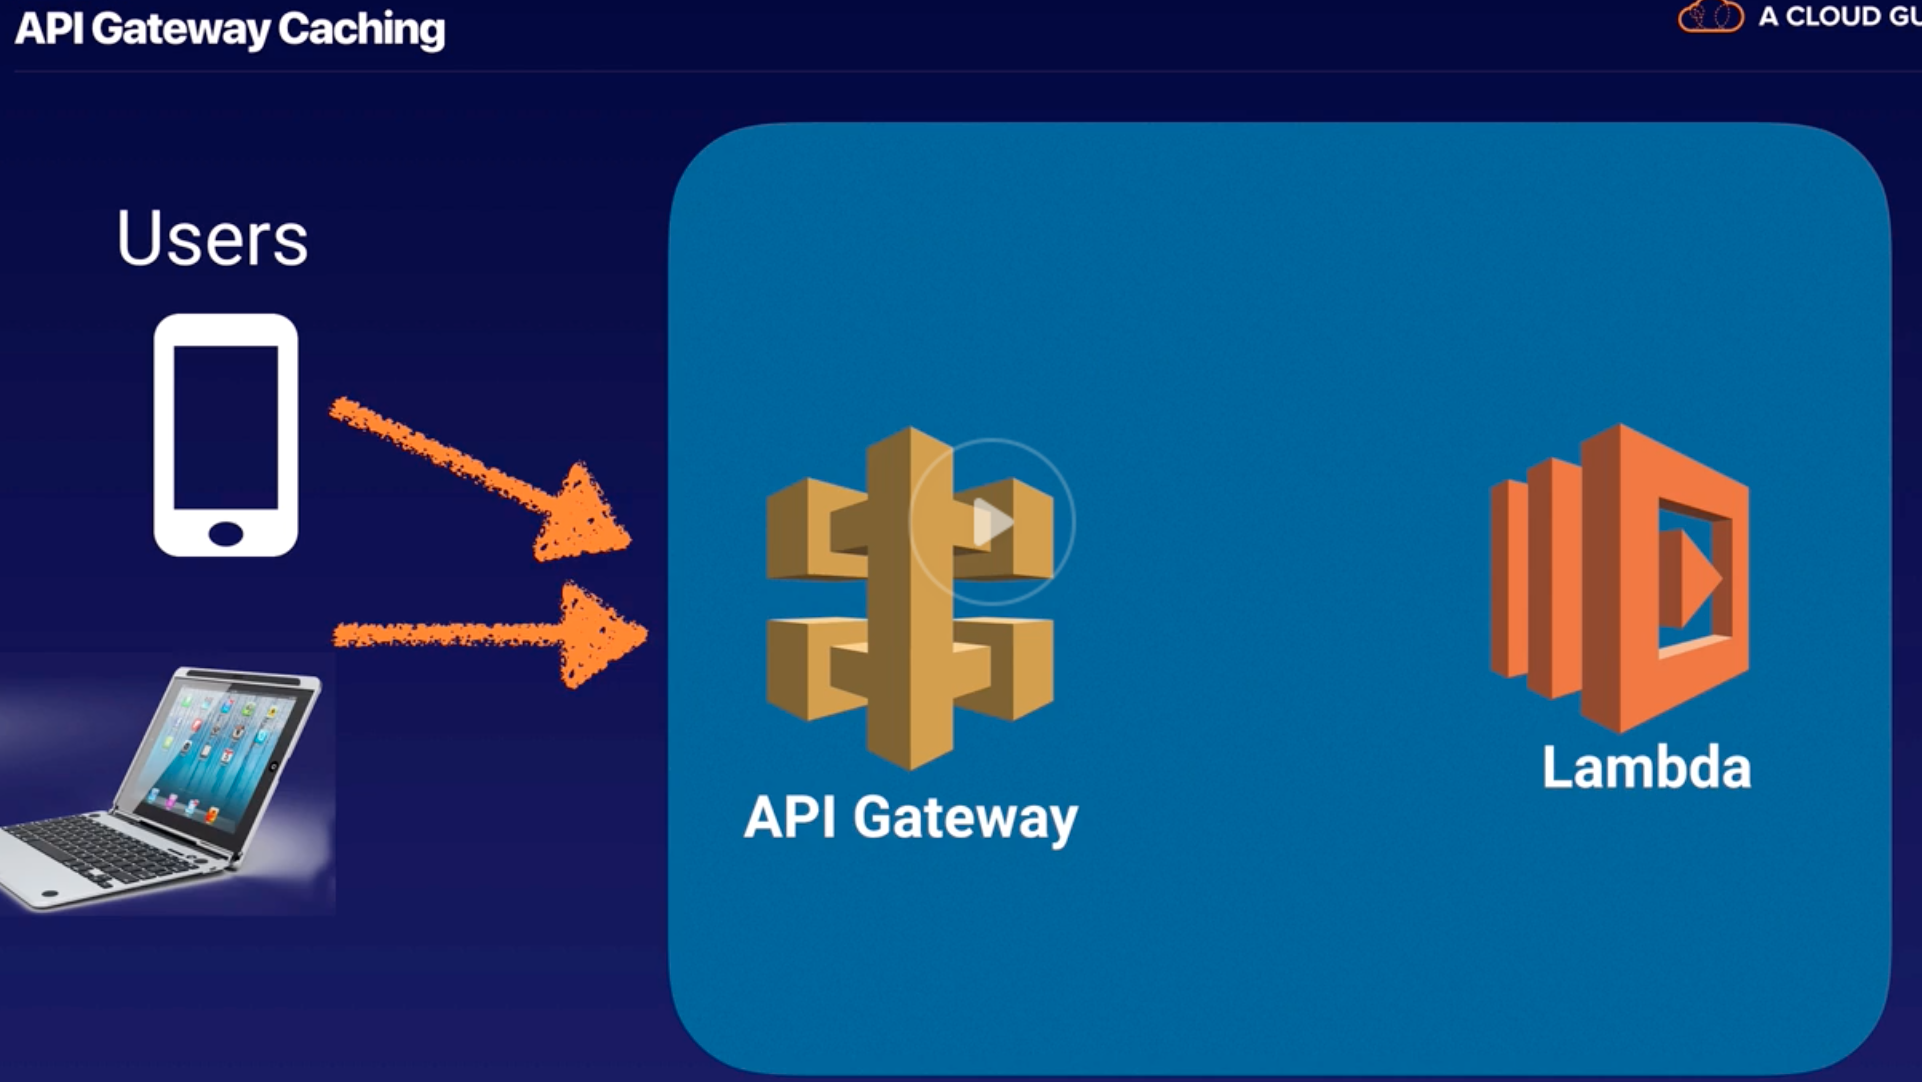
|
| 17 |
S3 Folders |
Subfolders of buckets. |
| 18 |
S3 Objects |
Files within buckets/ folders. |
| 19 |
S3 Lifecycle Policy |
Rules that change the storage class of S3 objects, |
| 20 |
S3 Permissions |
A granular control over who can view, access, use specific buckets and objects. |
| 21 |
S3 Versioning |
- Versioning for buckets/ objects. Increases storage by having versions.
- Status are ON or OFF.
- Once ON, you can only SUSPEND and not OFF.
- SUSPEND prevents versioning and older versions will remains. Applies at bucket level.
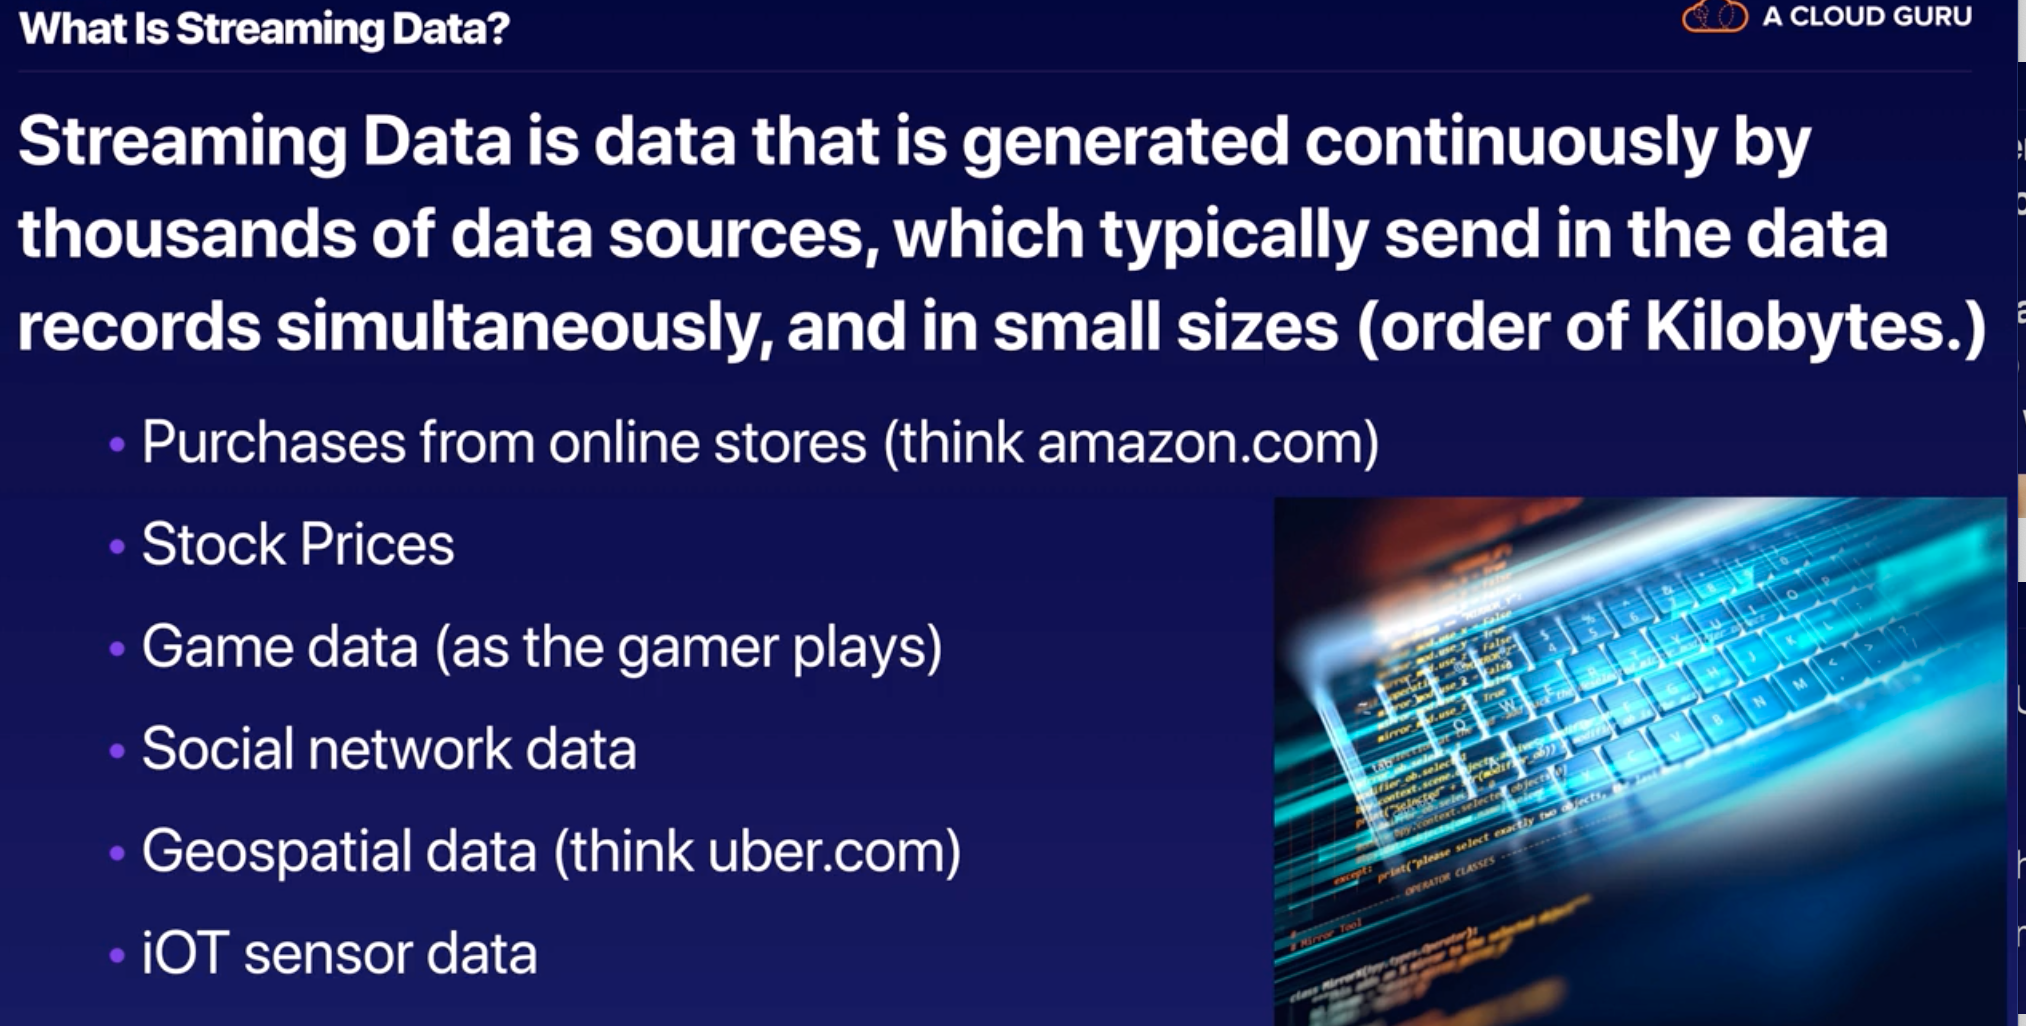
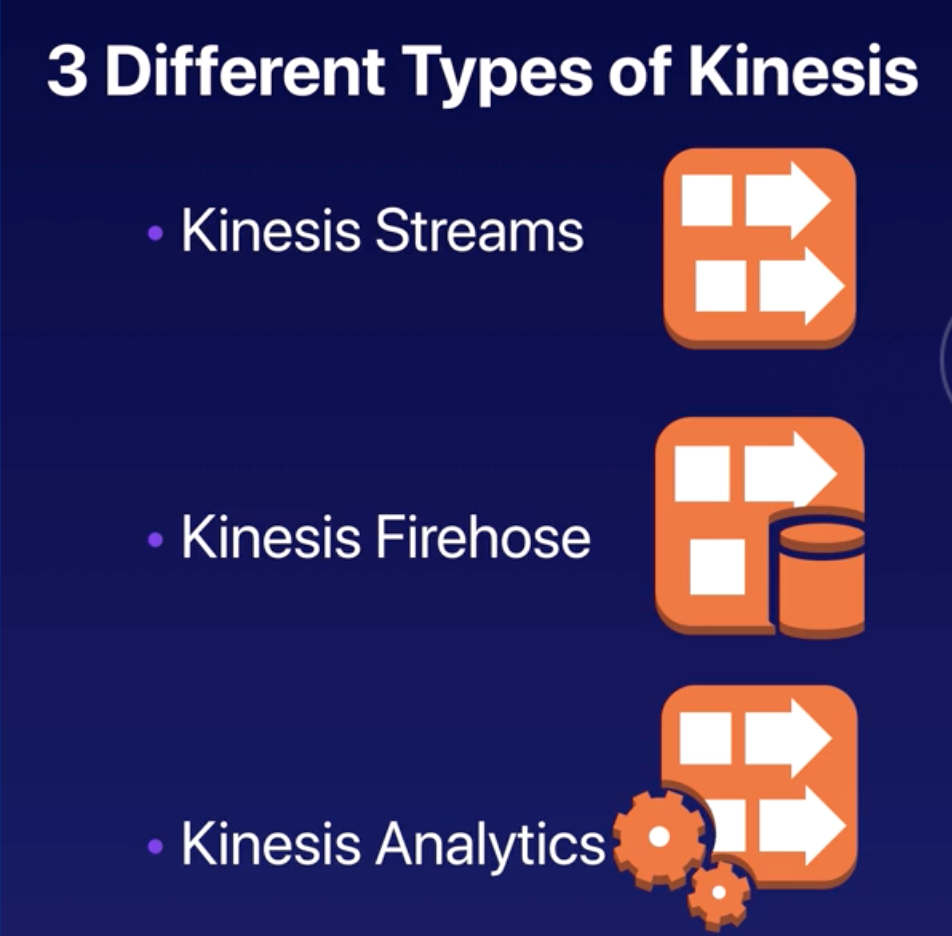
|
| 22 |
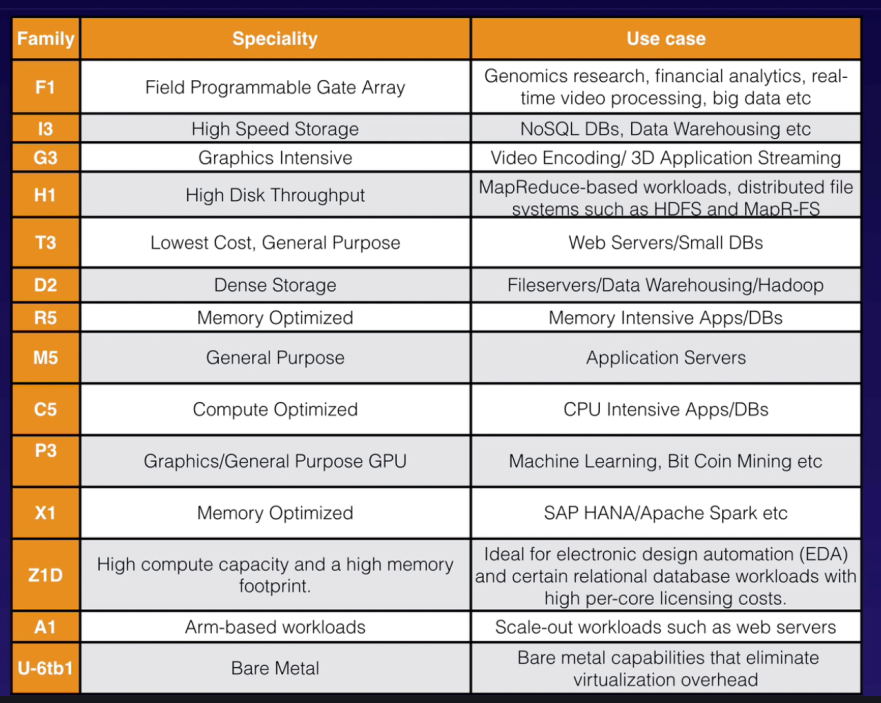
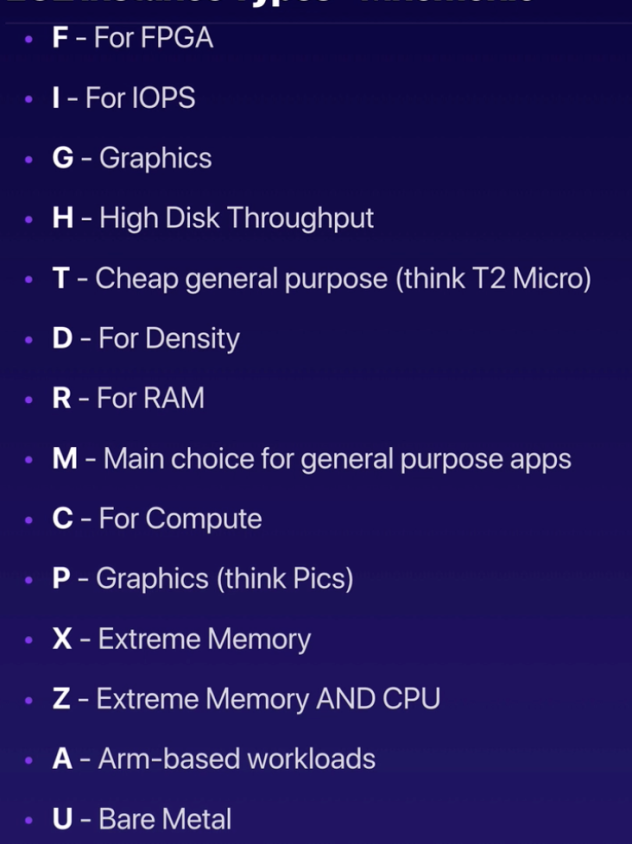
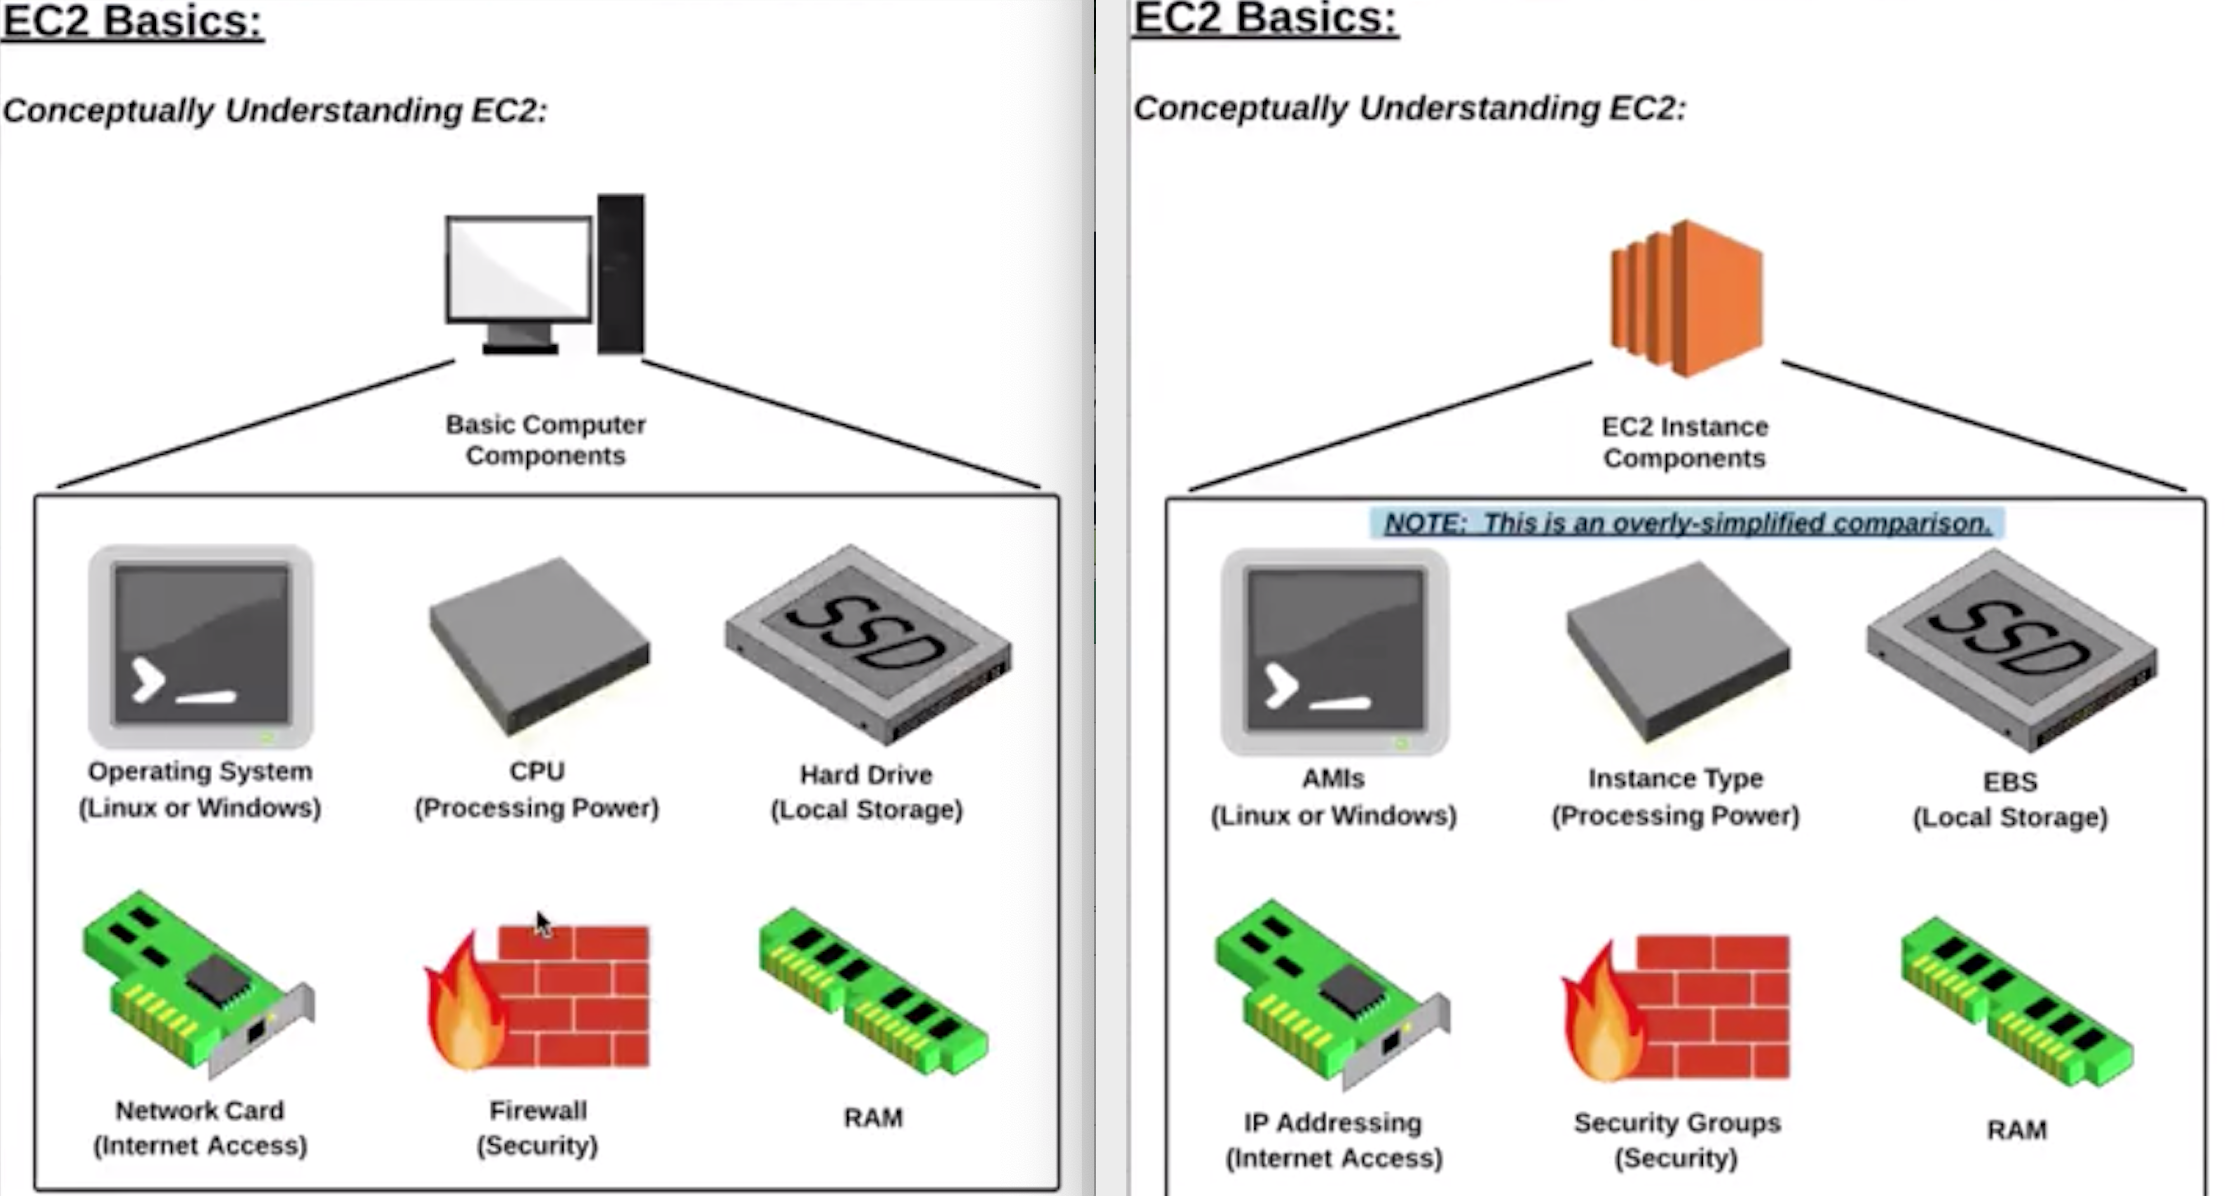
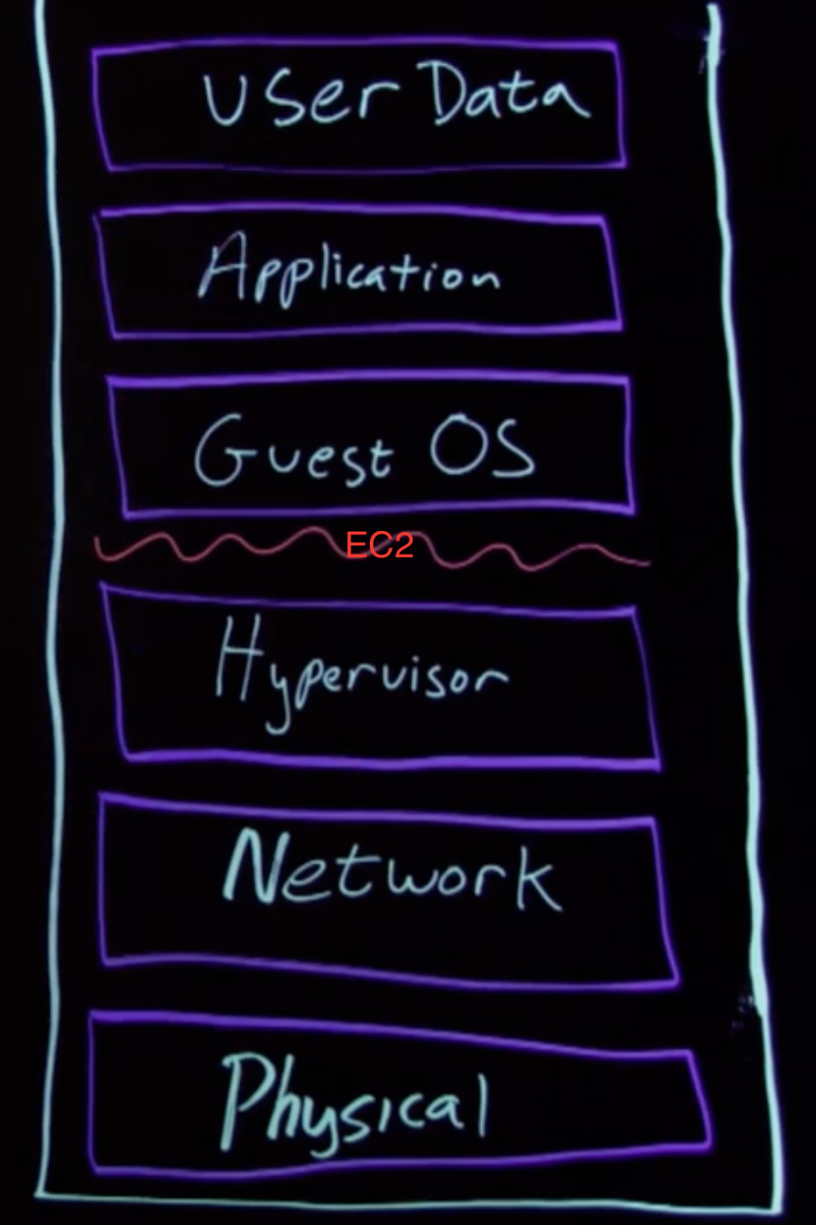
AMI |
- OS image with software packages and required settings (permissions, EBS, network card mappings).
- 3 types: Community, Marketplace and My AMIs.
|
| 23 |
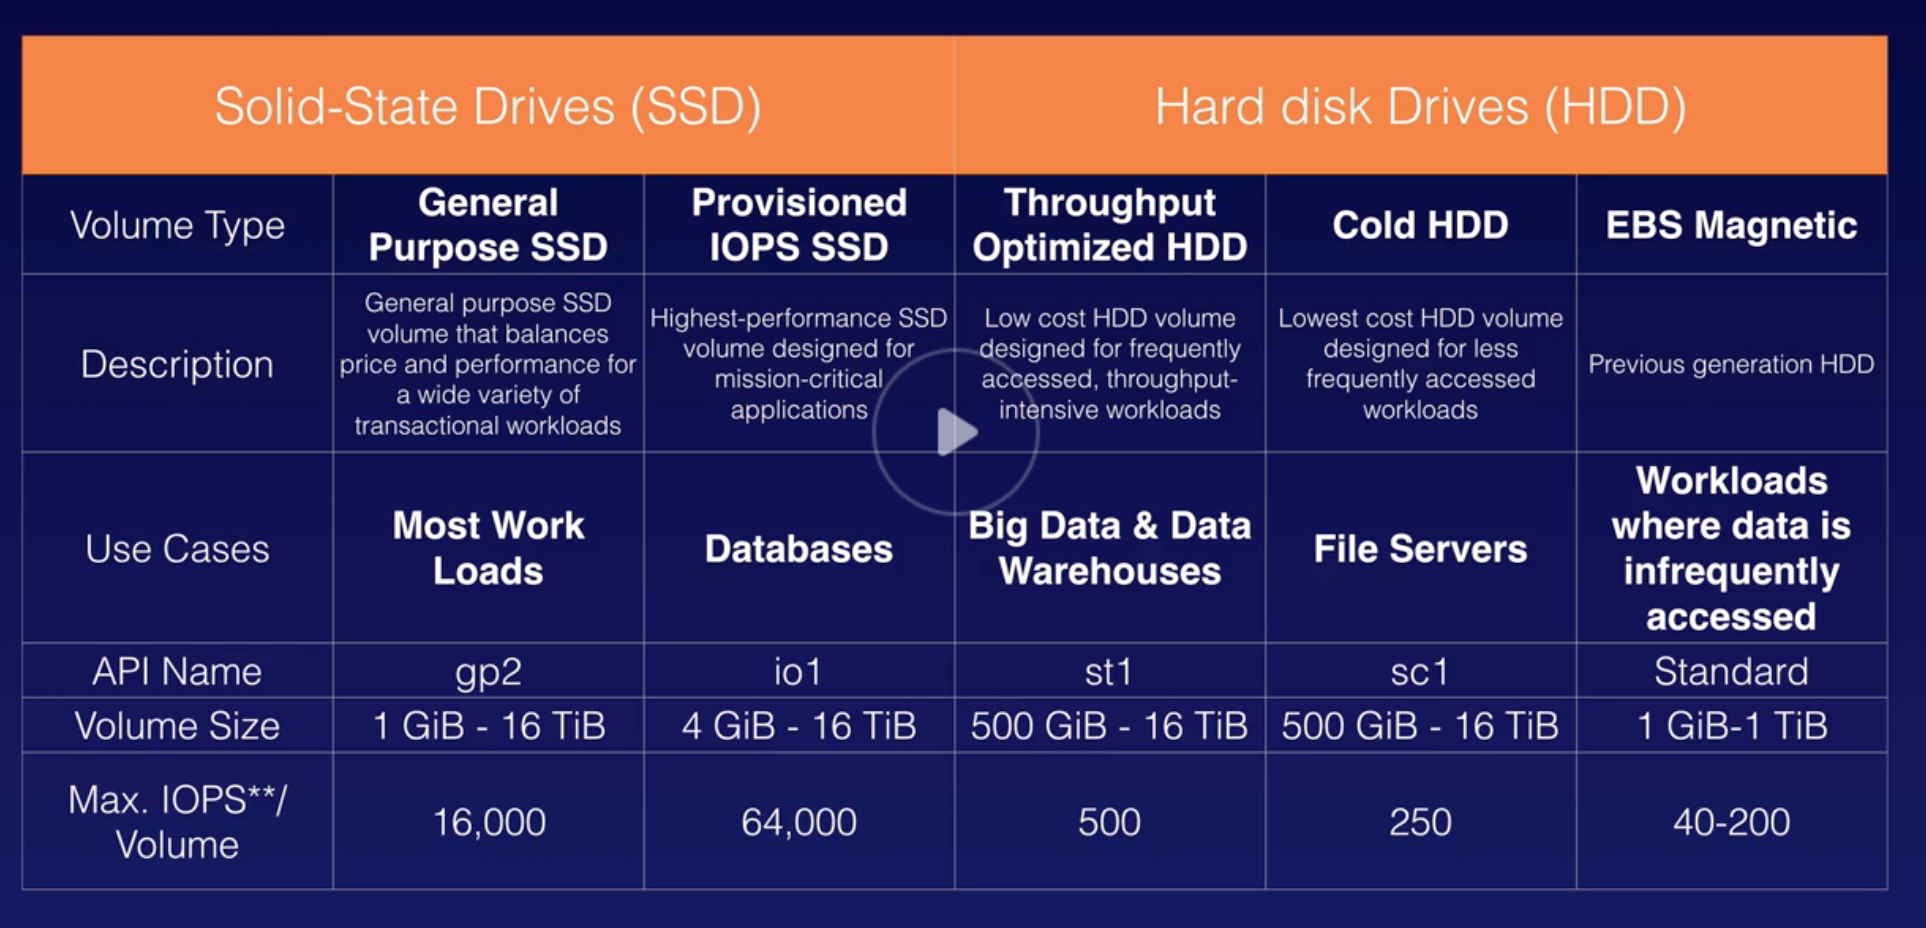
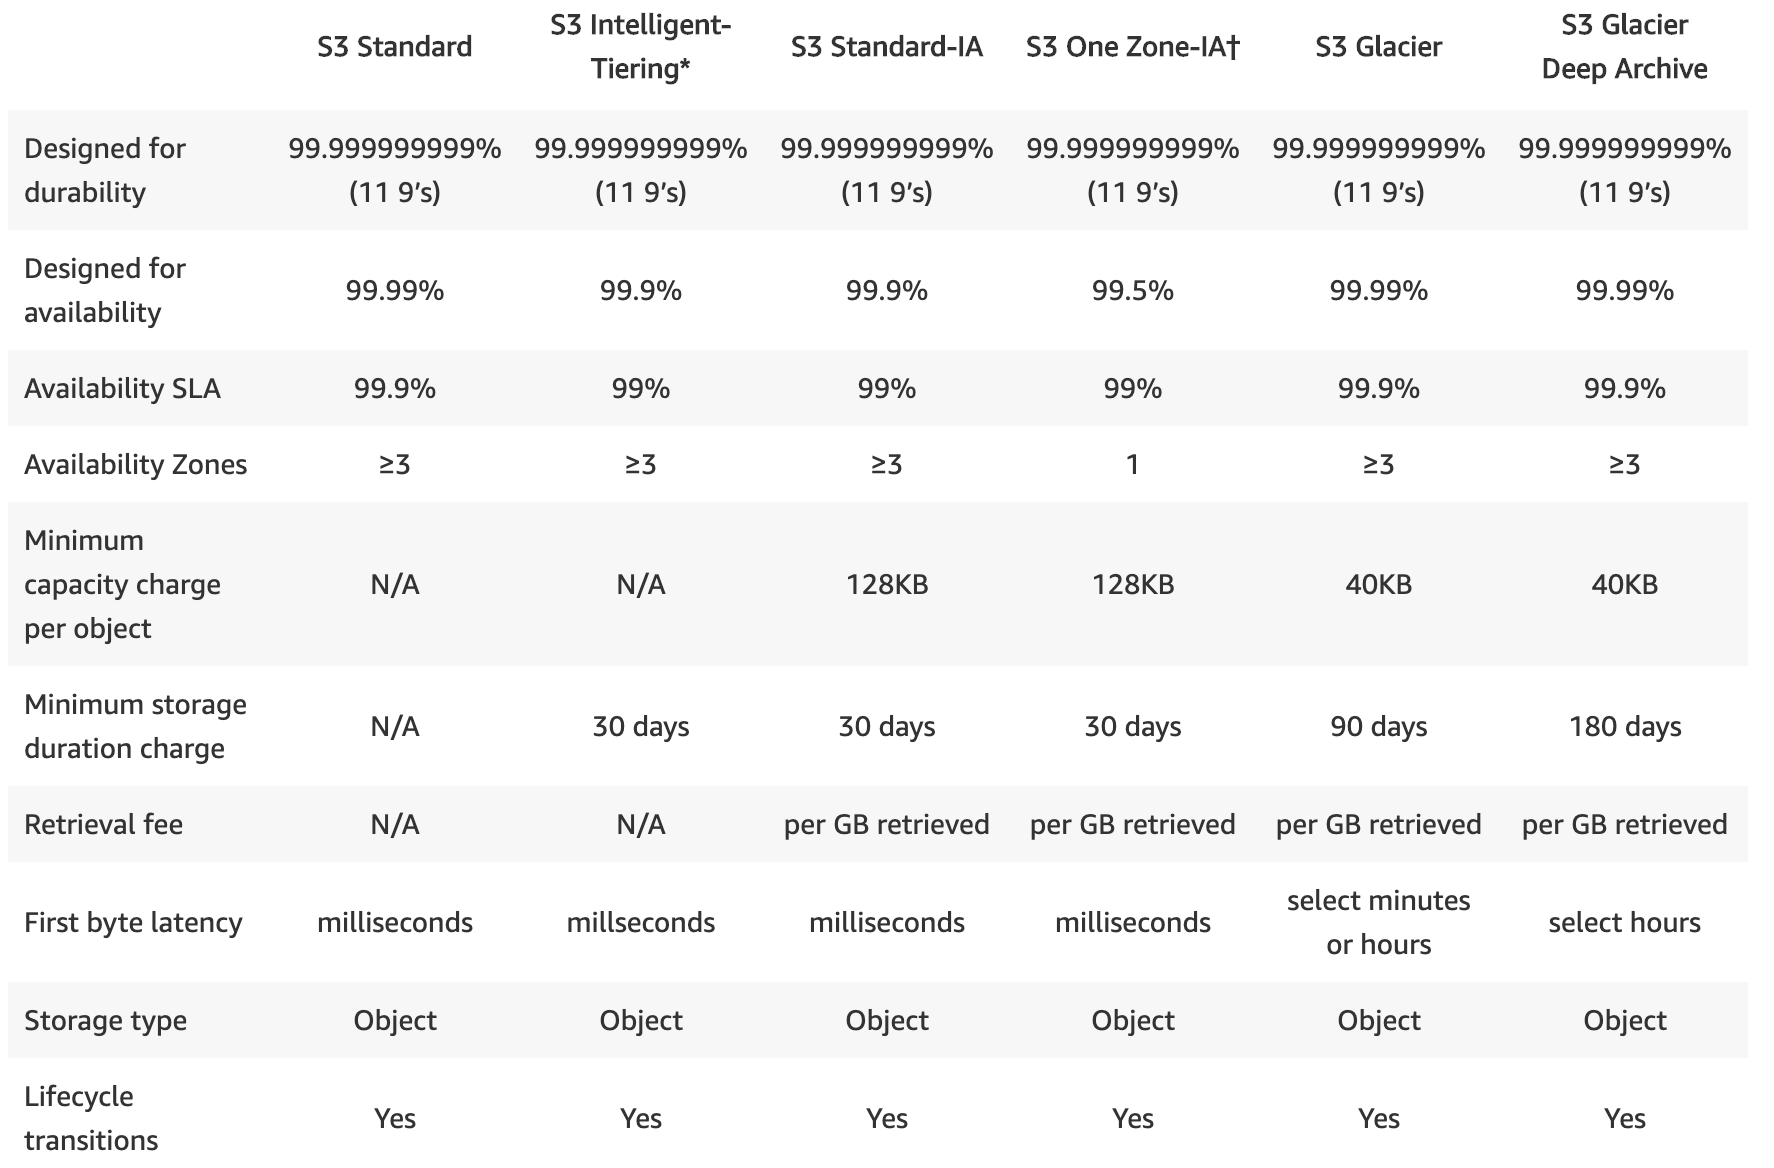
EBS |
- Block storage for EC2, persist data beyond lifetime of EC2 instance.
- When attached to EC2, EBS must be from same AZ.
- 3 volume types:
- GP (SSD)
- Provisioned IOPS (SSD)
- Throughout Optimized (HDD)
- Cold (HDD)
- EBS Magnetic (HDD)
- Cost factor:
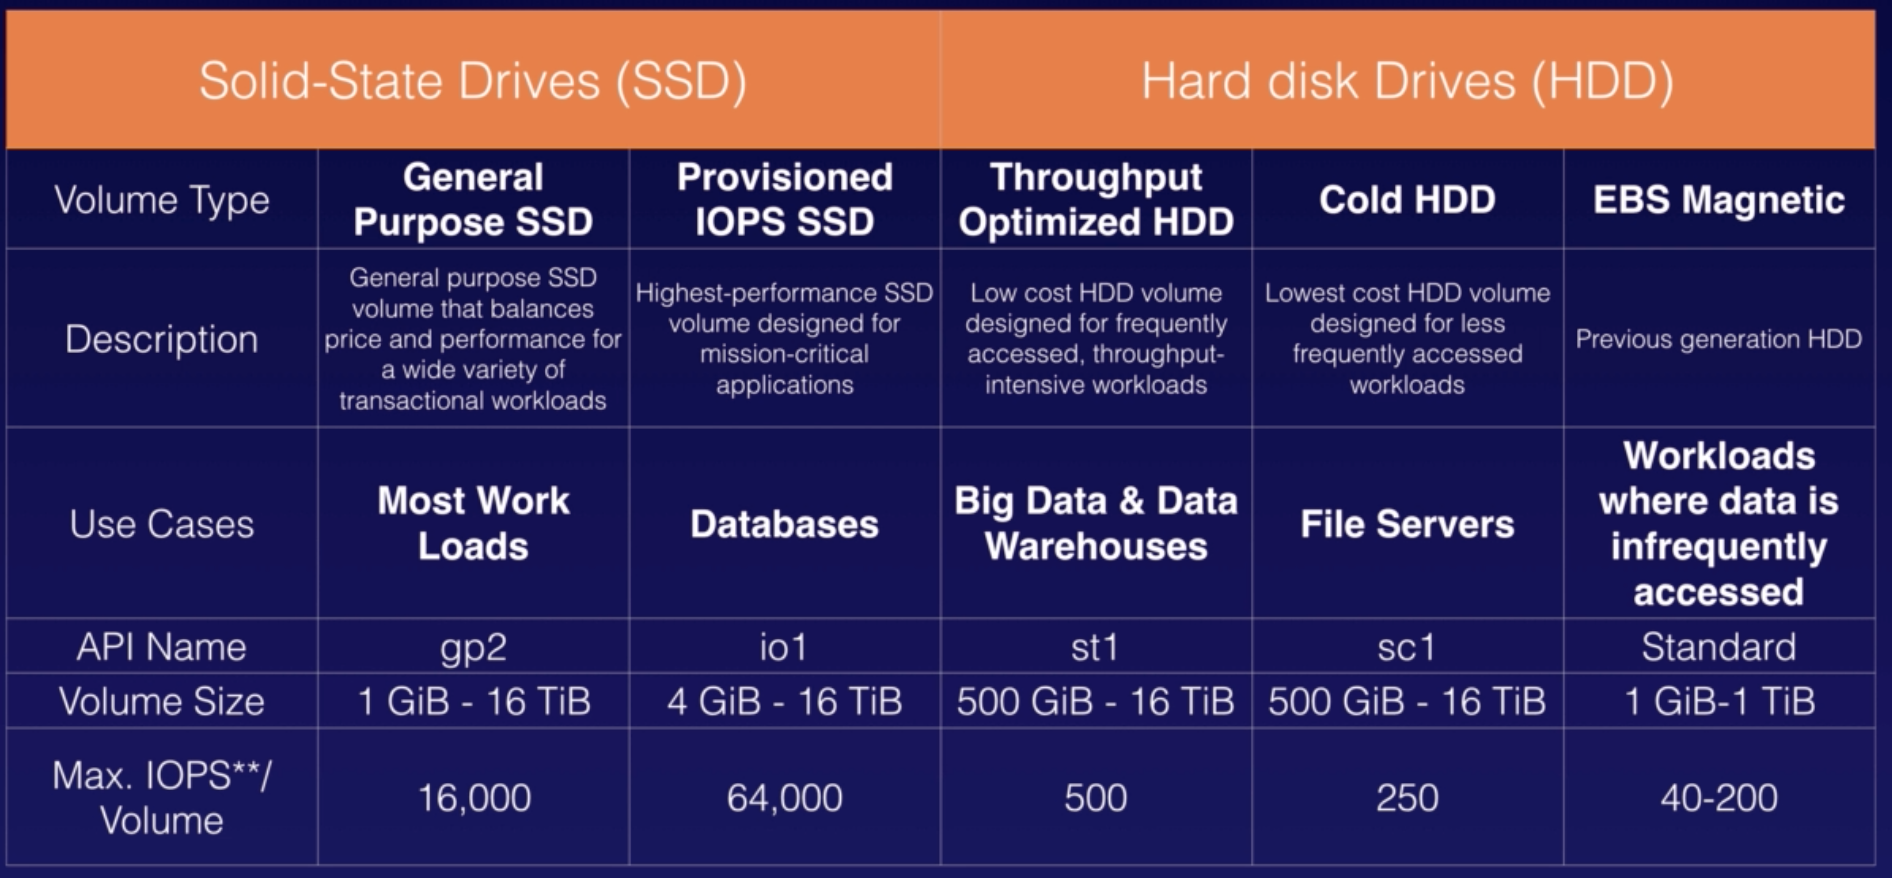
|
| 24 |
IOPS |
- I/O Operation per Seconds.
- SSD cap: 256KiB
- HDD cap: 1024KiB
|
| 25 |
Root vs EBS Volumes |
Every EC2 must have root volume (gone when EC2 recycled) but additional EBS volume can be added (persist beyond lifetime of EC2). |
| 26 |
Snapshots |
- Image or template of an EBS volume that can be stored as backup.
- Snapshots cannot be attach or detach to EC2. Snapshot can be restore by creating a new EBS volume.
|
| 27 |
IP Addressing |
Provide EC2 with public IP address.
Private IP Address: By default, all EC2 has private IP address which helps to communicate between other EC2 within same VPC.
Public IP Address: By default, EC2 can be launched with or without a public IP address. It helps to communicate with internet. |
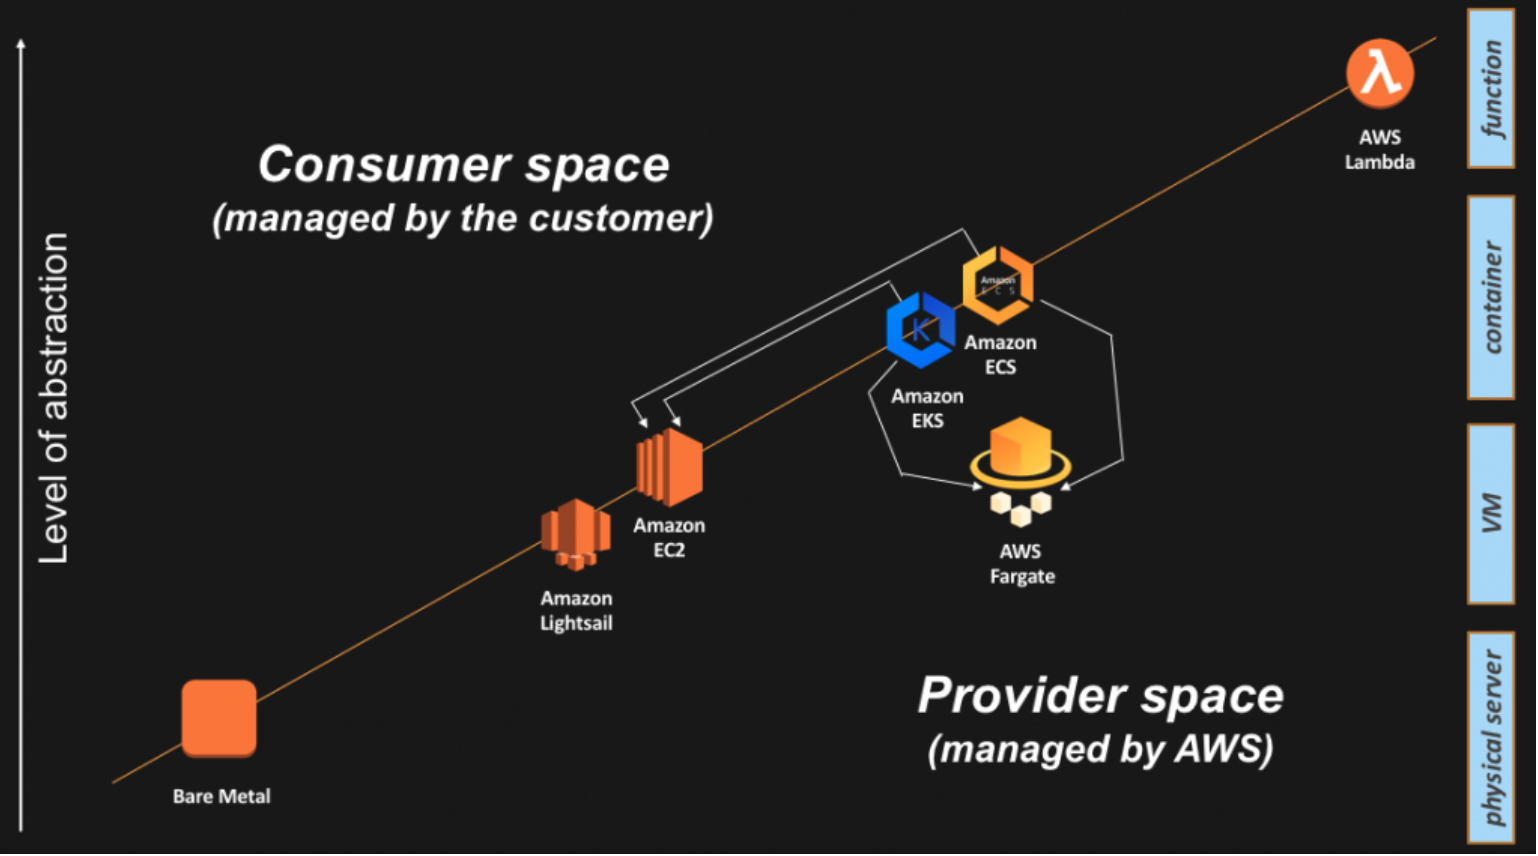
| 28 |
Lightsail |
Virtual Private Server (Pod based env) includes VM, SSD-based storage, data transfer, DNS management, and a static IP address. |
| 29 |
Polly |
ML turns text into lifelike speech |
| 30 |
Rekognition |
ML; image analyzer |
| 31 |
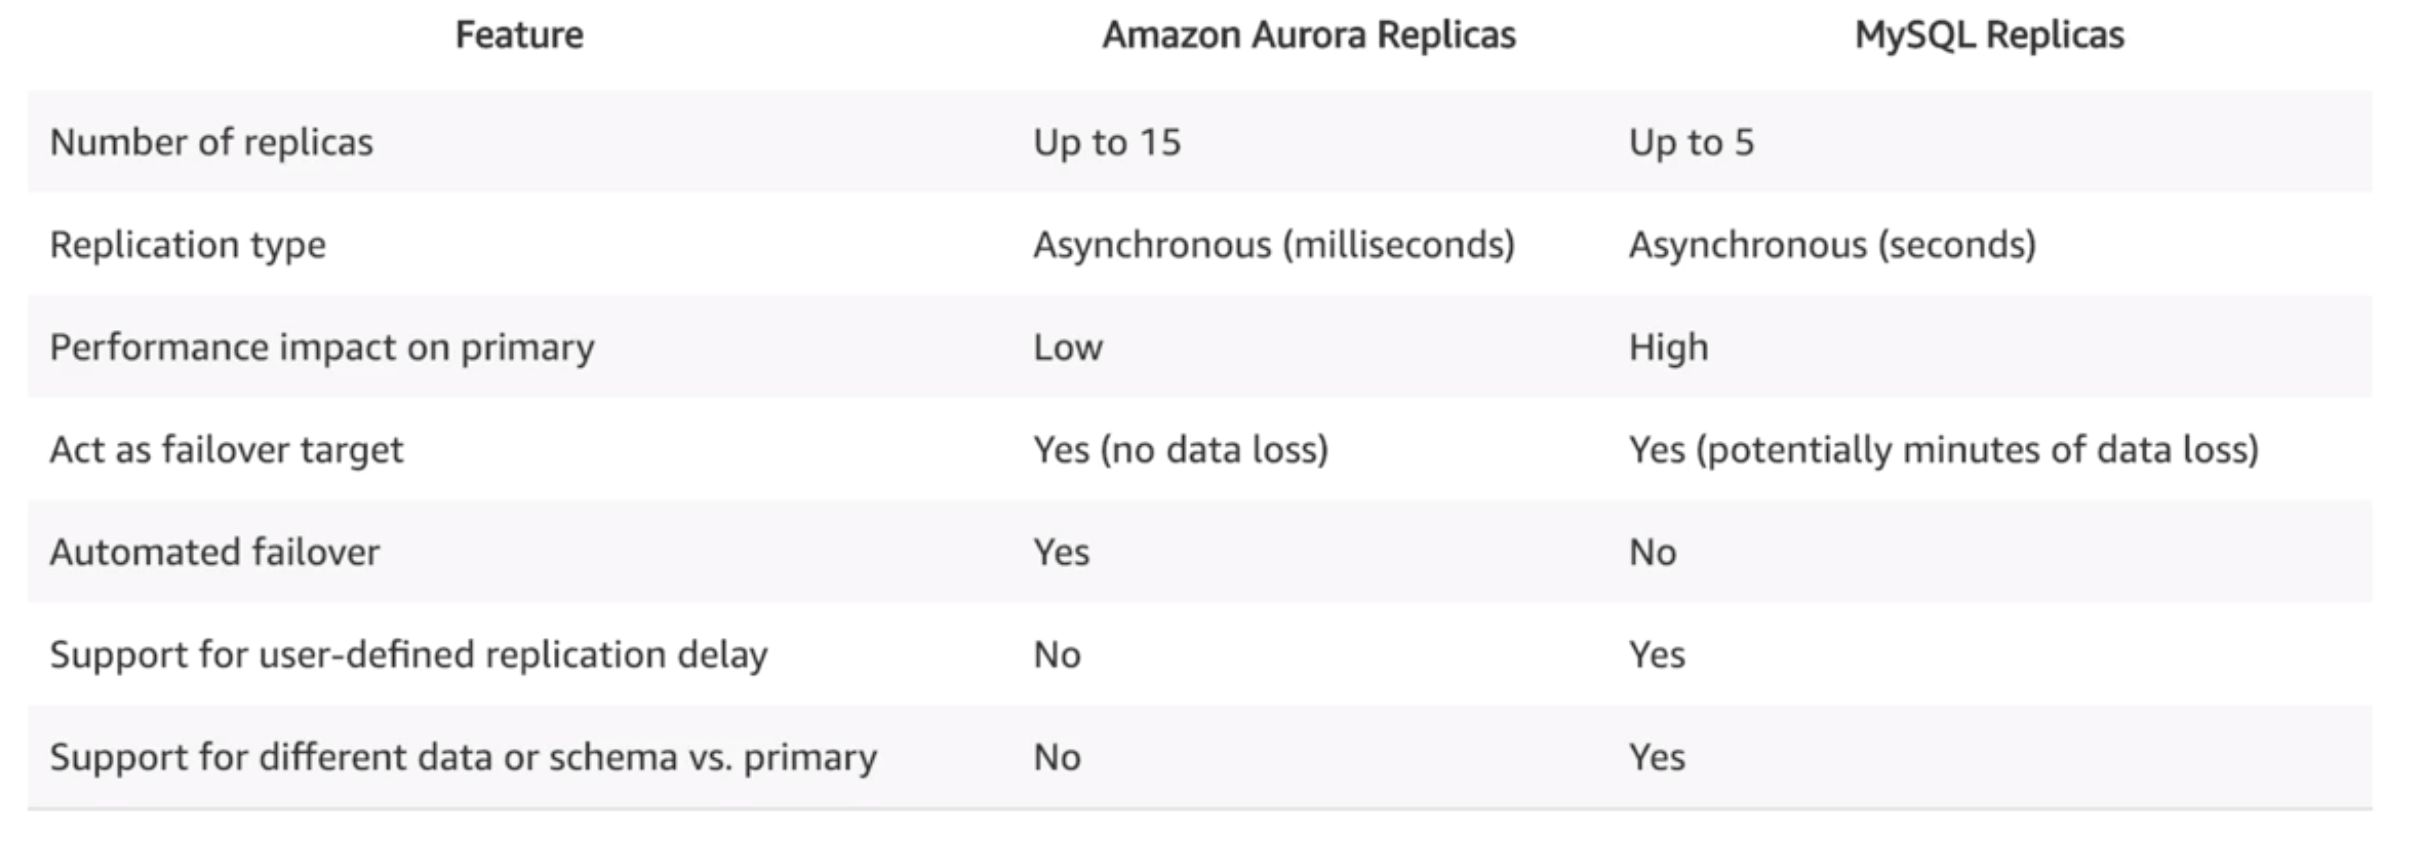
RDS |
- Relational database in the cloud.
- Resizable capacity, hardware provisioning, database setup, patching and backups.
- RDS doesn’t support AutoScaling like EC2 instances, but it does support manual horizontal scaling (by adding read replicas) and manual vertical scaling (by upgrading/downgrading an existing instance).
- SQL DB service supports following DB engines: Amazon Aurora, MySQL, MariaDB, PostgreSQL, Oracle, MS SQLServer.
- No backup storage service cost, but storage cost per GB.
|
| 32 |
DynamoDB |
- NoSQL DB service (serverless) supports MongoDB, CassandraDB, Oracle NoSQL.
- JSON doc storage type.
|
| 33 |
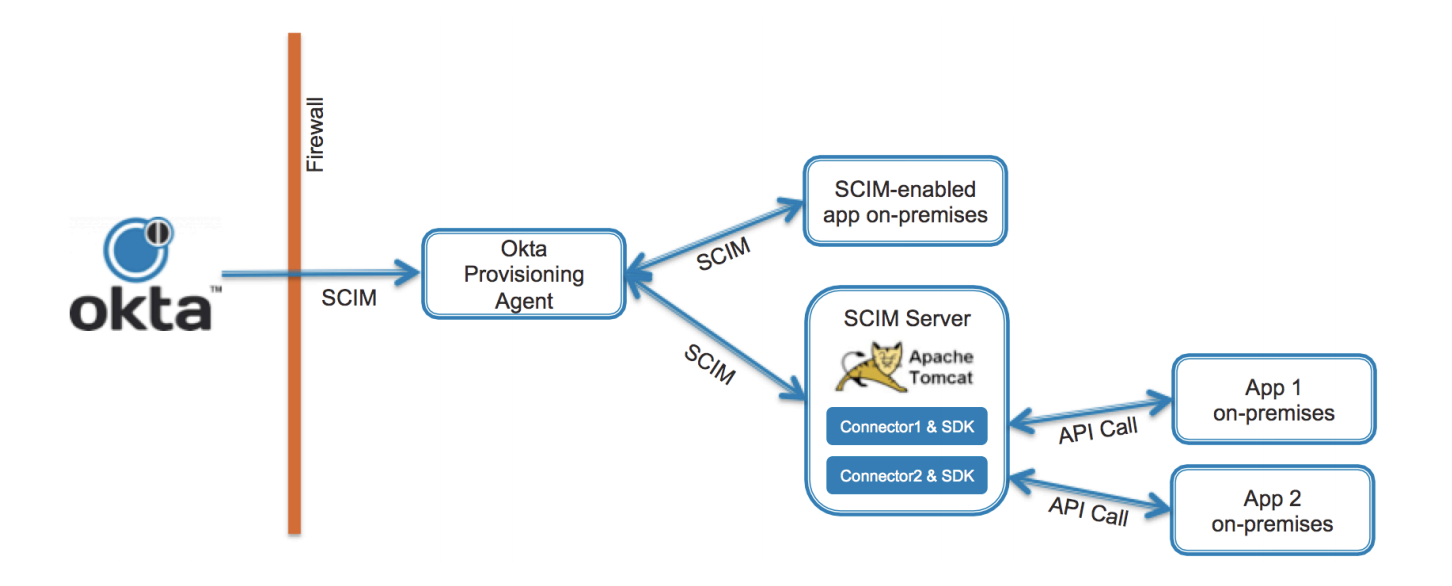
DB Migration Service |
Migrate or replicate your existing databases to RDS. |
| 34 |
SSH Tunneling |
- Tunneling from internet to RDS via 22/ 443 port.
- Using SSH to access a resource without a public IP address via a resource with a public IP address (inside of a VPC).
|
| 35 |
Systems Manager |
Gives visibility and control of your infrastructure on AWS. Supports tools:
- Resource Groups
- Insights Dashboard
- Run Command
- State Manager
- Inventory
- Maintenance Window
- Patch Manager
- Automation
- Parameter Store
- Distributor
- Session Manager
|
| 36 |
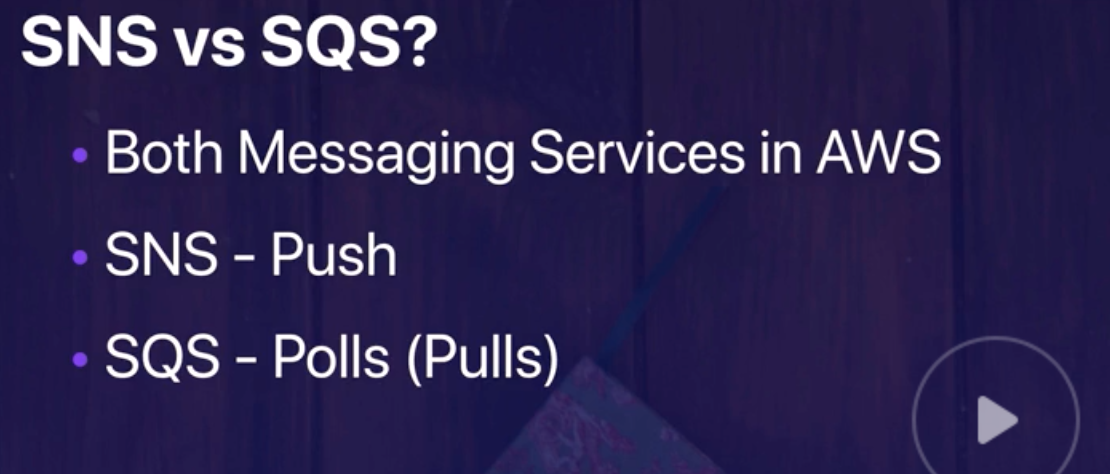
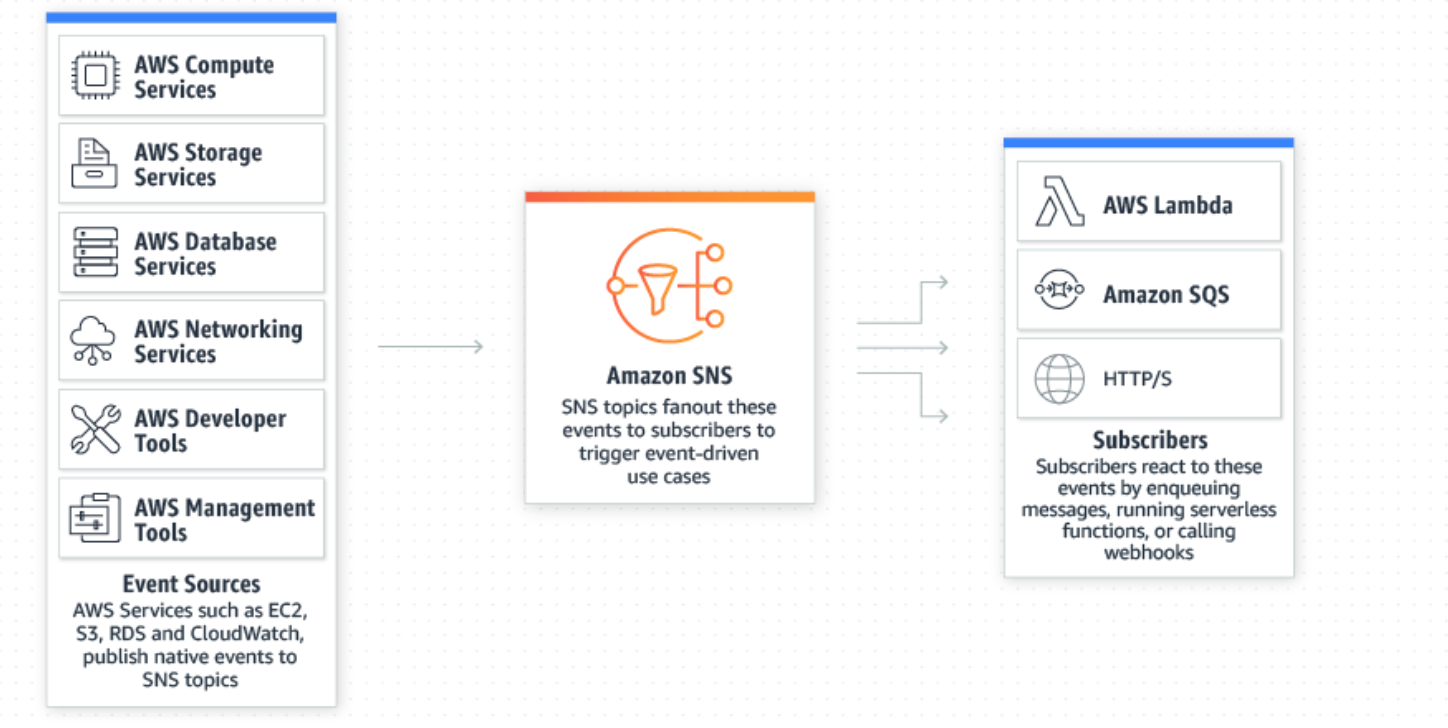
SNS |
Async Pub/ Sub messaging and mobile notification services supports Amazon SQS, HTTP/S, email, Lambda, SMS, APN, Google push notification. |
| 37 |
Topics |
Labeling/ grouping of different endpoints that you send messages to. |
| 38 |
Publishers |
Human/ alarm/ event that triggers the messages to be sent. |
| 39 |
Subscribers |
Endpoints that a topic sends messages to (i.e. email address, phone). |
| 40 |
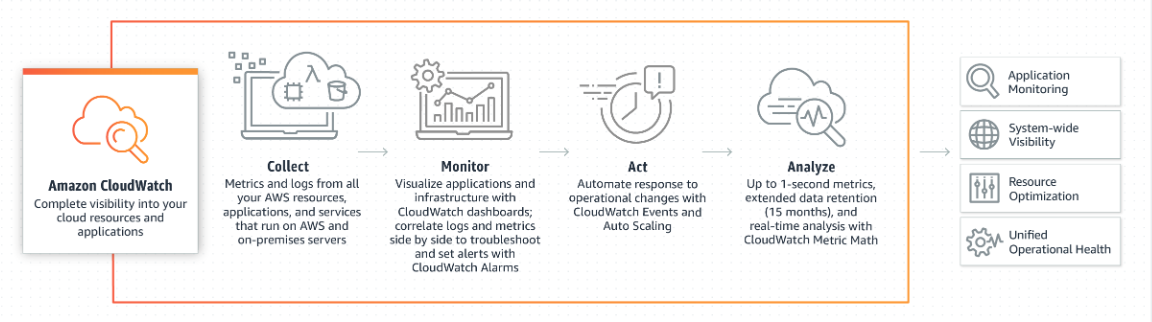
CloudWatch |
- Monitors/ collects/ aggregates metrics/ logs of resources.
- Set alarms and automatically react to changes in AWS.
- Sets threshold to trigger alarms and that can trigger an action (SNS message).
|
| 41 |
CloudWatch Thresholds |
Maximum allowed value to not trigger an alarm. |
| 42 |
CloudWatch Alarms |
- Sends notifications or takes pre-defined decisions.
- 3 types: ALARM, INSUFFICIENT, OK.
|
| 43 |
CloudWatch Dashboard |
To view resource metrics (EC2 CPU Util, S3 bucket size, Billings over-limit) |
| 44 |
CloudWatch Events |
Events provides a near real-time stream of system events that describe changes to AWS. |
| 45 |
CloudWatch Rules |
- Write rules to indicate which events are of interest to your application and what automated actions to take when a rule matches an event.
- Eg: set a rule to invoke Lambda or notify an SNS topic.
|
| 46 |
CloudWatch Log Insights |
Enables to drive actionable intelligence from logs to address operational issues without needing to provision servers or manage software. |
| 47 |
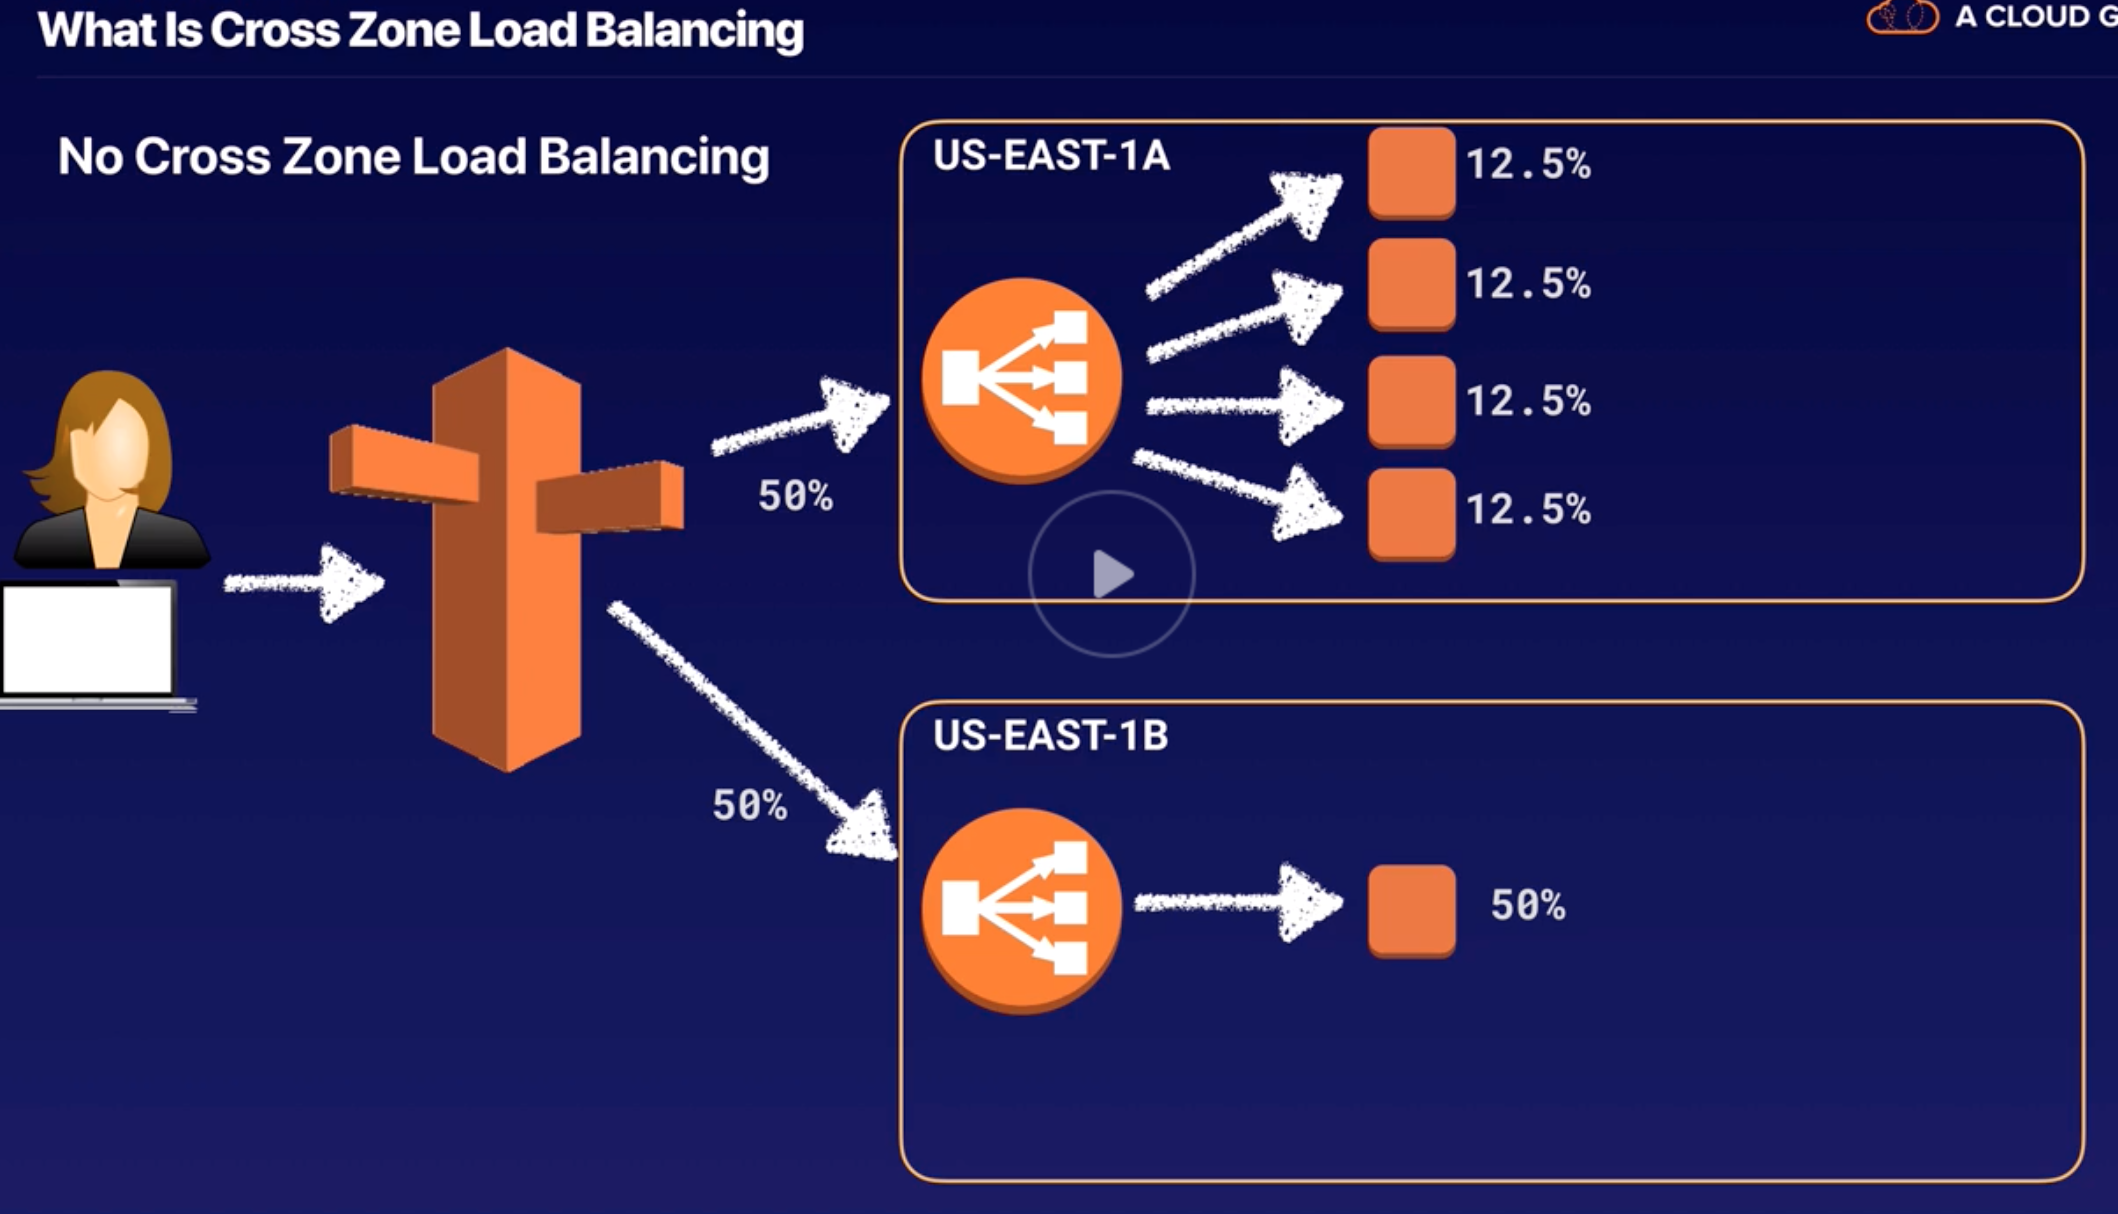
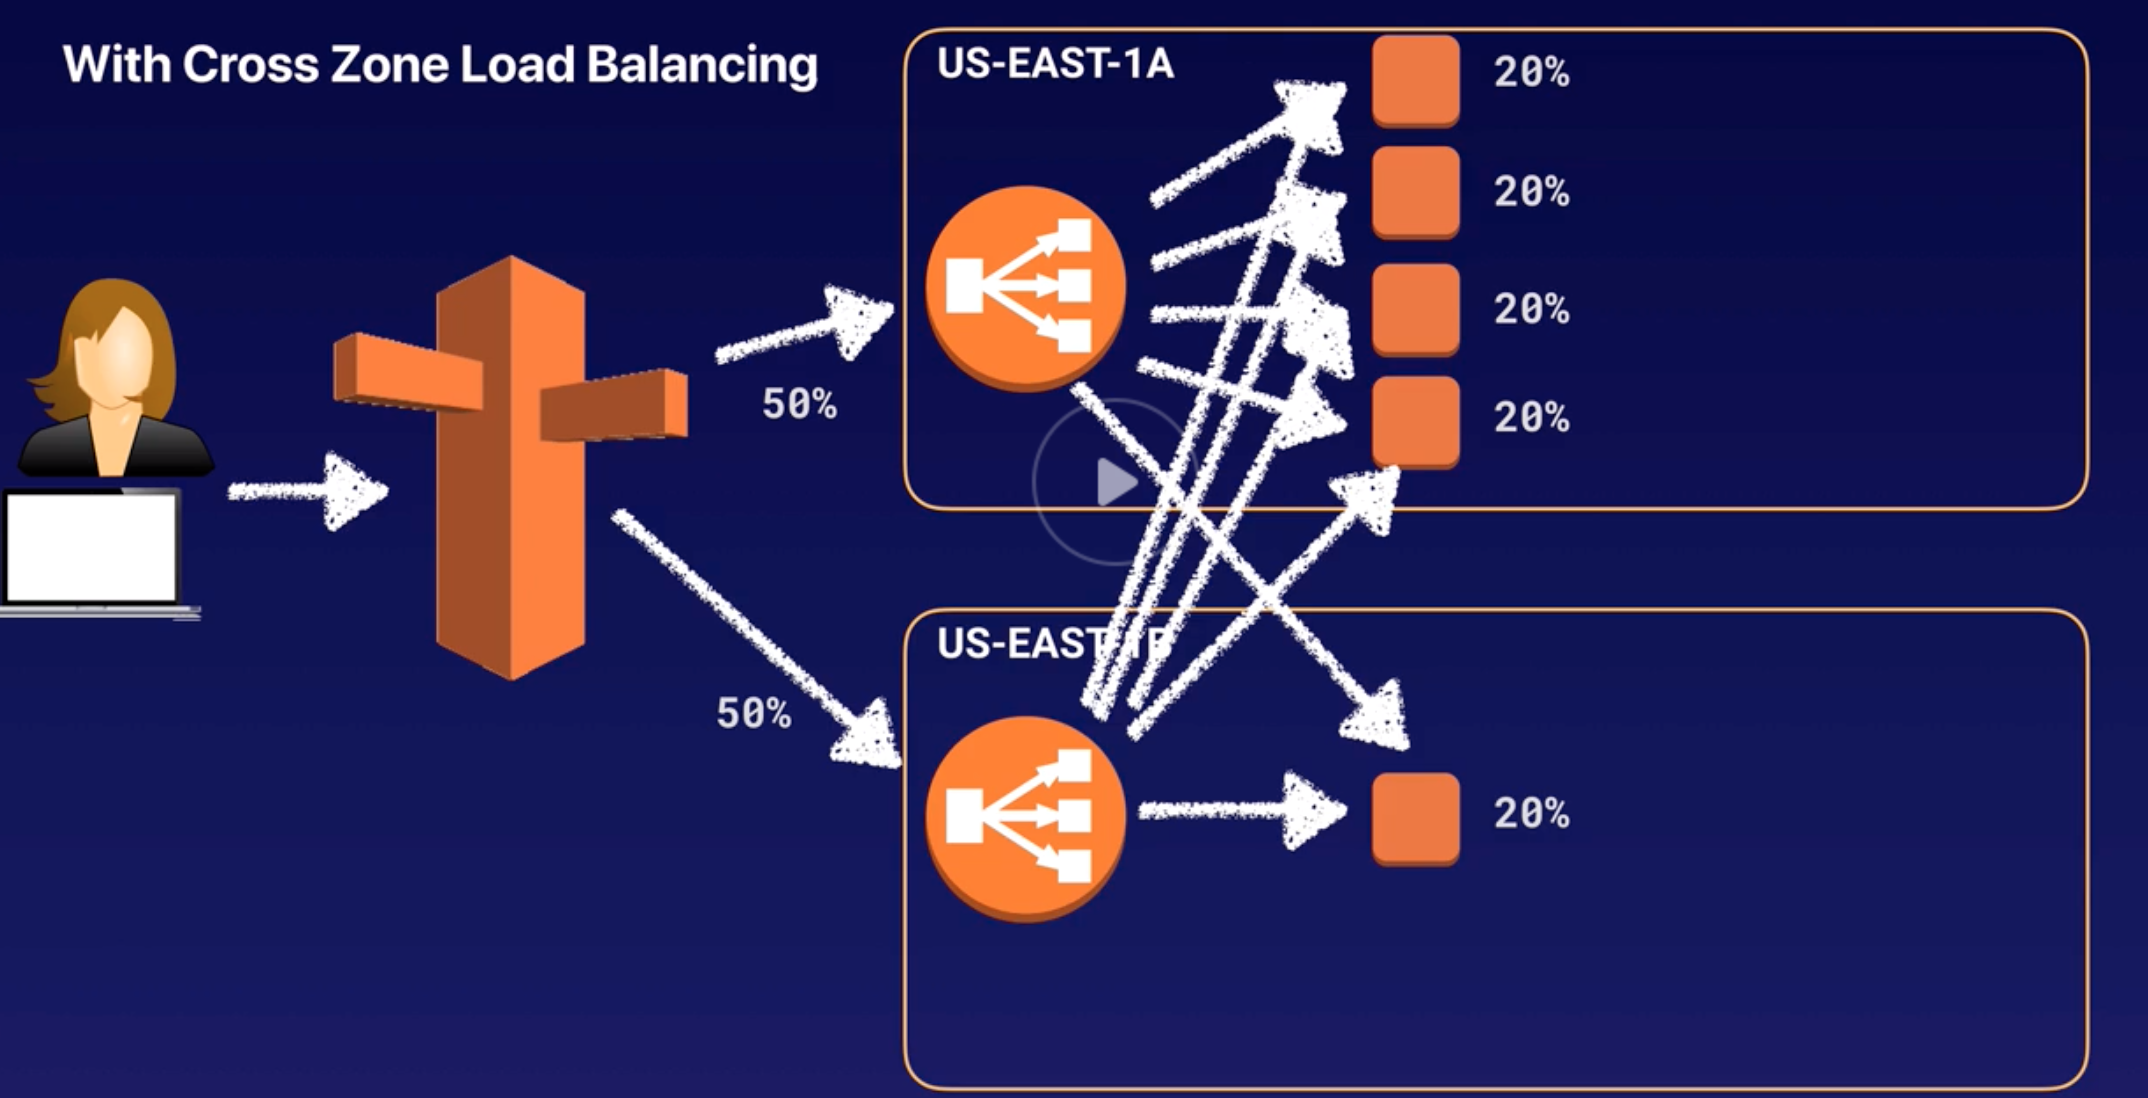
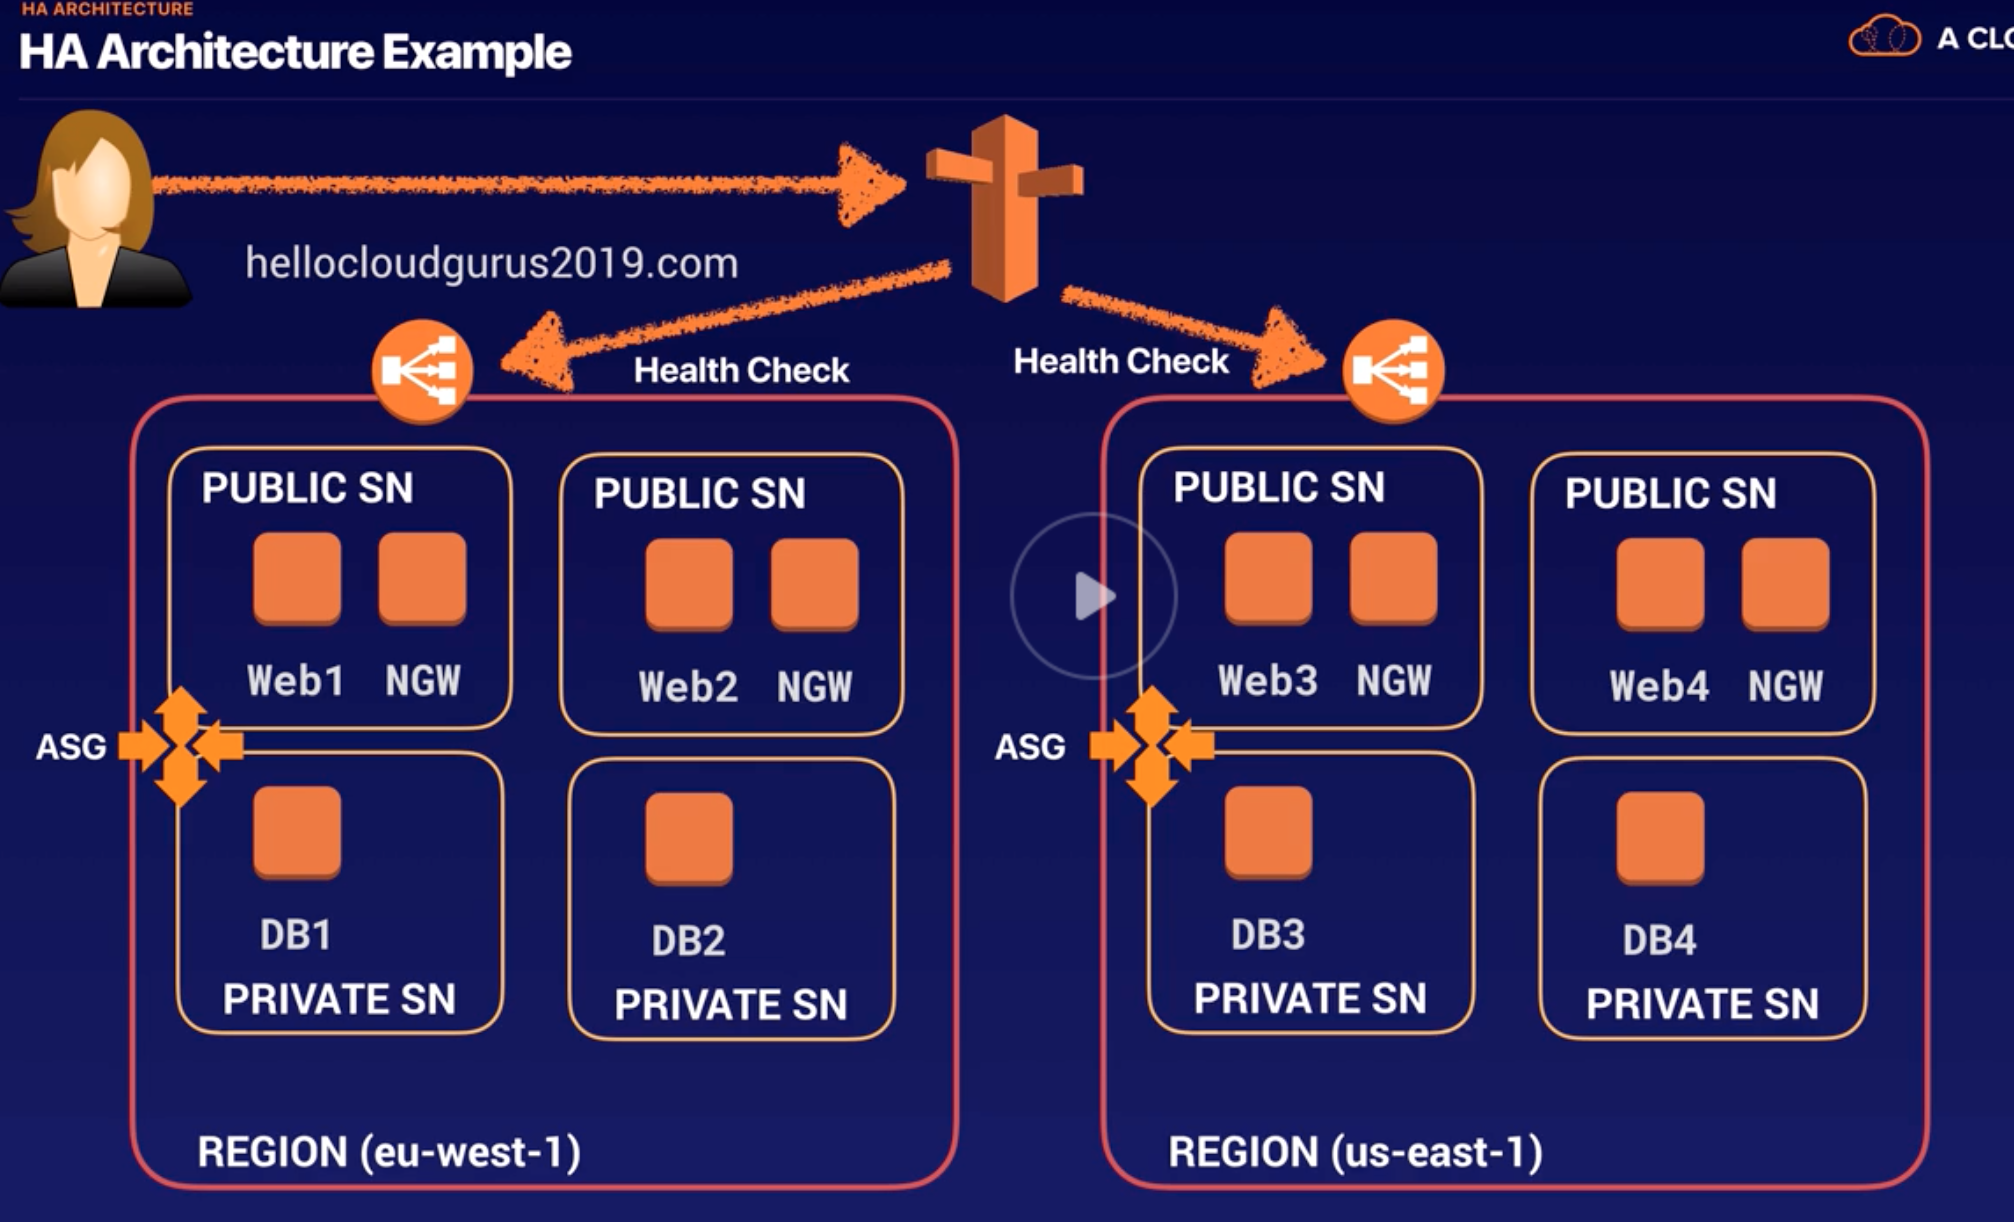
ELB |
- Distributes incoming traffics across multiple EC2 in multiple AZ.
- Fault tolerant increases by having ELB.
- Detects unhealthy instances and routes traffic only to healthy instances.
|
| 48 |
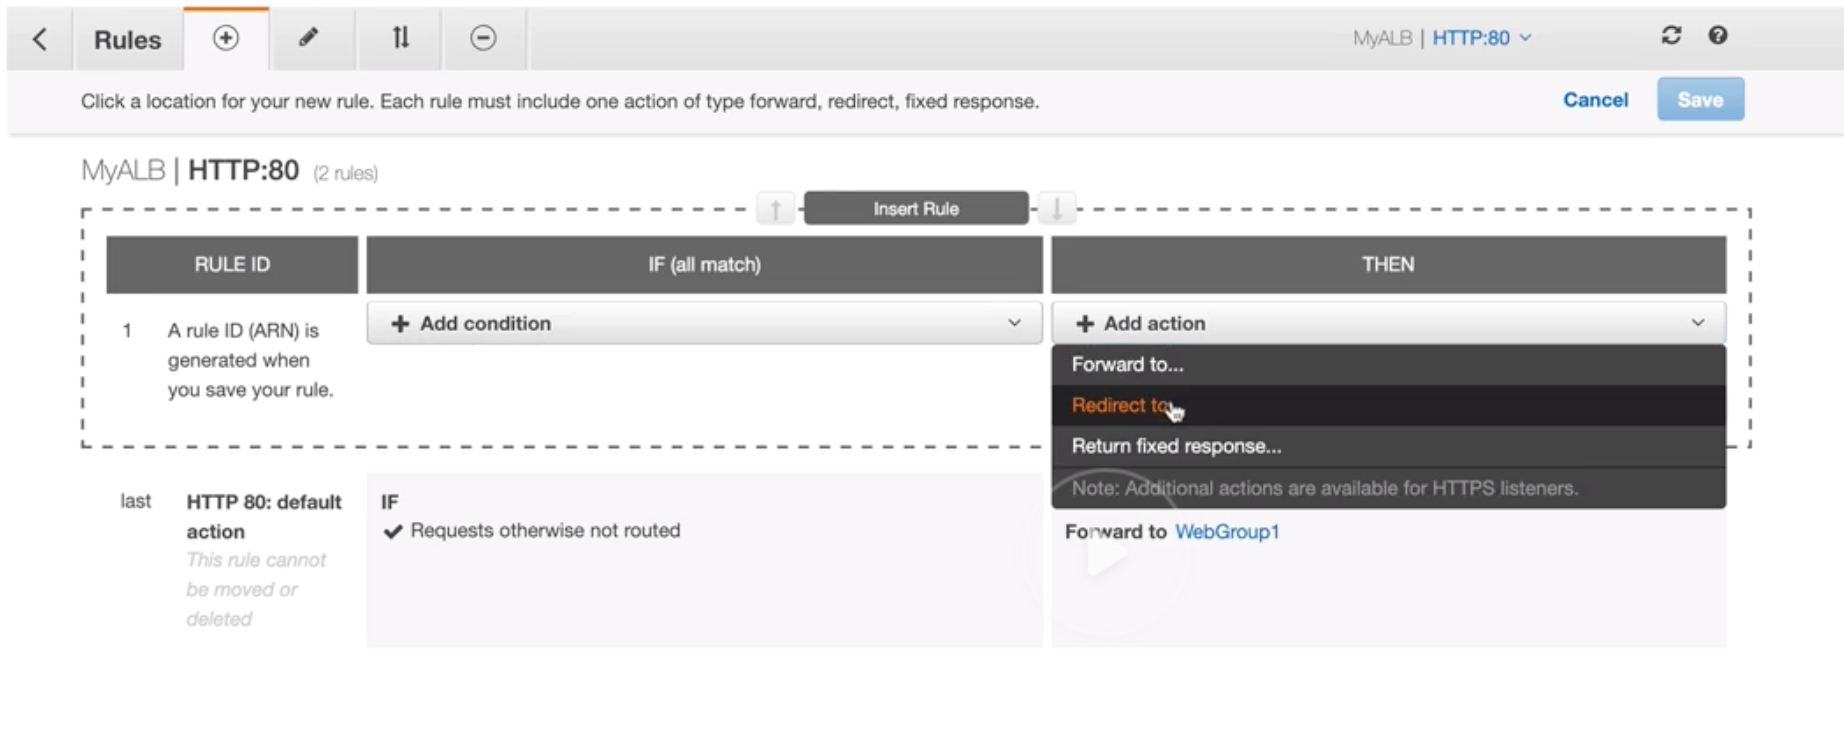
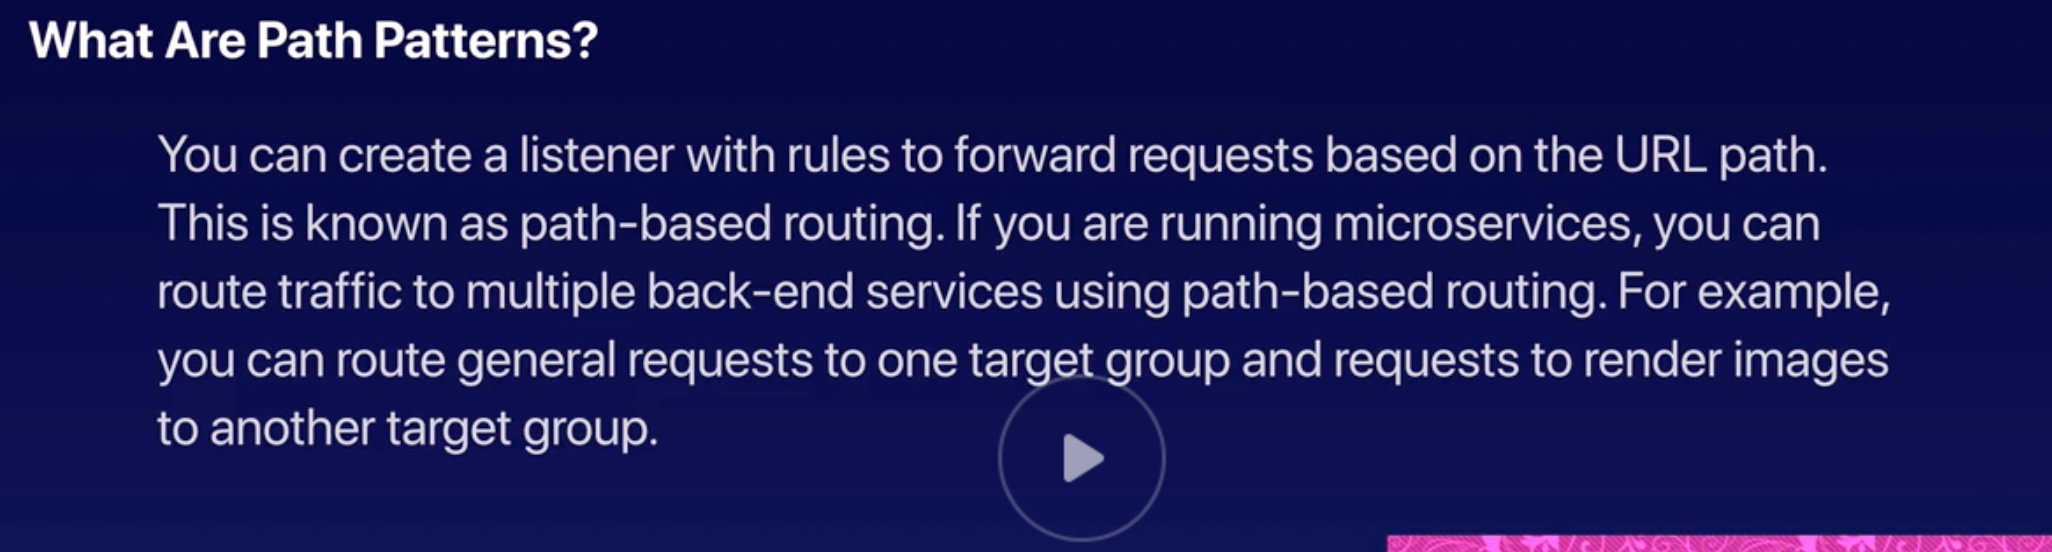
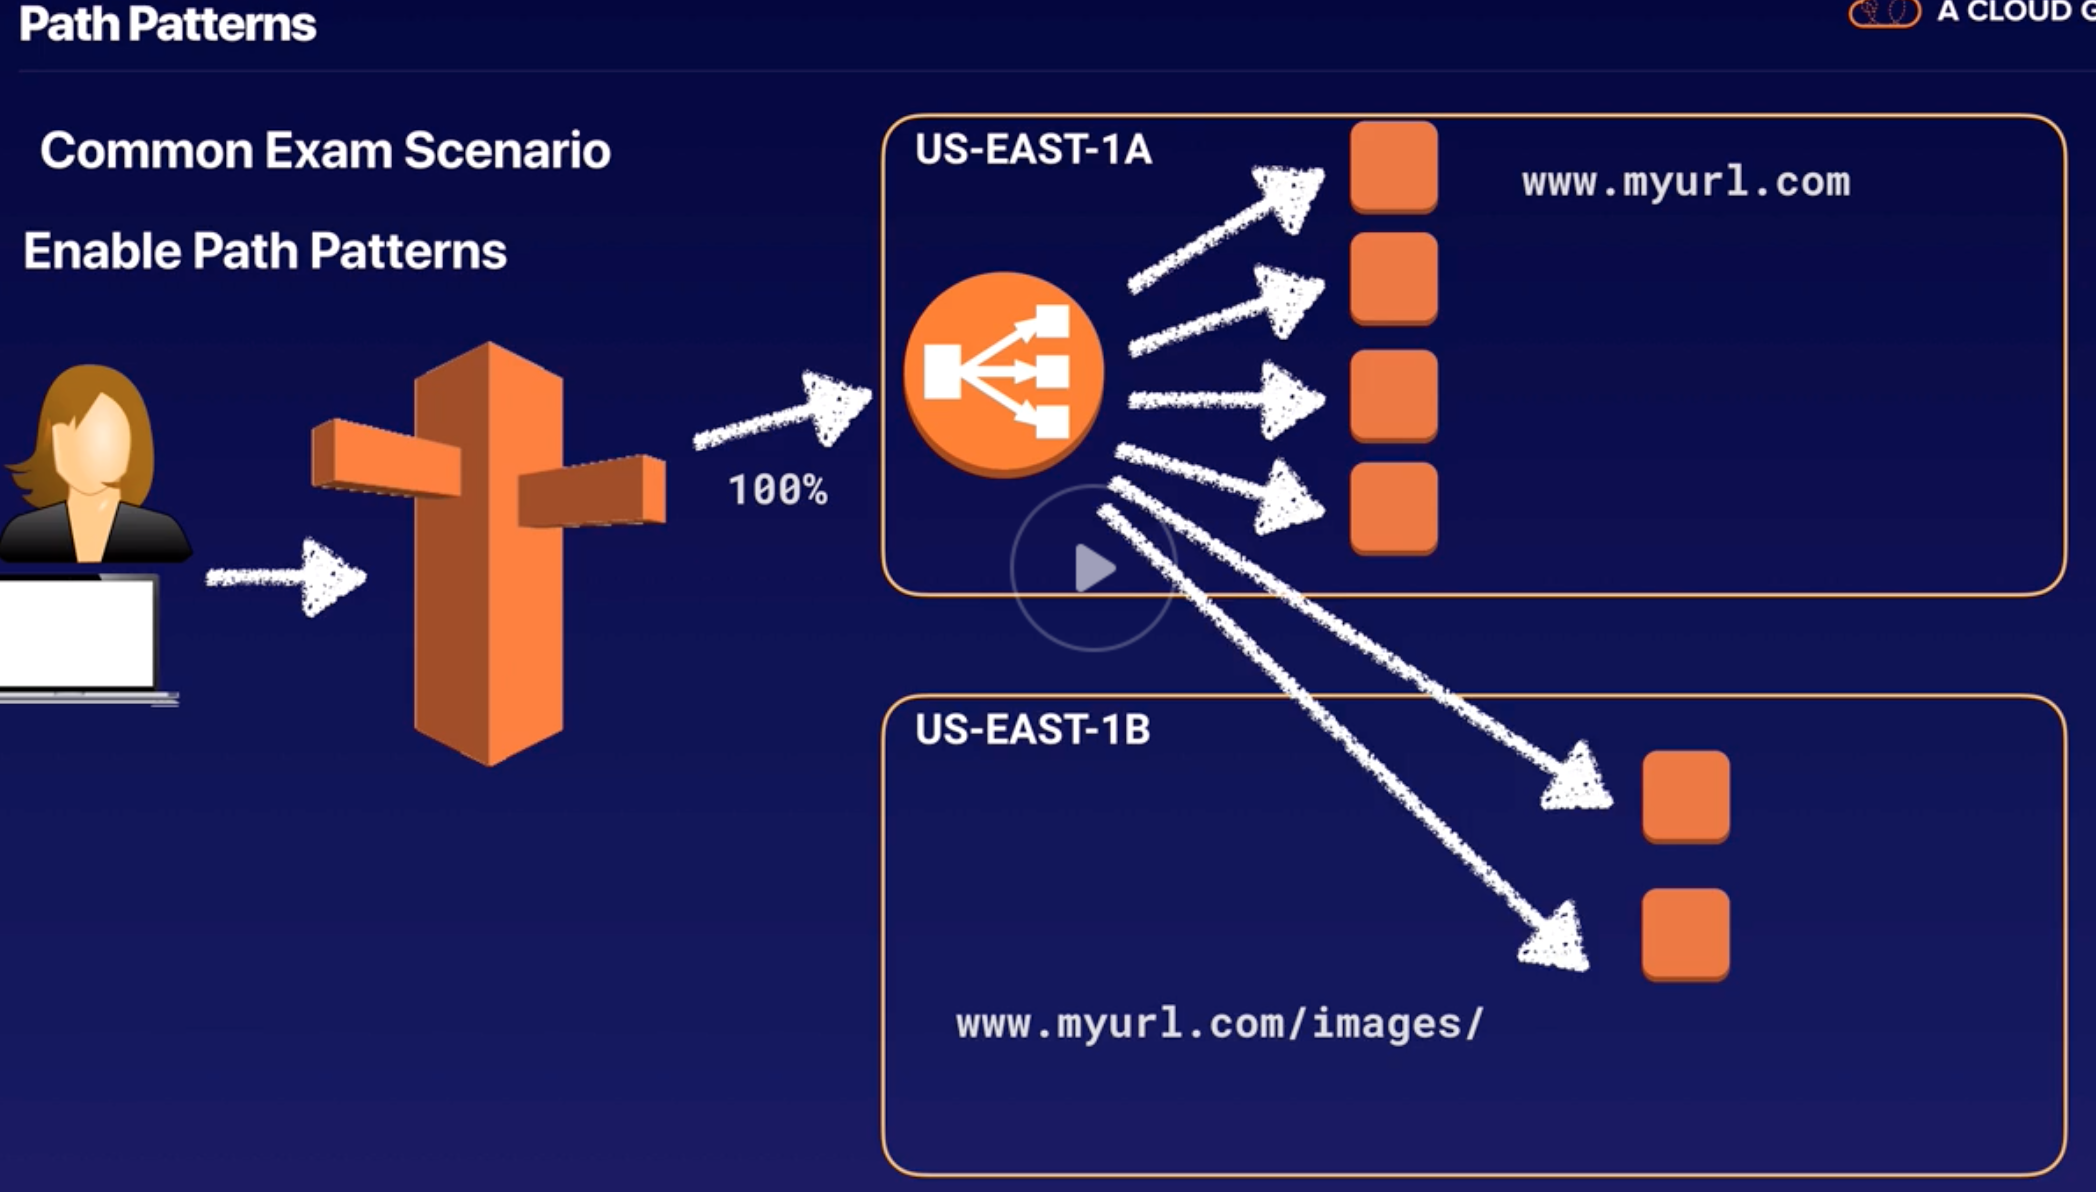
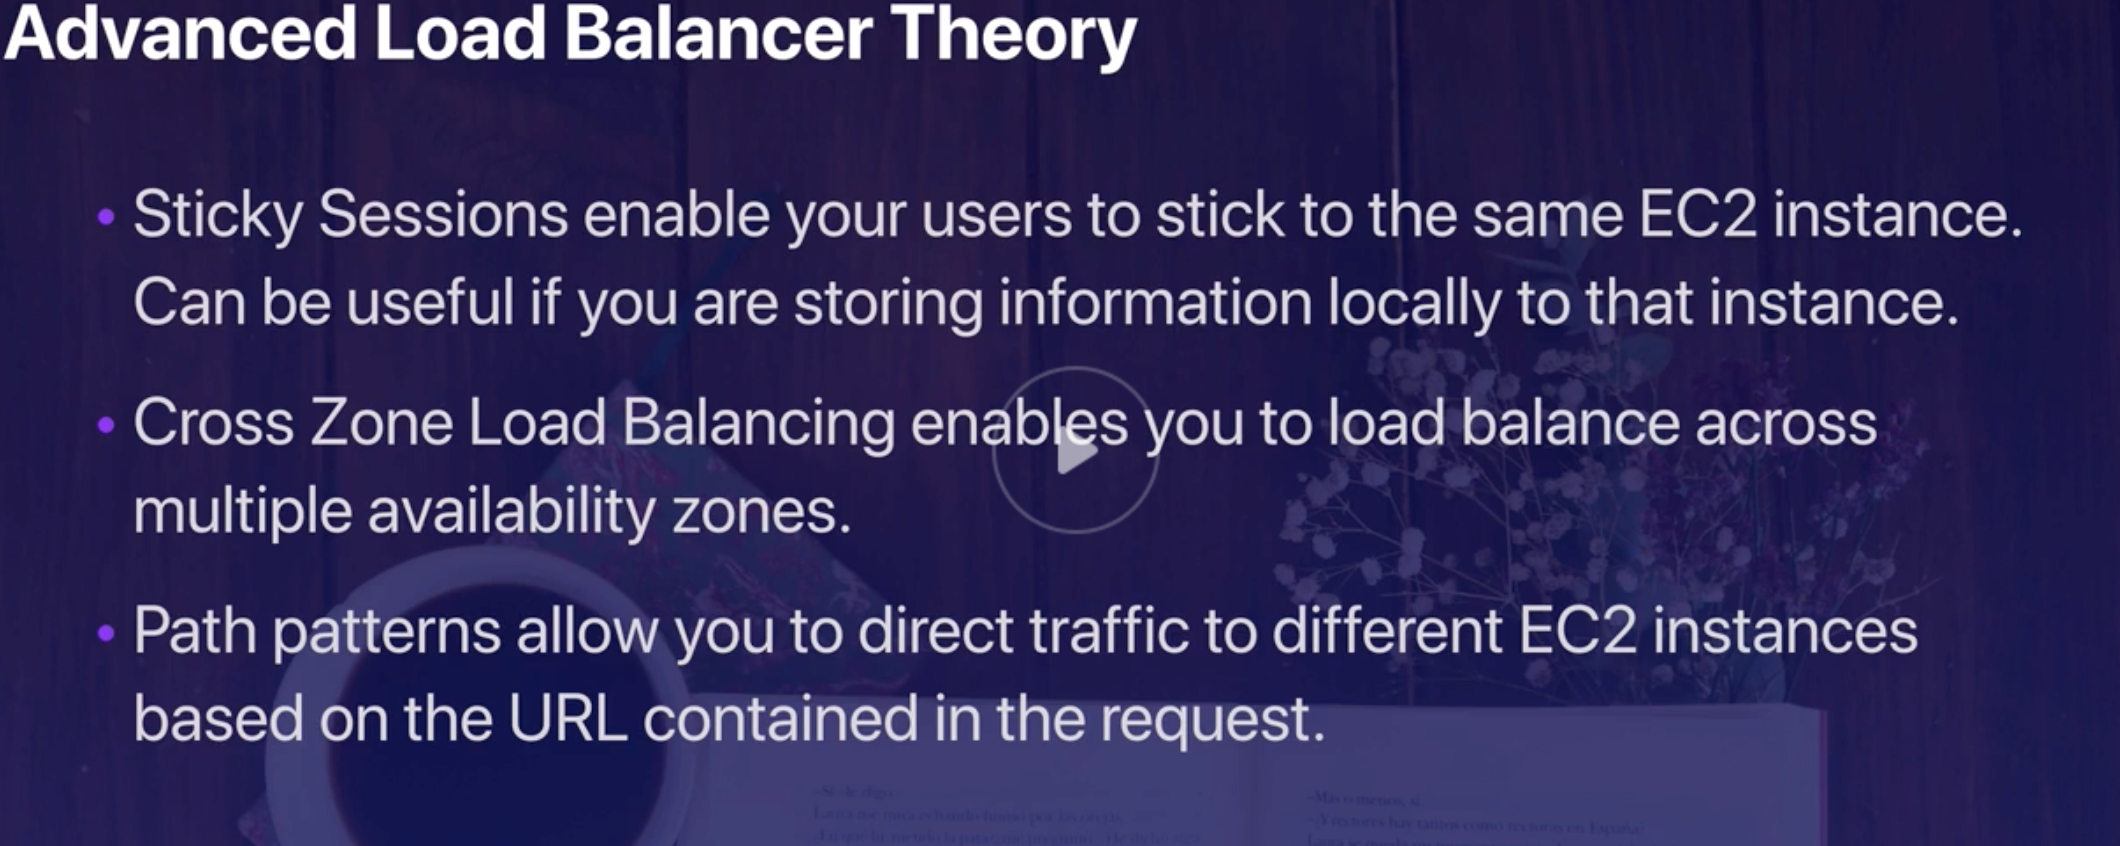
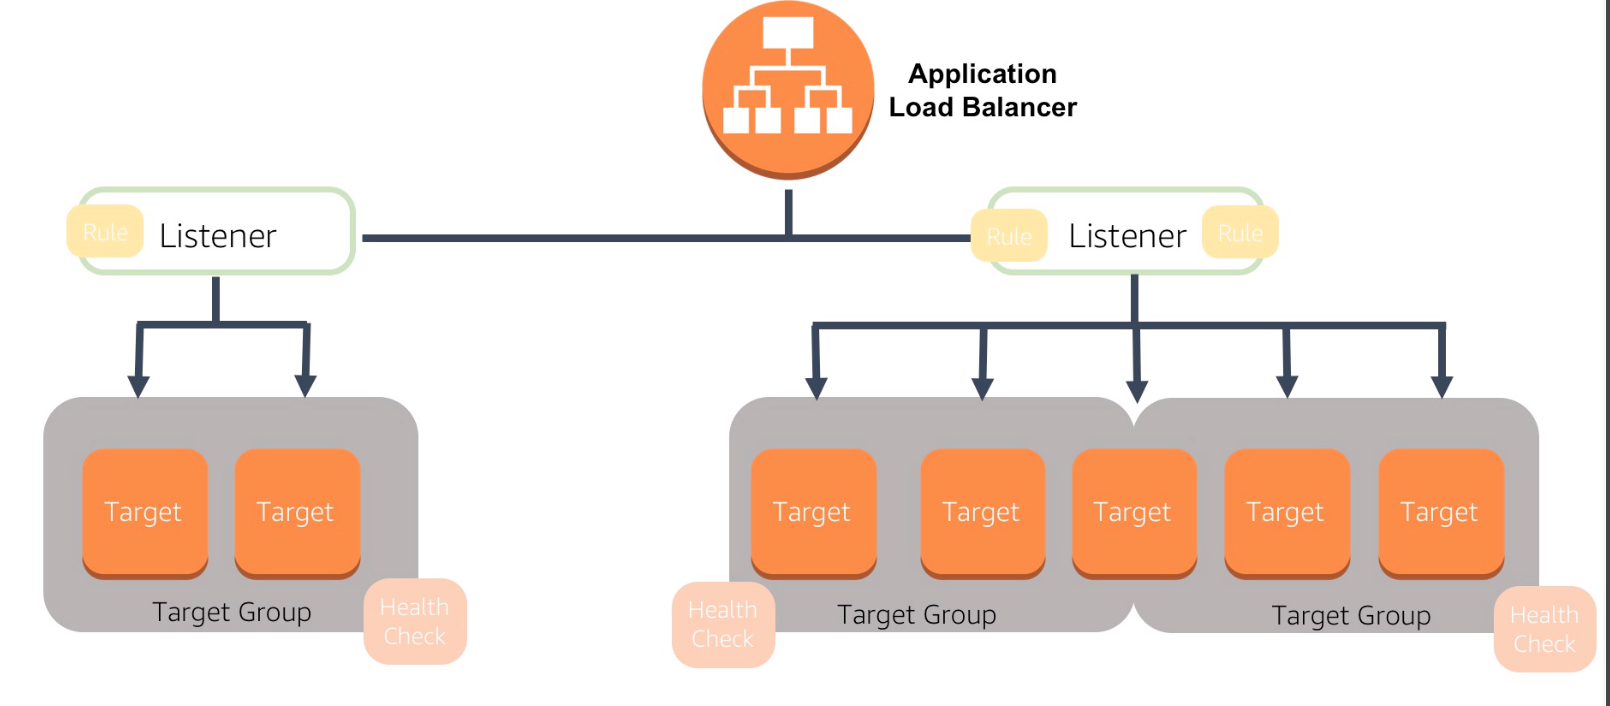
Application LB |
- Routing decisions at the Application layer 7 (HTTP/ HTTPS).
- Intelligent and supports path-based routing.
- Dynamic host port mapping: Route requests to one or more ports on each EC2 instance or container instances in VPC.
|
| 49 |
Network LB |
- Routing decisions at the Transport layer 4 (UDP OR TCP/SSL).
- Speed and handles millions of requests per second.
- After the LB receives a connection, it selects a target from the target group for the default rule using a flow hash routing algorithm.
|
| 50 |
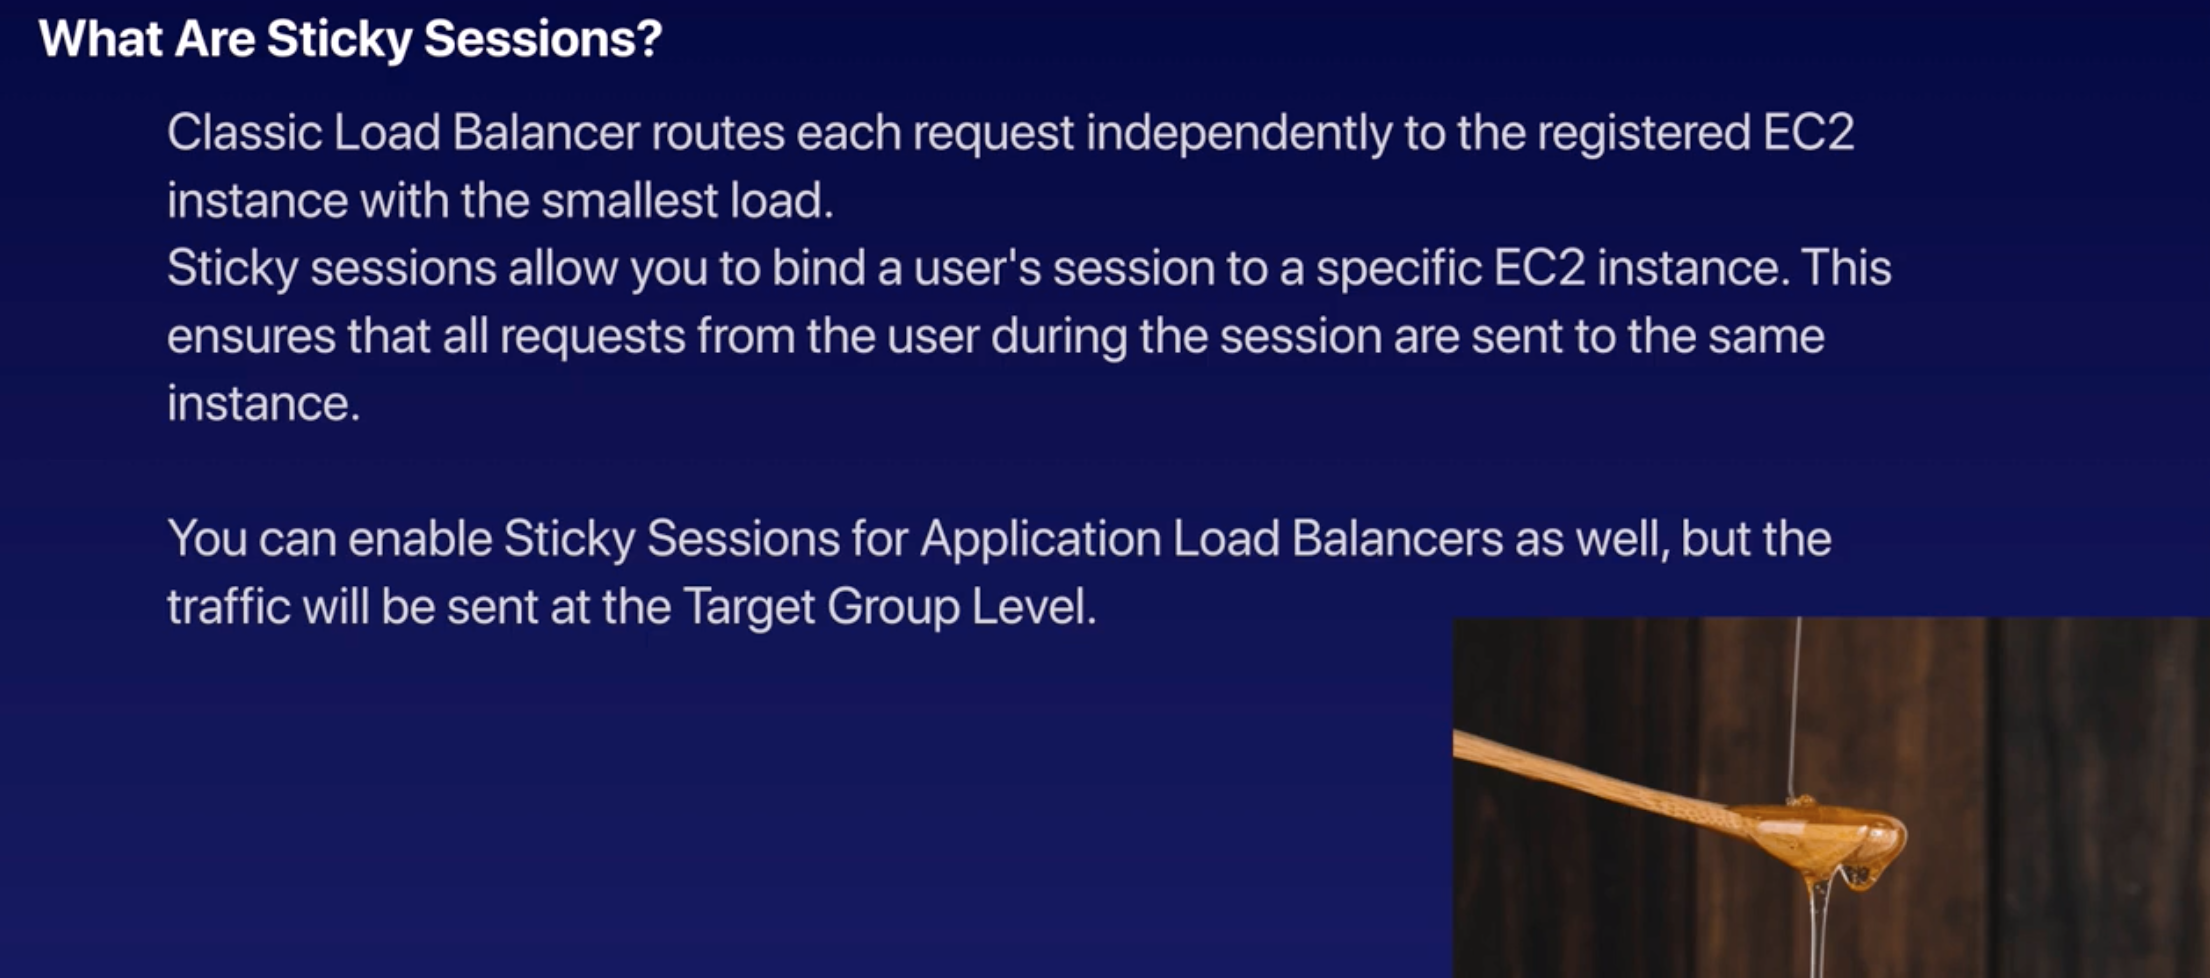
Classic LB |
- Routing decisions at either Transport layer (TCP/SSL) or Application layer (HTTP/HTTPS).
- Supports either EC2-Classic or a VPC (Previous generation LB).
- Static host port mapping: Requires fixed relationship between load balancer port and container instance port.
|
| 51 |
LB Health Check |
Checks the health of EC2 by HTTP or TCP pings with Response Timeout/ Interval/ Unhealthy and Healthy Threshold. |
| 52 |
Load Balancer Capacity Unit (LCU) |
Based on the highest usage dimension of one of the following:
- Number of new connections per second (up to 25 new connections per second is one LCU)
- Number of active connections per minute (up to 3,000 active connections per minute is one LCU)
|
| 53 |
Auto Scaling |
- Monitors applications and automatically adjusts capacity to maintain steady, predictable performance at the lowest possible cost.
- Works closely with ELB, as ELB checks health of EC2 which triggers the AS to add or remove instances based on configured AS Group Policy (when to launch AS with Scale-In/ out policy).
- Free to use, pay for the launched resource.
|
| 54 |
Auto Scaling Groups |
- Group contains a collection of EC2 instances (within multi-AZ & VPC) that are treated as a logical grouping for the purposes of automatic scaling and management.
- Enables to use EC2 Auto Scaling features such as health check replacements and scaling policies (when to add servers. Eg: CPU Utils is > 70%).
- Core functionalities:
- Maintaining the # of instances in an AS group.
- Automatic scaling (increase or decrease) of EC2.
|
| 55 |
Auto Scaling Launch Configuration |
EC2 template used when Auto Scaling needs to add additional server to AS Group when required (can add bootstrap script and other configurations to start instances). |
| 56 |
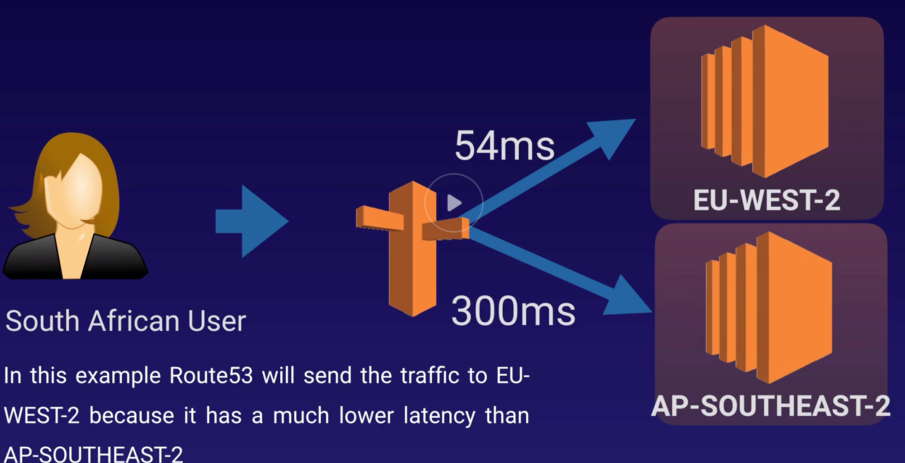
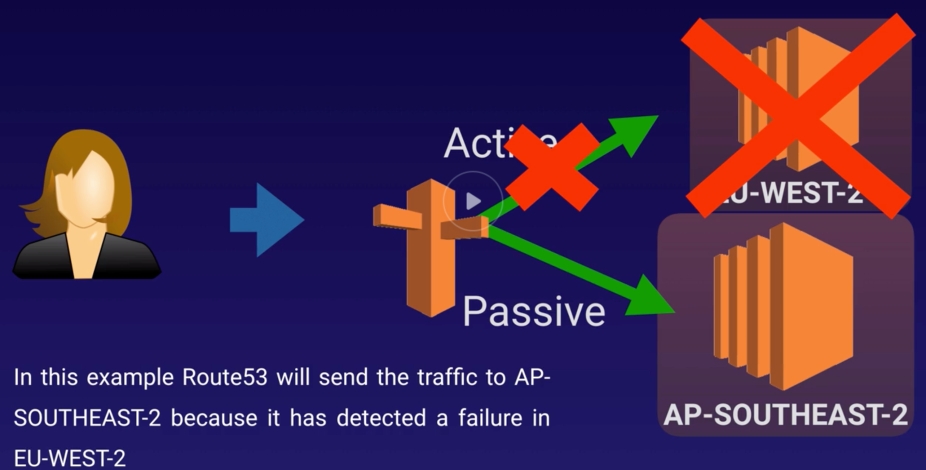
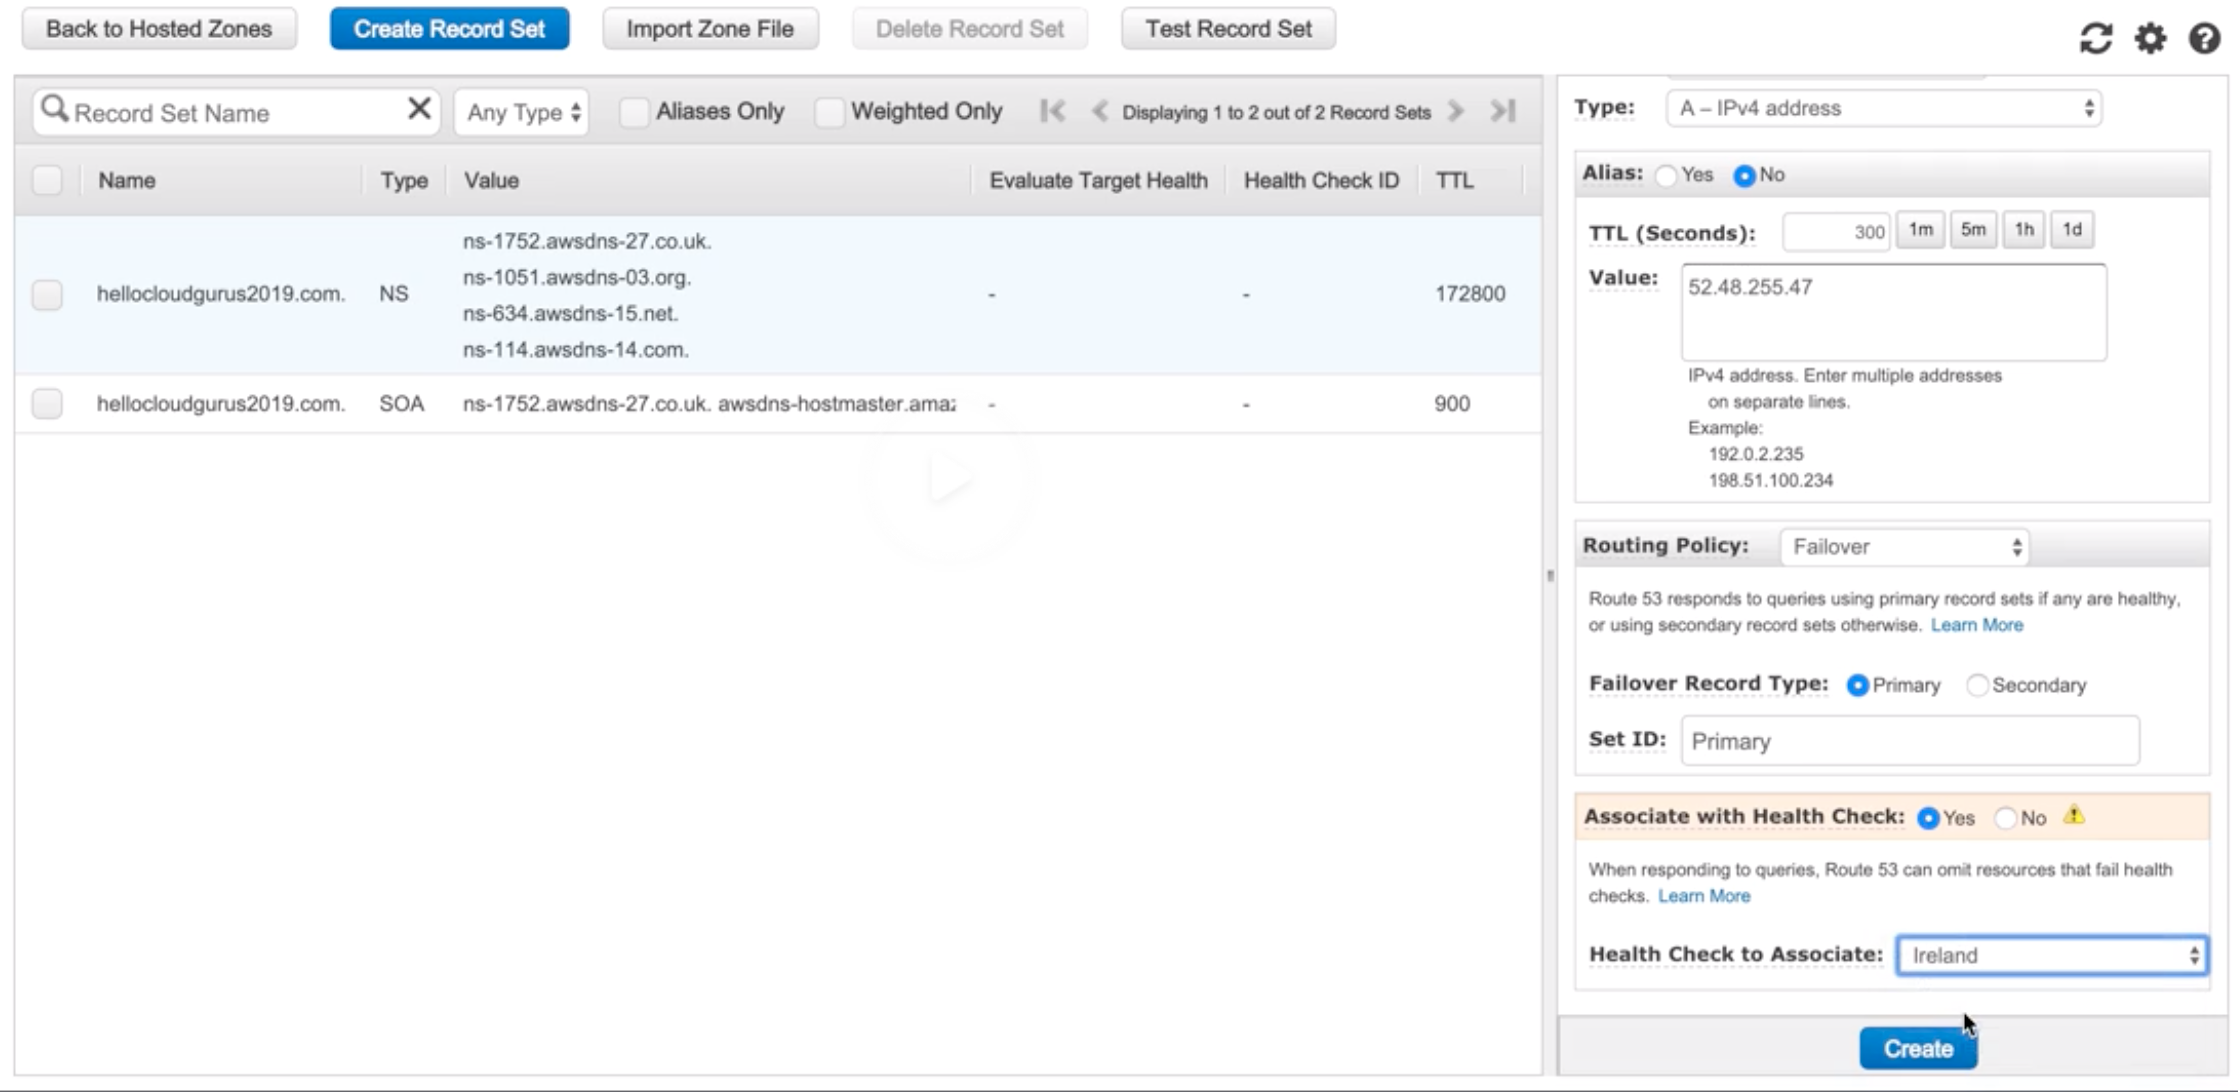
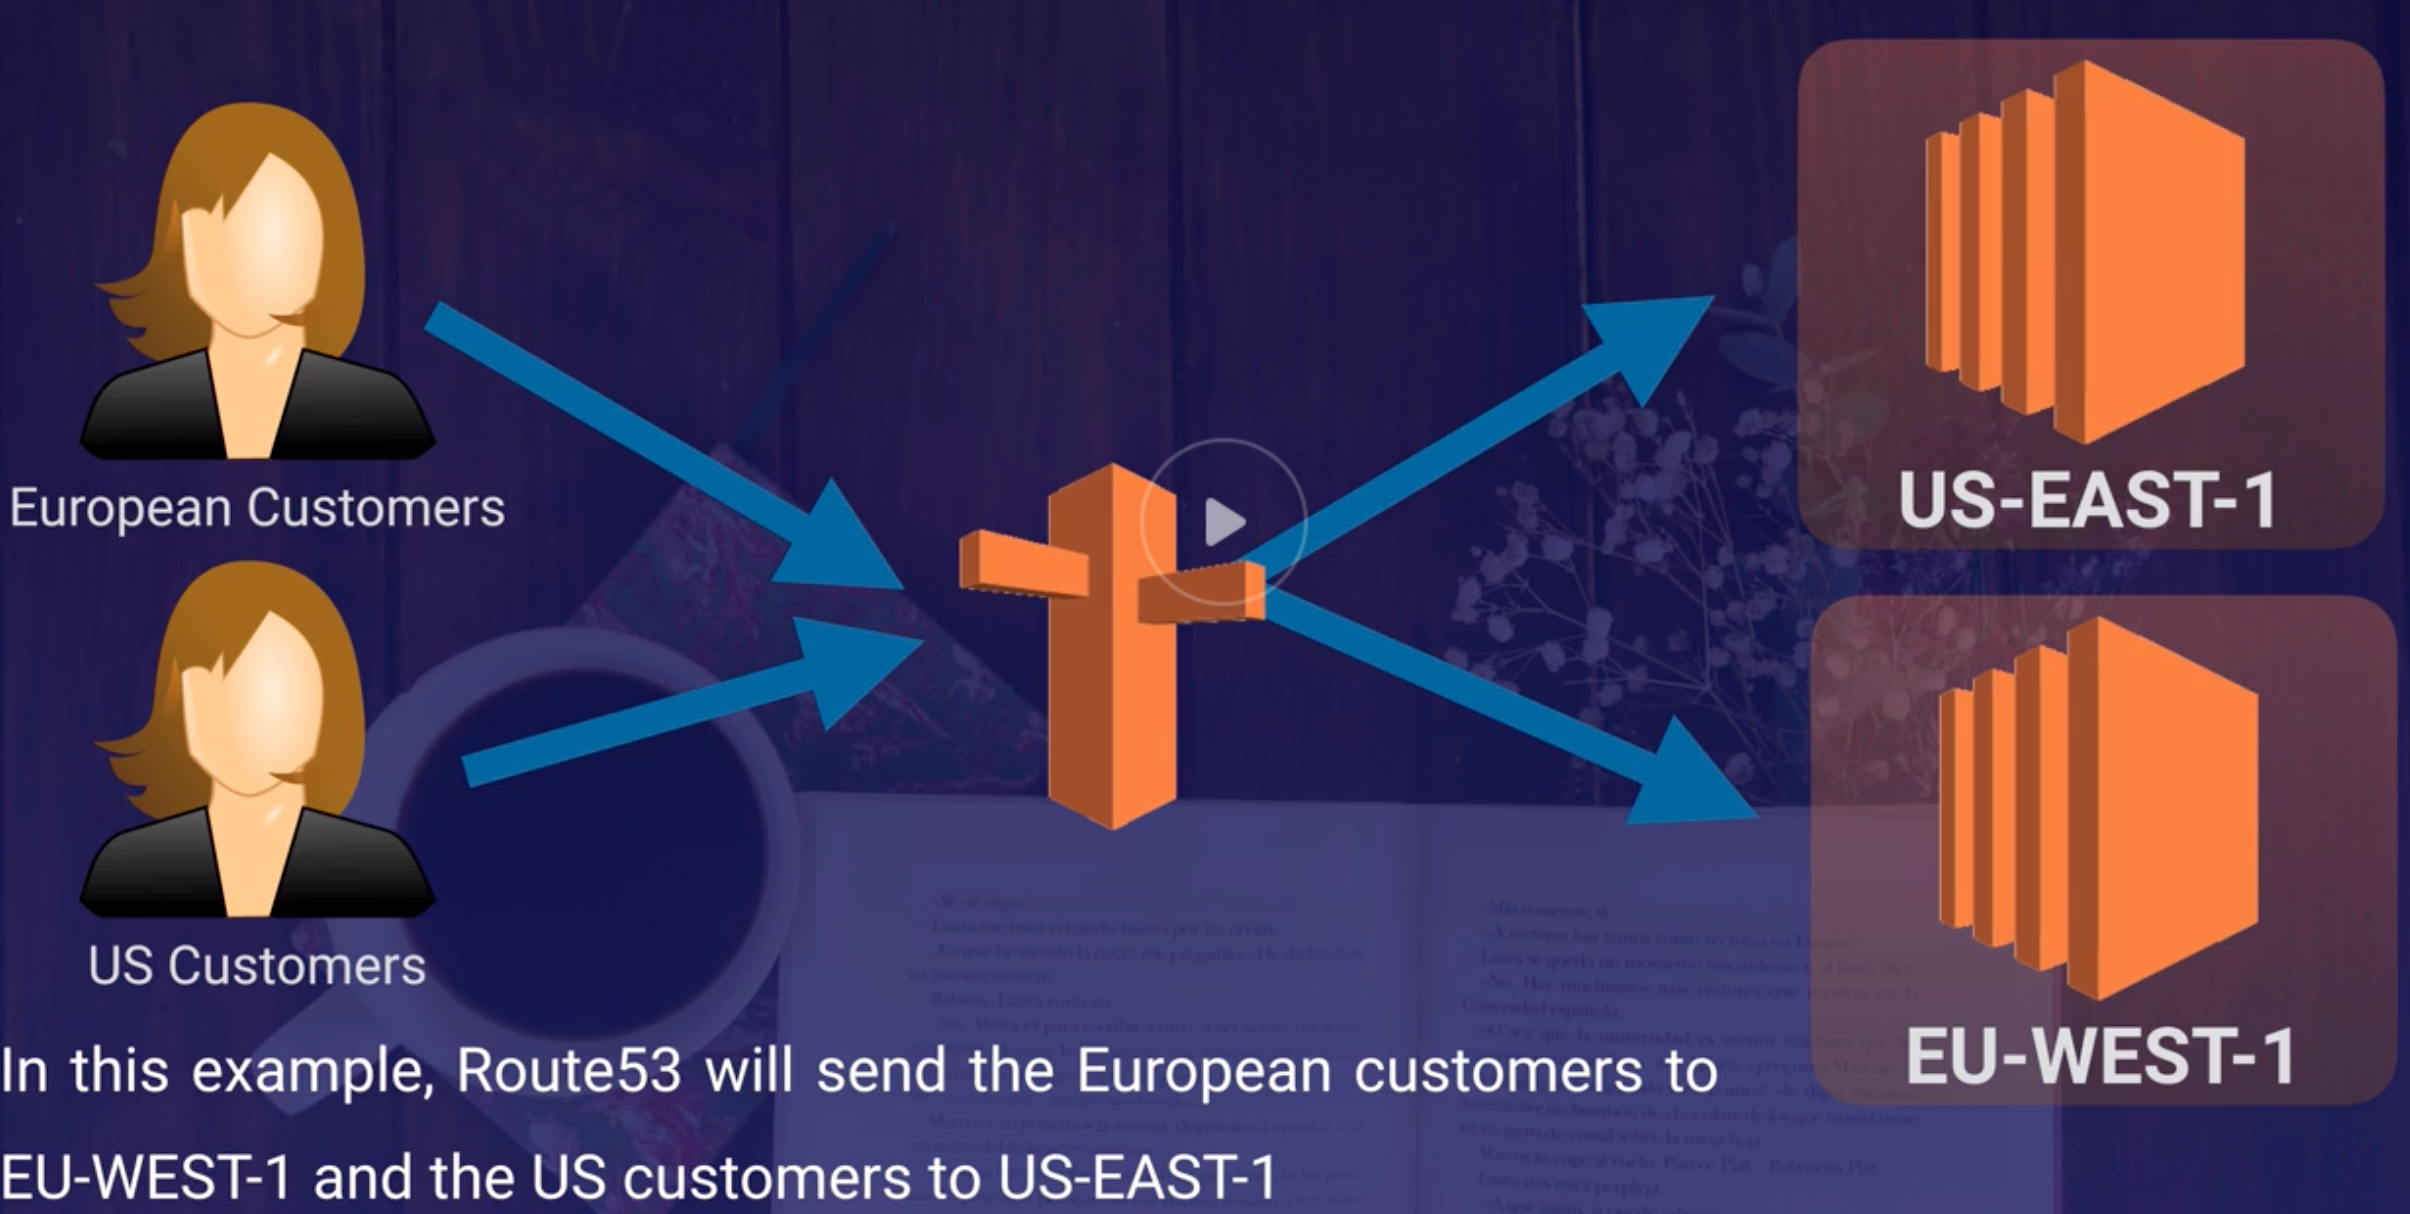
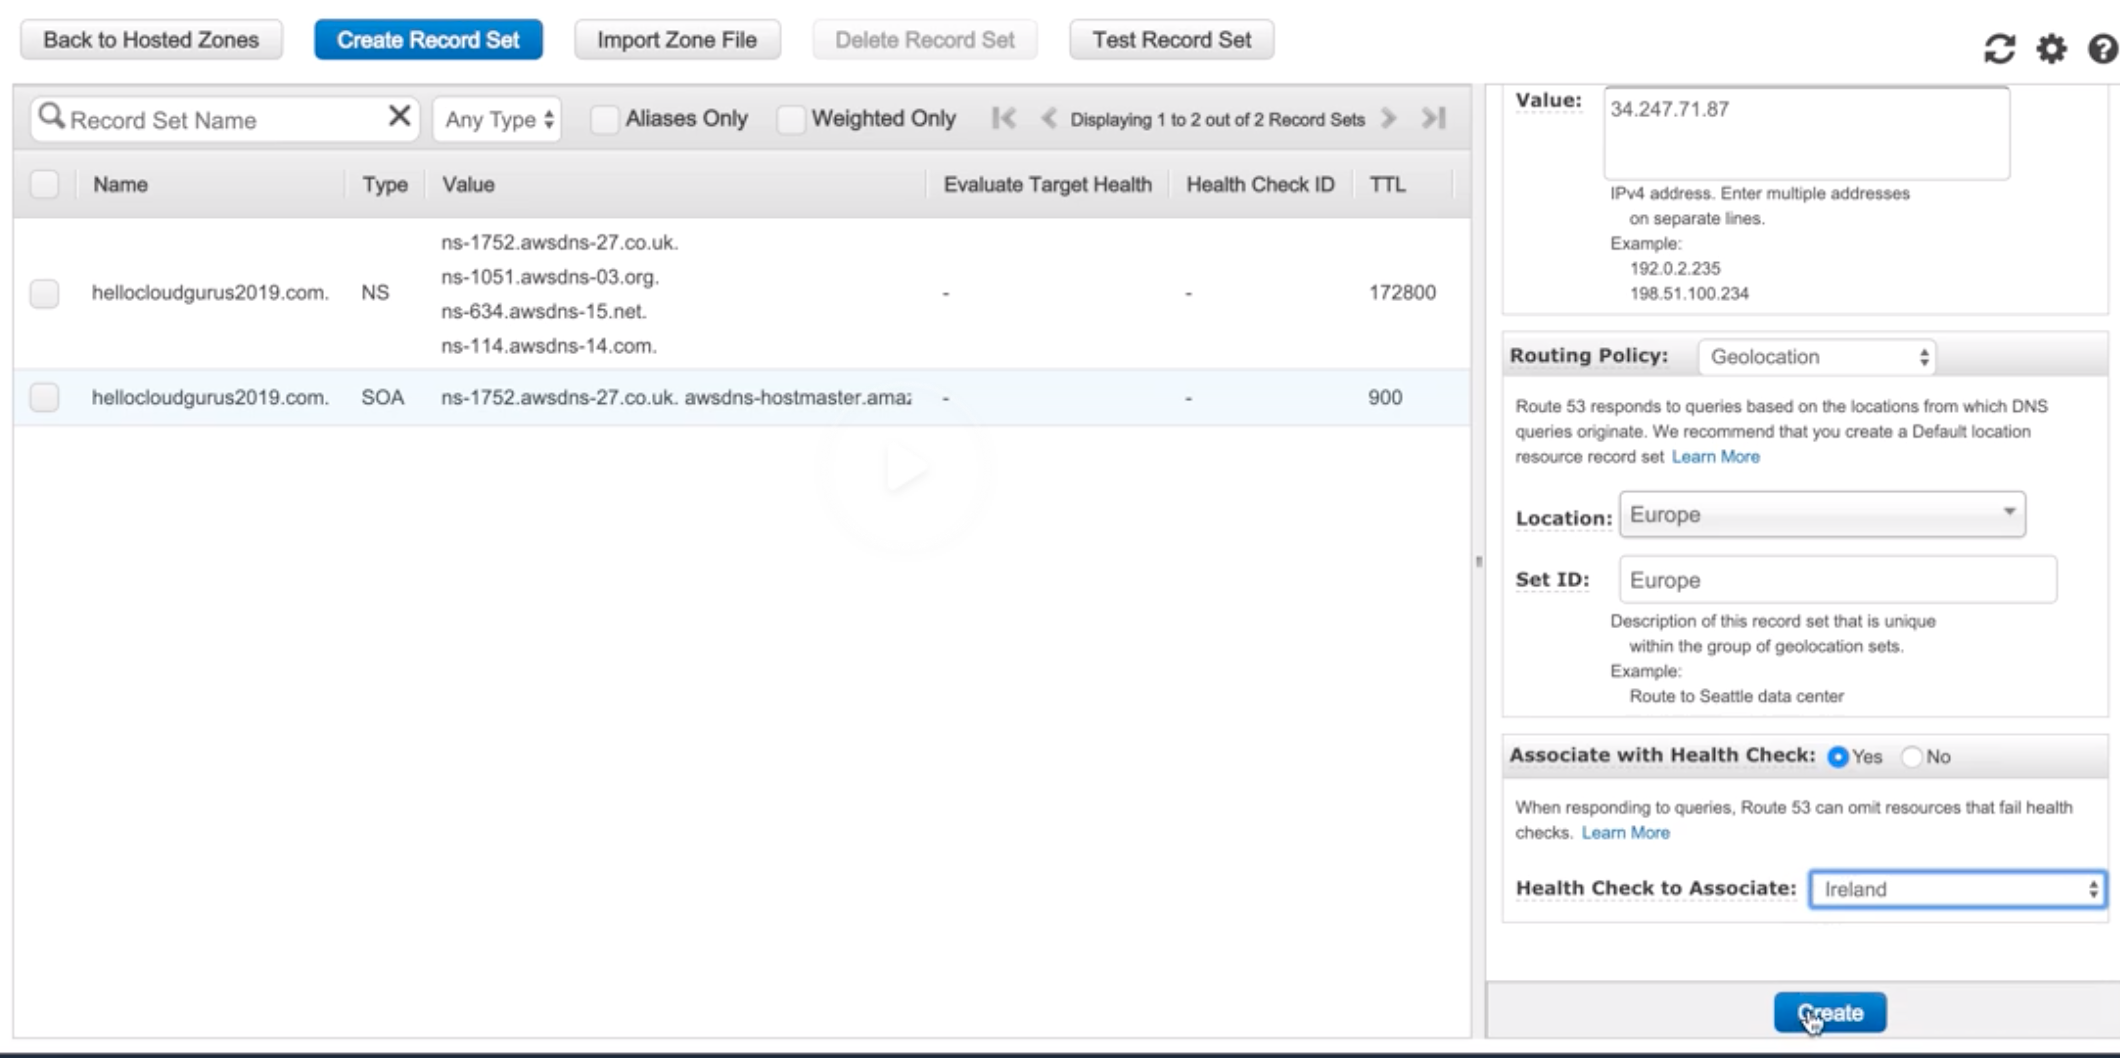
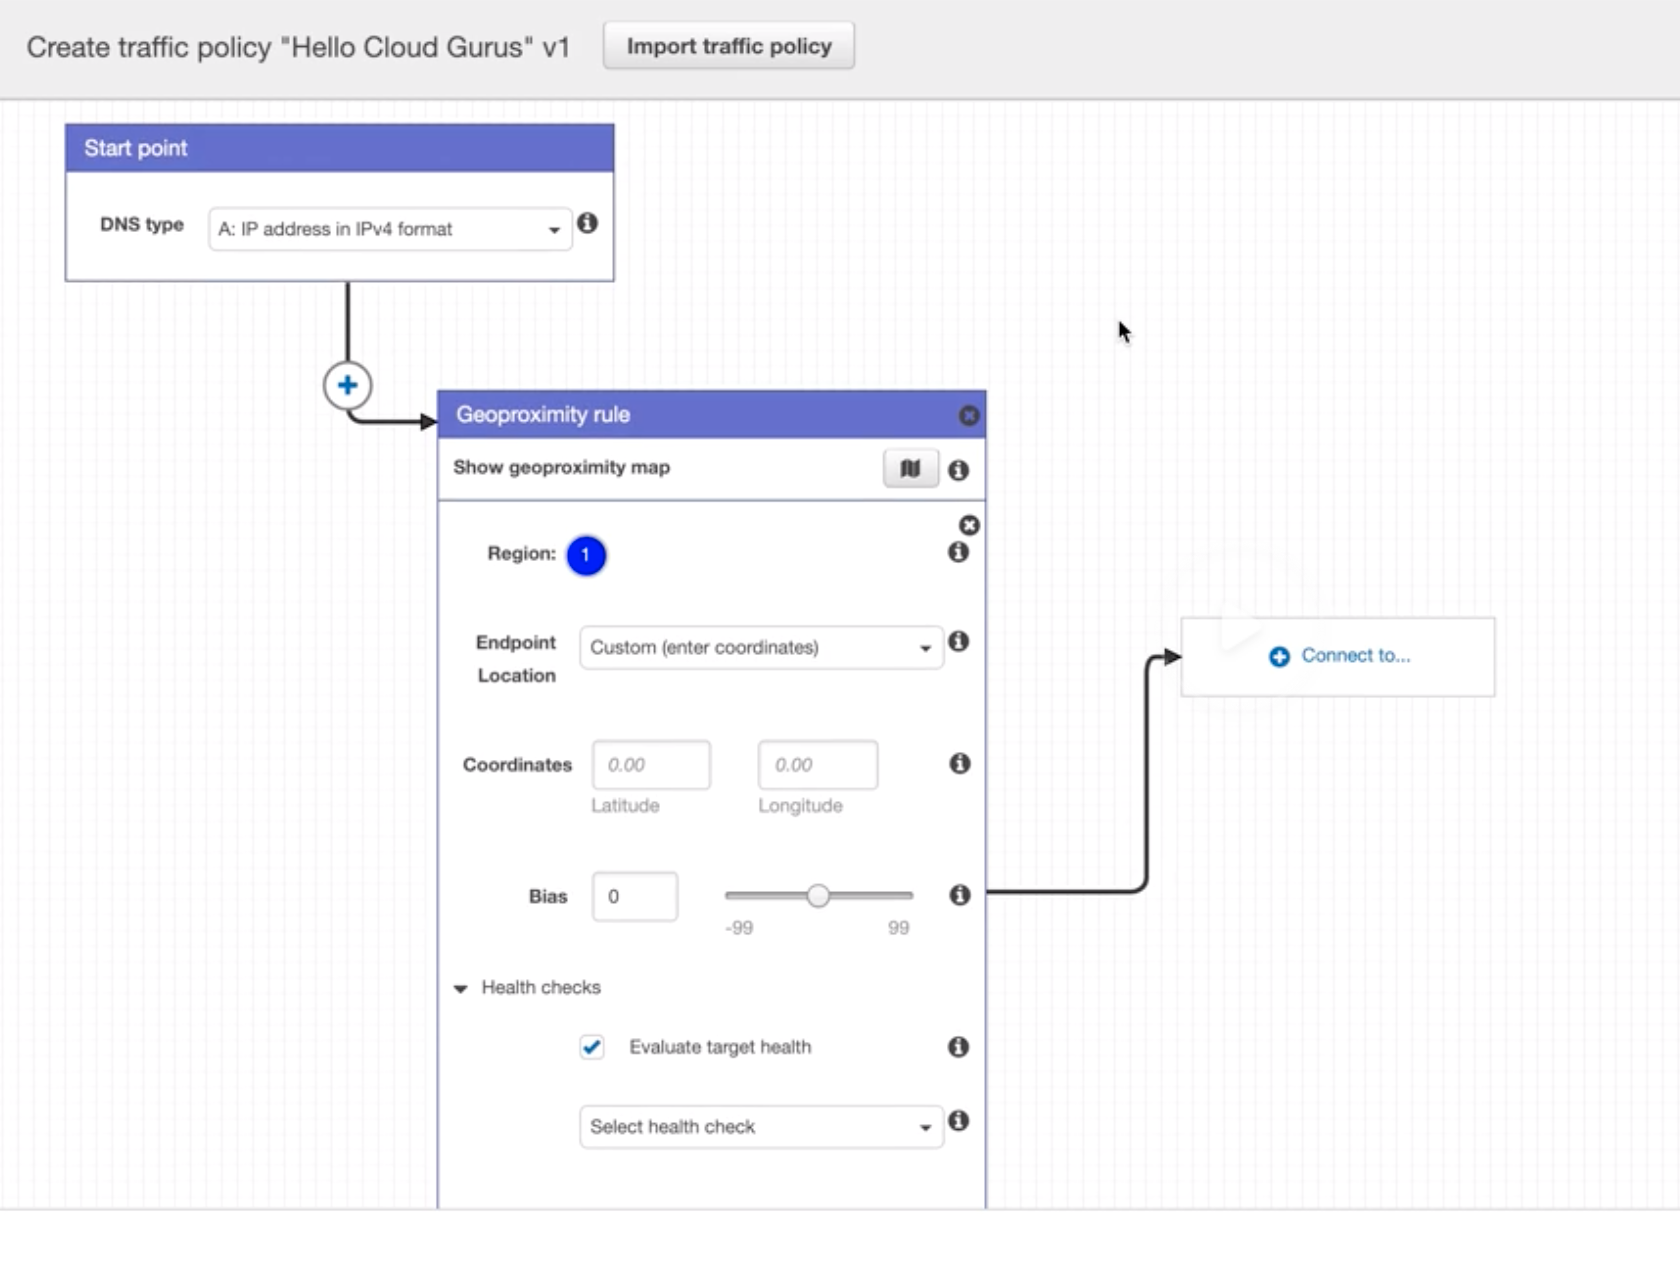
Route 53 |
- Highly available and scalable cloud DNS web service.
- 3 functionalities:
- Domain Registration: Register domains.
- DNS Service: friendly domains -> IP address and responds to DNS queries using a global n/w authoritative DNS servers.
- Health Checking: Sends automated requests over the internet to apps in EC2 to verify that it’s reachable, available and functional.
- Route 53 automatically sends your DNS record information to DNS servers AND it is also where you decide where traffic request for that domain/IP address are routed.
|
| 57 |
Hosted Zones |
Registered domain path routes information and its IP address.
- Eg: example.com, it’s subdomains (acme.example.com).
|
| 58 |
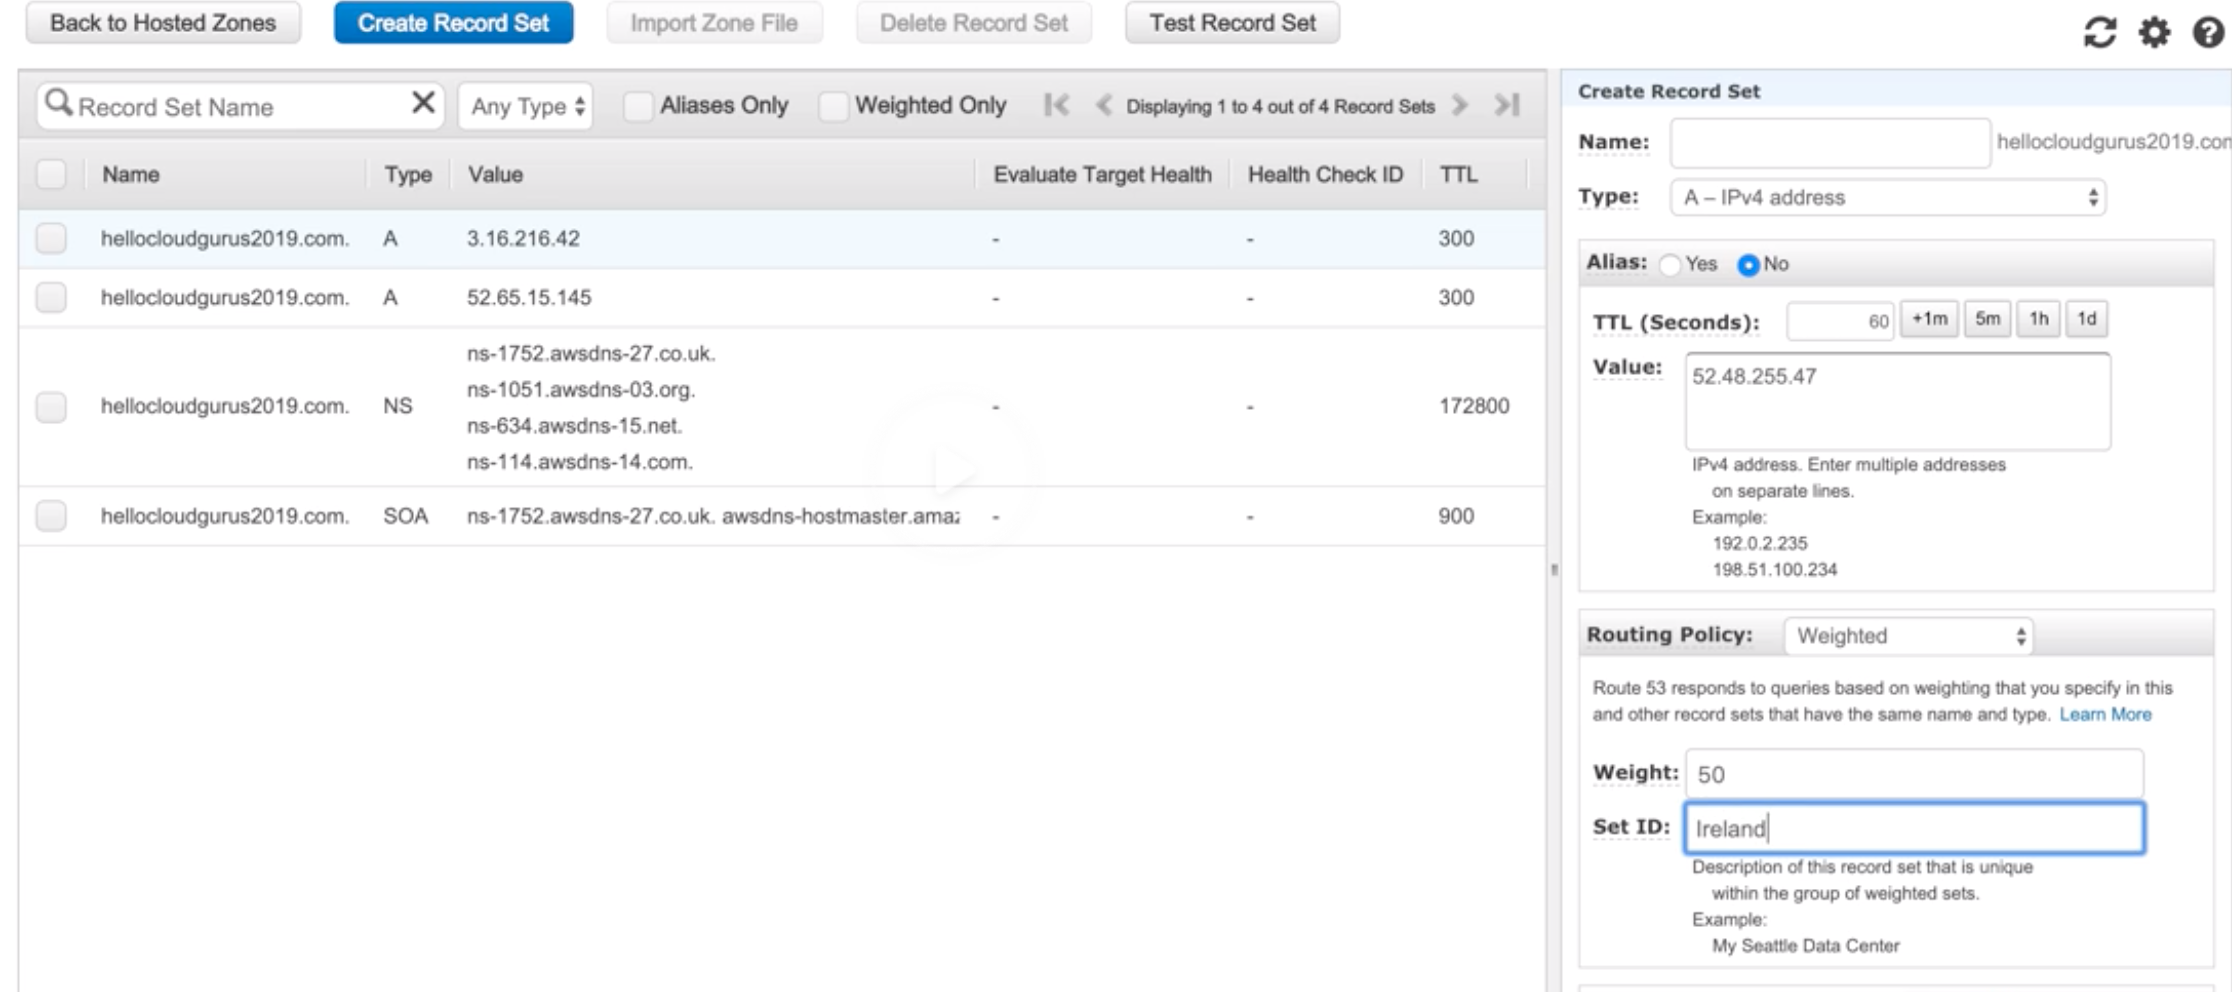
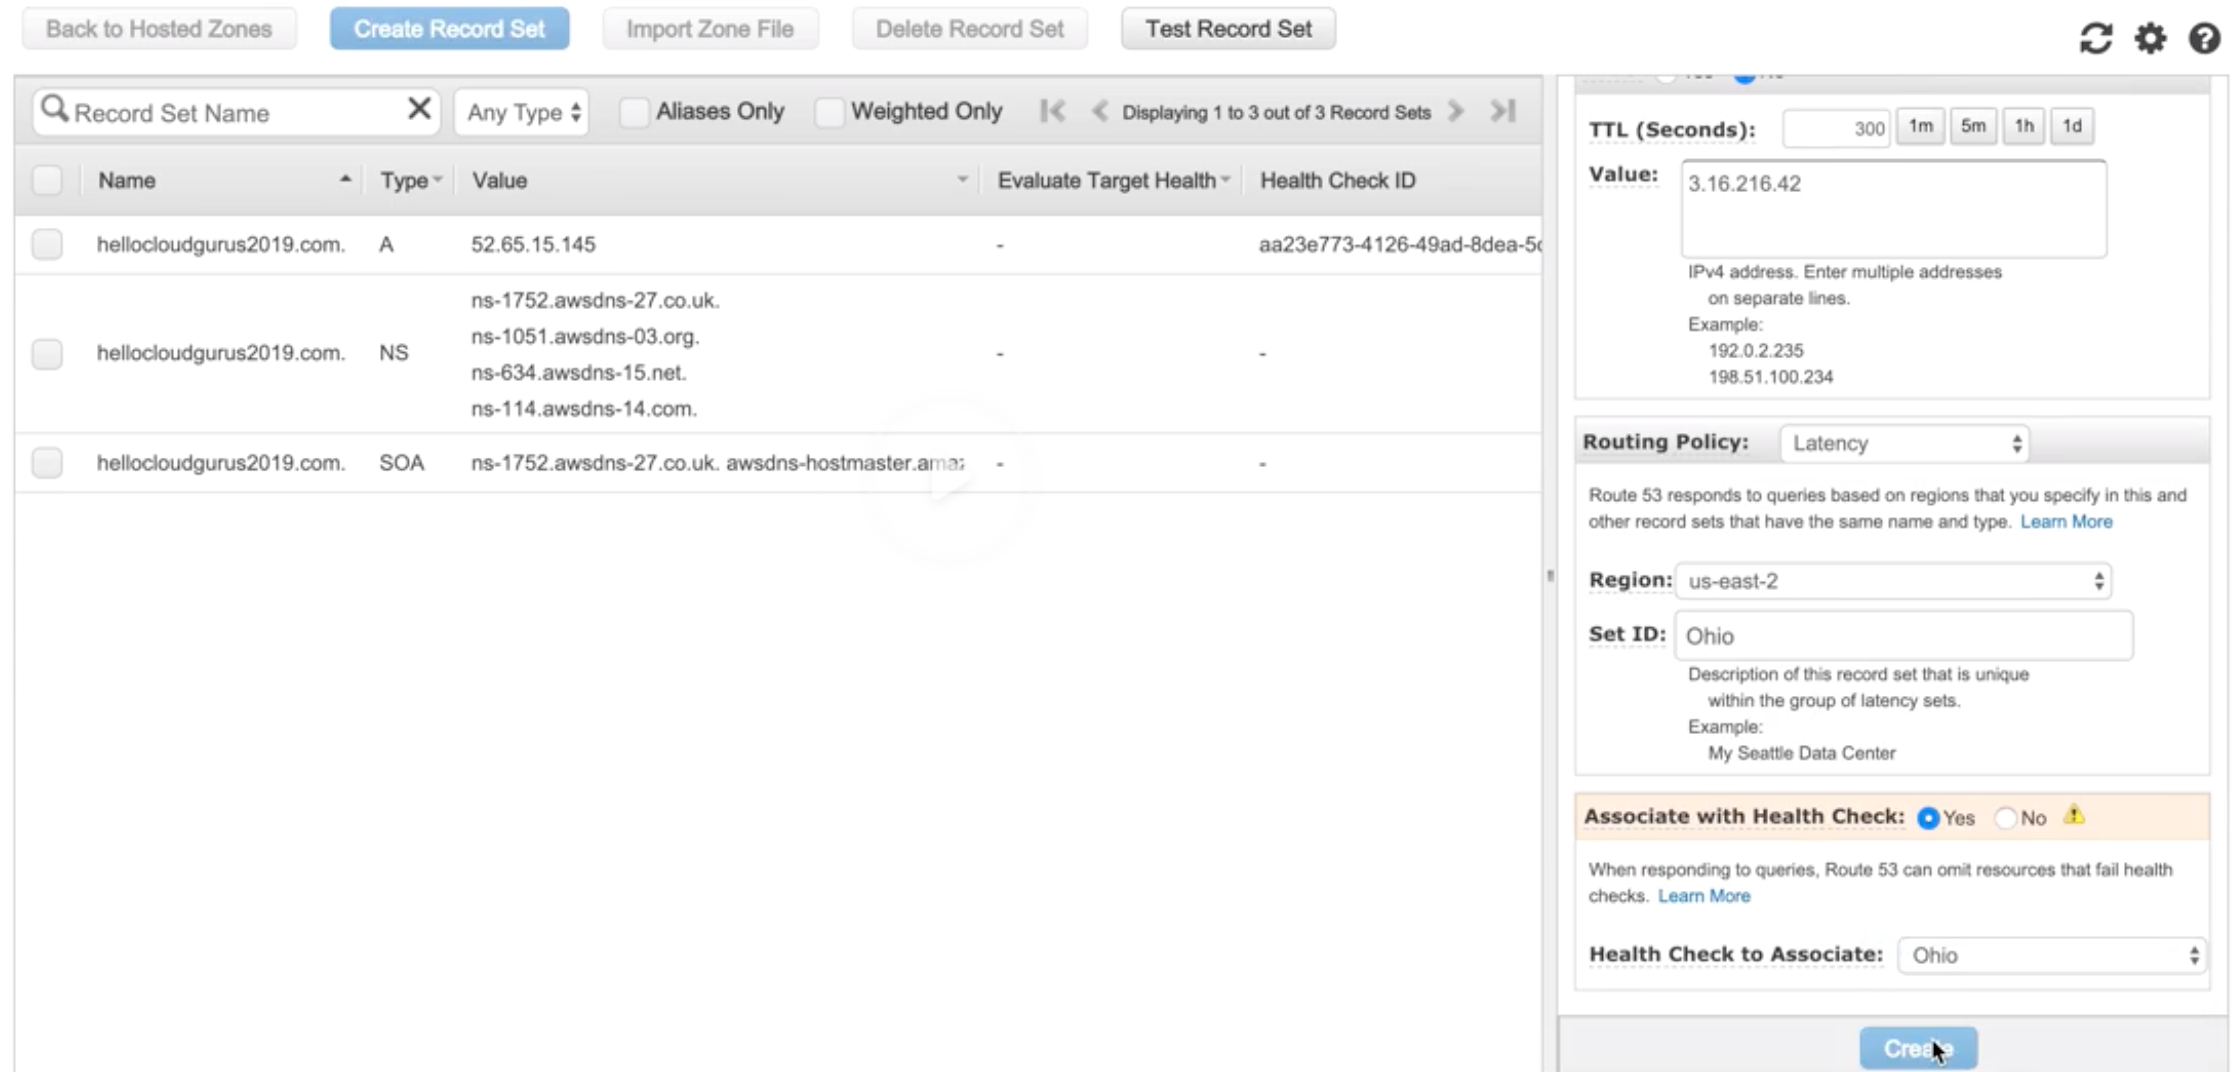
Record Sets |
Information about the resource record. |
| 59 |
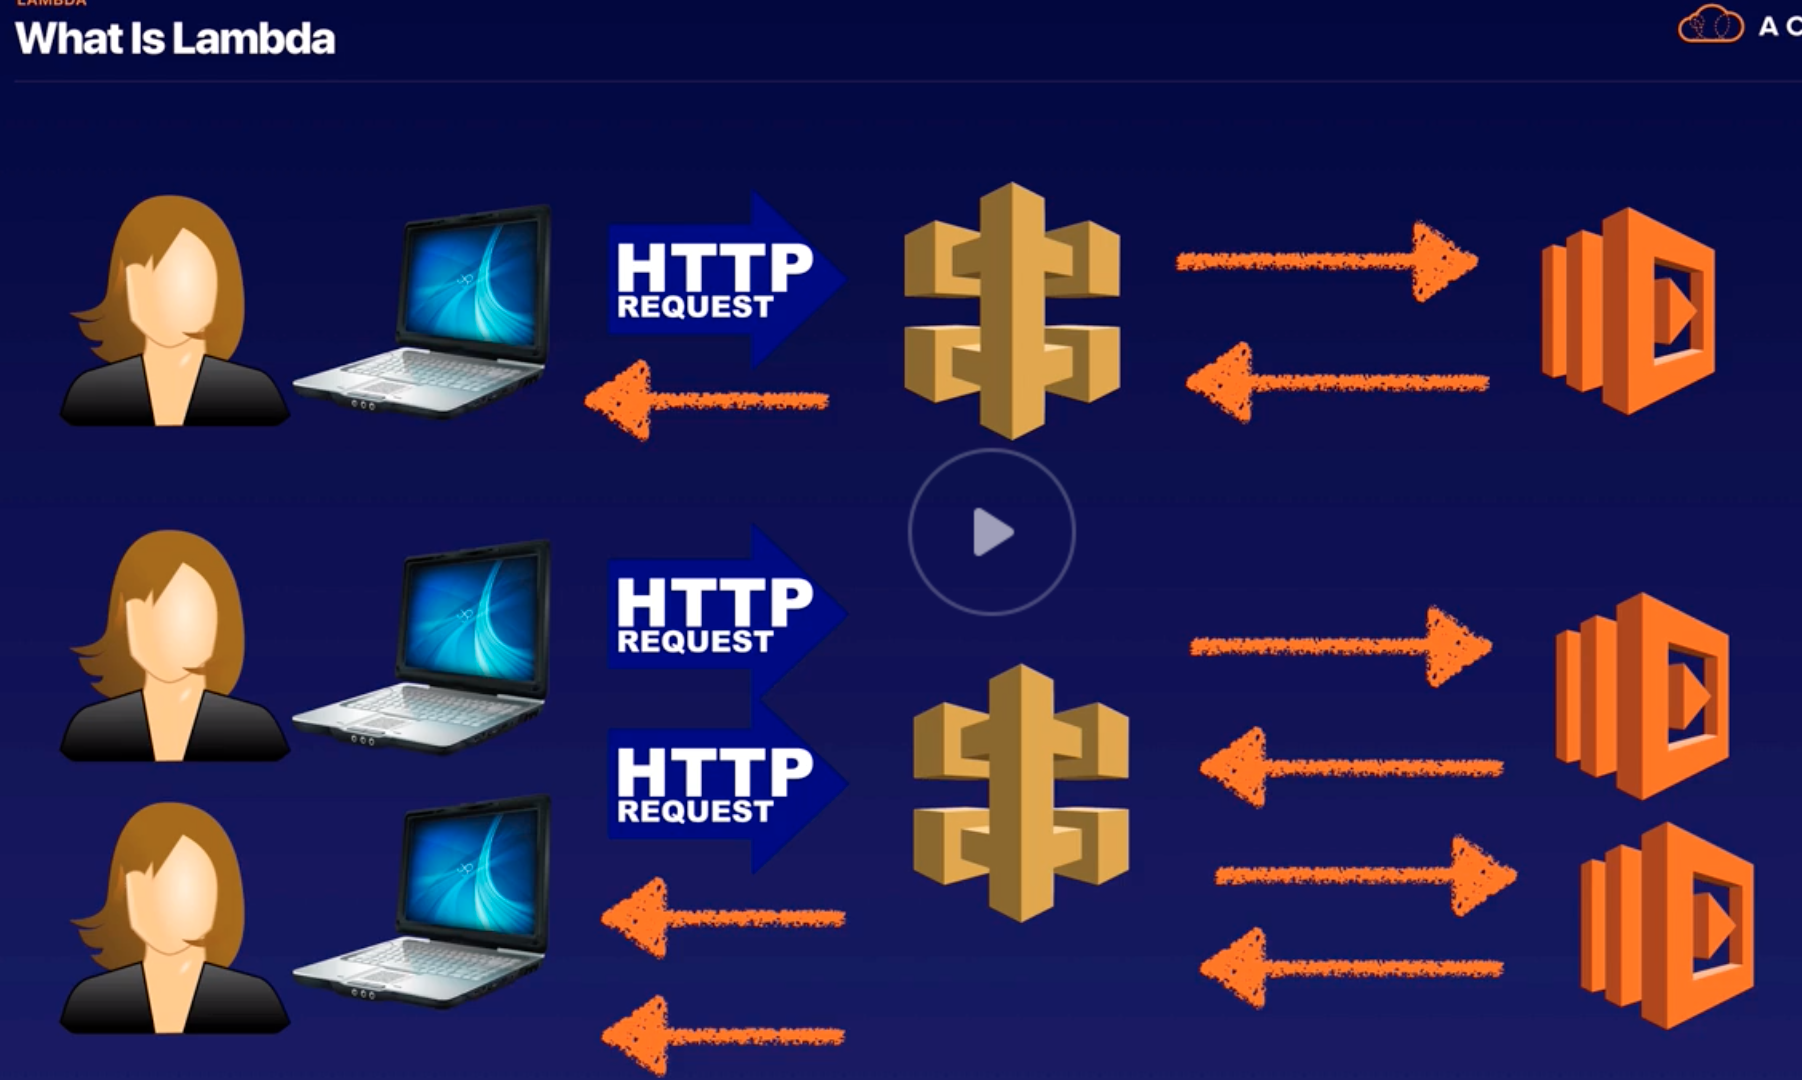
Lambda |
- Serverless and event-driven computing.
- “trigger” can be added to launch Lambda.
- Role must be created to run Lambda.
- Required memory allocation and time-out needs to be set.
- Sub-second metering and charges based on:
- # of execution request.
- Execution duration.
|
| 60 |
Instance Purchasing Options |
Options to purchase EC2 instances. |
| 61 |
EC2 – On-Demand Instances |
Pay, by the second, for the instances that you launch. Expensive. |
| 62 |
EC2 – Reserved Instances |
- Purchase, at a significant discount (75% discount), instances that are always available, for one to three years.
- 3 Options:
- All Upfront RI (AURI): nothing to pay.
- Partial Upfront RI (PURI): pay end of month.
- No Upfront RI (NURI): pay end of month. A successful billing history is required before you can purchase.
- Standard RI (no change in instance type)
- Convertible RI (change in instance type)
- Scheduled RI (recurring schedule)
|
| 63 |
EC2 – Scheduled Instances |
Purchase instances that are always available on the specified recurring schedule, for a one-year term. |
| 64 |
EC2 – Spot Instances |
Request unused EC2 instances, which can lower your Amazon EC2 costs significantly (90%). |
| 65 |
EC2 – Dedicated Hosts |
Pay for a physical host that is fully dedicated to running instances, and bring existing per-socket, per-core, or per-VM software licenses to reduce costs. |
| 66 |
EC2 – Dedicated Instances |
Pay, by the hour, for instances that run on single-tenant hardware. Share dedicated rack space within server host. |
| 67 |
EC2 – Capacity Reservations |
- Reserve capacity for EC2 instances in a specific AZ for any duration.
- When you create a Capacity Reservation, you specify the AZ in which you want to reserve the capacity, the number of instances for which you want to reserve capacity, and the instance attributes, including the instance type, tenancy, and platform/OS.
|
| 68 |
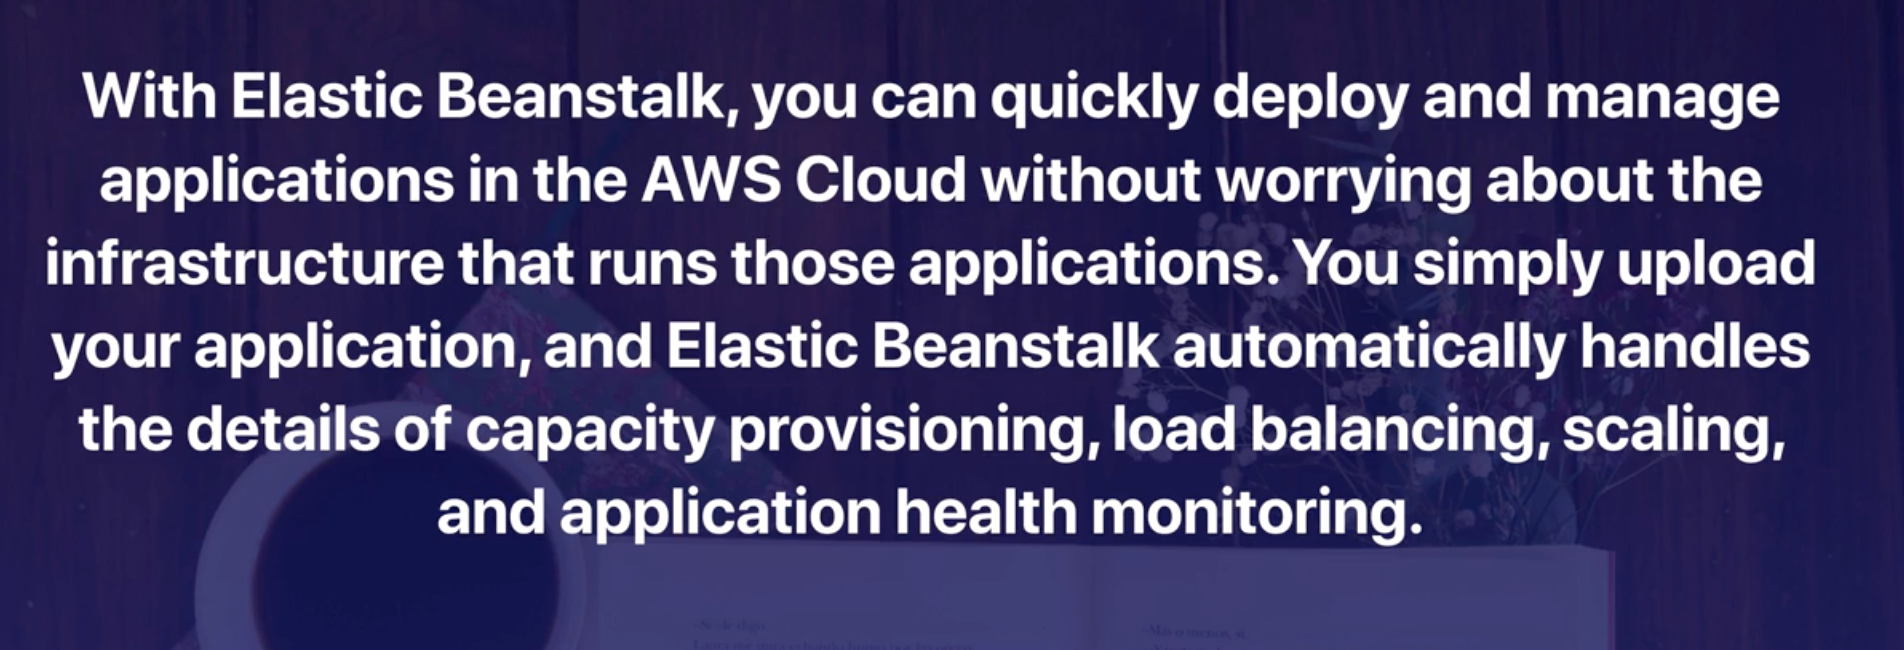
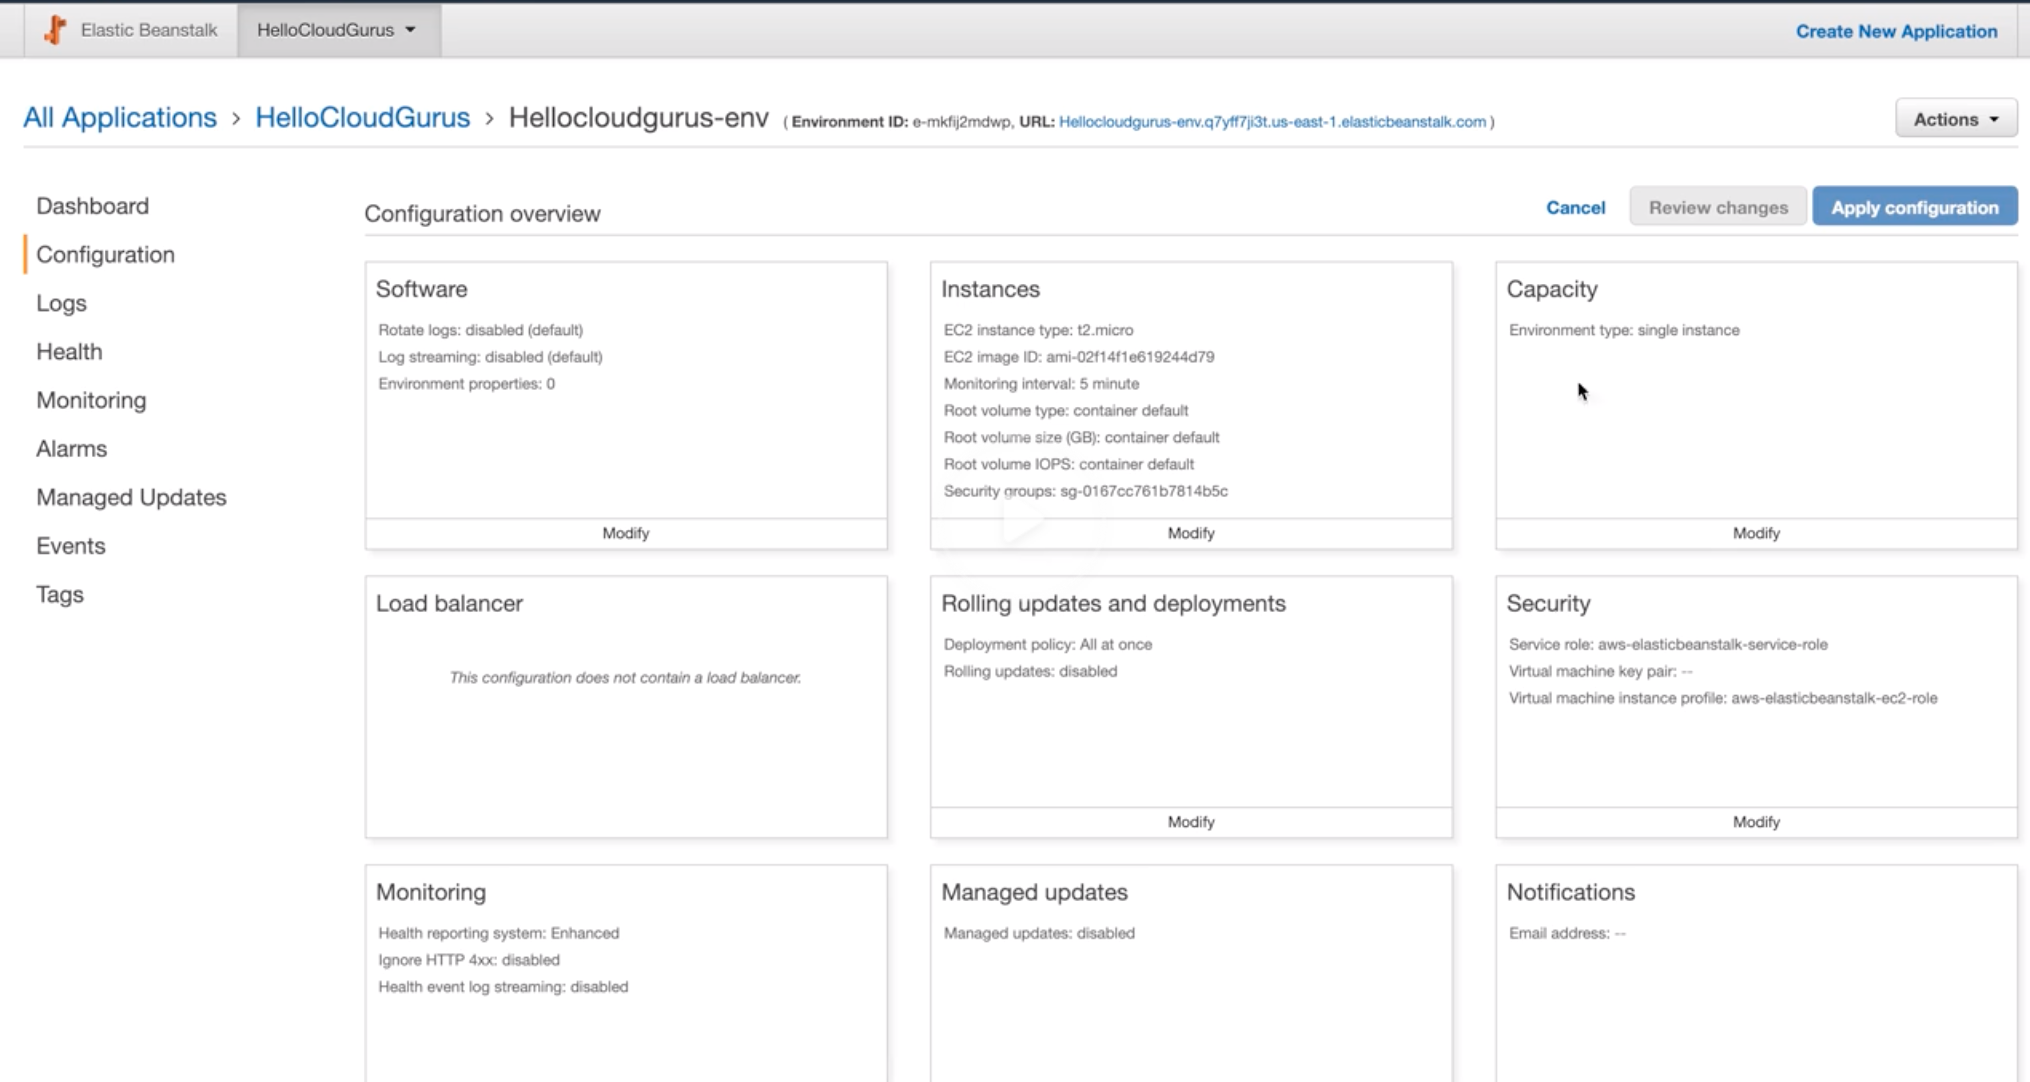
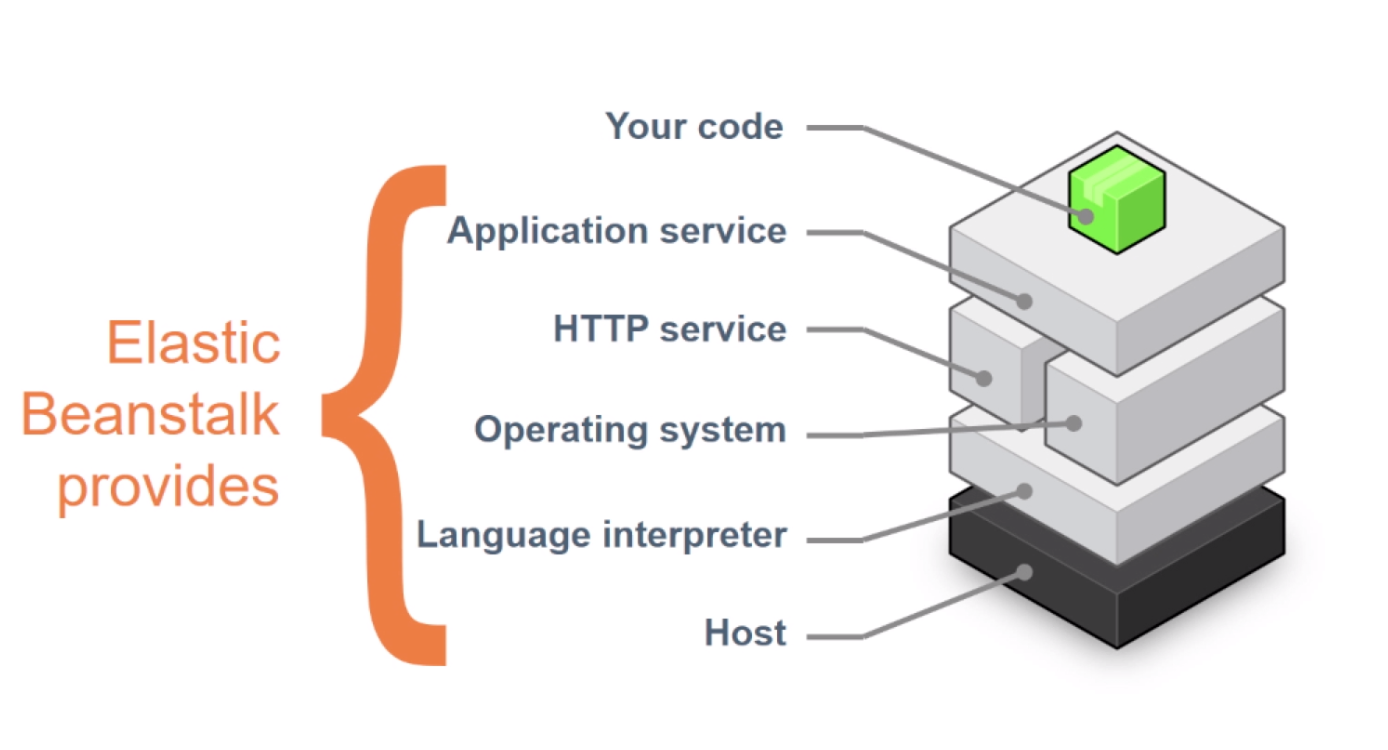
Elastic Beanstalk |
- PaaS – Custom application management platform for non-developer.
- Upload code and define the types of software, Beanstalk will build the code and create the environments.
- Automatically handles:
- Capacity provisioning
- Load balancing
- Auto scaling
- Monitoring
- Application container top of AWS.
- Free; You pay for usage.
|
| 69 |
CloudFront |
- CDN. Customize cache, define the TTL.
- Origin: Gets data from S3, ELB, Lambda, EC2.
- S3, ELB or EC2 as origins for your applications, and Lambda@Edge to run custom code closer to customers’ users.
- No data transfer fee for AWS origins (S3, EC2 or ELB)
- Usages:
- Static Website Content Delivery
- Serve On-Demand or Live Streaming Video
- Encrypt Specific Fields Throughout System Processing
- Customize at the Edge – send error page, authn/ authz before sending to origin server
- Serve Private Content by using Lambda@Edge.
|
| 70 |
CloudTrail |
- Records all API calls made, delivers logs to S3 buckets which include identity, source IP and request and response details.
- Doesn’t log OS system log and Database request/ response.
- Used for governance, compliance, and risk auditing.
|
| 71 |
CloudFormation |
- Infrastructure as a Code – Template based infrastructure management to avoid repeated task of creating infra.
- Declarative programming of stack provisioning in AWS.
- Template file (in source control as JSON) is an input to CloudFormation to manage 100’s of AWS resource.
- Permissions are required to successfully create the stack.
- Free to use, but resource usage cost.
|
| 72 |
DB tools |
- DocumentDB: Word document database service with MongoDB
- Neptune: Graph DB
- TimeStream: Timeseries DB (IoT)
- DB Migration Service: Migrate DB to AWS with minimal downtime
|
| 73 |
Shield |
- DDoS protection services (block UDP reflection, syn floods)
- Two types:
- Standards (automatic for all AWS services; inline mitigation)
- Advanced (paid; 24/7 support team; advanced attack mitigation)
- AWS services with built-in DDoS mitigation include:
- Route 53
- CloudFront
- WAF
- ELB
- VPCs and Security Groups?
|
| 74 |
Trusted Advisor |
- Environment optimization service.
- Real time guidance to help to provision resources by following AWS best practices.
- Automatically analyze resources that proliferated and that needs to be tracked.
- Gives best practice on 4 categories:
- Cost optimization
- Performance
- Security
- Fault tolerance
- 7 core checks free to everyone:
- S3 bucket permission
- Security Groups (specific ports unrestricted)
- IAM use/ MFA on Root Account
- Keys non-rotation
- EC2 non-patching
- EBS public snapshots (check if snapshots are publicly readable)
- RDS public snapshots (check if RDS is public)
- Service limits (eg: 20 EC2 limit)
|
| 75 |
Support Plans |
- Basic: core trusted advisor, no technical support, submit bug, feature request and service limit.
- Developer: Basic + cloud support associates, guidance less than 24 hours, impairment within 12 hours response.
- Provides general guidance when you request Architecture Support.
- Business: full trusted advisor, cloud support engineer 24/7, email, chat, phone, 1-hour response, contextual guidance on use case (per account basis).
- Enterprise: Tech Account Manager (TAM), full trusted advisor, cloud support engineer 24/7, email chat phone, 15 min response, consultative review on use case, apply to all accounts, well architected review, access to online labs.
|
| 76 |
ECS |
- Elastic Container Service (Amazon ECS) is a container orchestration service that supports Docker containers.
- ECS install and operate container orchestration software, manage and scale a cluster of virtual machines, or schedule containers on VMs.
- API calls to launch and stop Docker-enabled applications, query the complete state of your application, and access many familiar features such as IAM roles, security groups, load balancers, CloudWatch Events, CloudFormation templates, and CloudTrail logs.
|
| 77 |
Fargate |
- Fargate manages a cluster of servers and schedule placement of containers on the servers.
- Fargate works with ECS that manages EC2 (spin new EC2 with defined instance types, provision and scale clusters, or patch and update each server).
- Fargate takes care of:
- Task placement strategies, such as binpacking or host spread.
- Tasks are automatically balanced across AZs.
- Similar to AS: AS for EC2, Fargate for ECS (running containers in EC2).
|
| 78 |
Redshift |
- Data Warehouse tool – OLAP (online analytical process)
- Queries to data lake, S3.
- Fork of PostgreSQL 8.0.2
- Connect to JDBC/ODBC
- SQL compliant and Parallel queries.
- Quicksight – BI tool.
|
| 79 |
X-Ray |
- Managed debugger for three-tier applications to complex microservices applications consisting of thousands of services or for Lambda functions..
- X-Ray provides an end-to-end view of requests as they travel through your application, and shows a map of your application’s underlying components.
|
| 80 |
Dev tools |
- Corretto: Open JDK
- Cloud Development Kit: SDK for AWS cloud using Cloud Formation
- Cloud9: IDE
- CodeCommit: GIT source control service
- CodeBuild: CI- Build and test code
- CodePipeline: Continous Delivery- binaries ready to be deployed
- CodeDeploy: Continous Deployment- to production
- CodeStar: CI/ CD (build, delivery and deploy)
- DeviceFarm: Testing platform for different devices
|
| 81 |
Snowball |
- A service that accelerates transferring large amounts of data into and out of AWS using physical storage devices, bypassing the Internet (import and export from AWS is supported).
- This transport is done by shipping the data in the devices through a regional carrier.
- 256 bit encryption.
- Snowball: No compute; 50 TB to 80 TB
- Snowball Edge: Mini AWS in your hand. Snowball with compute; 100 TB.
- Snowmobile: No compute; 100TB to 100 PB (exabytes)
|
| 82 |
Storage Gateway |
- A hybrid cloud storage service that gives you on-premises access to virtually unlimited cloud storage.
- These include moving tape backups to the cloud, reducing on-premises storage with cloud-backed file shares, providing low latency access to data in AWS for on-premises applications, as well as various migration, archiving, processing, and disaster recovery use cases.
- The gateway connects to S3, S3 Glacier, S3 Glacier Deep Archive, EBS, and Backup, providing storage for files, volumes, snapshots, and virtual tapes in AWS.
|
| 83 |
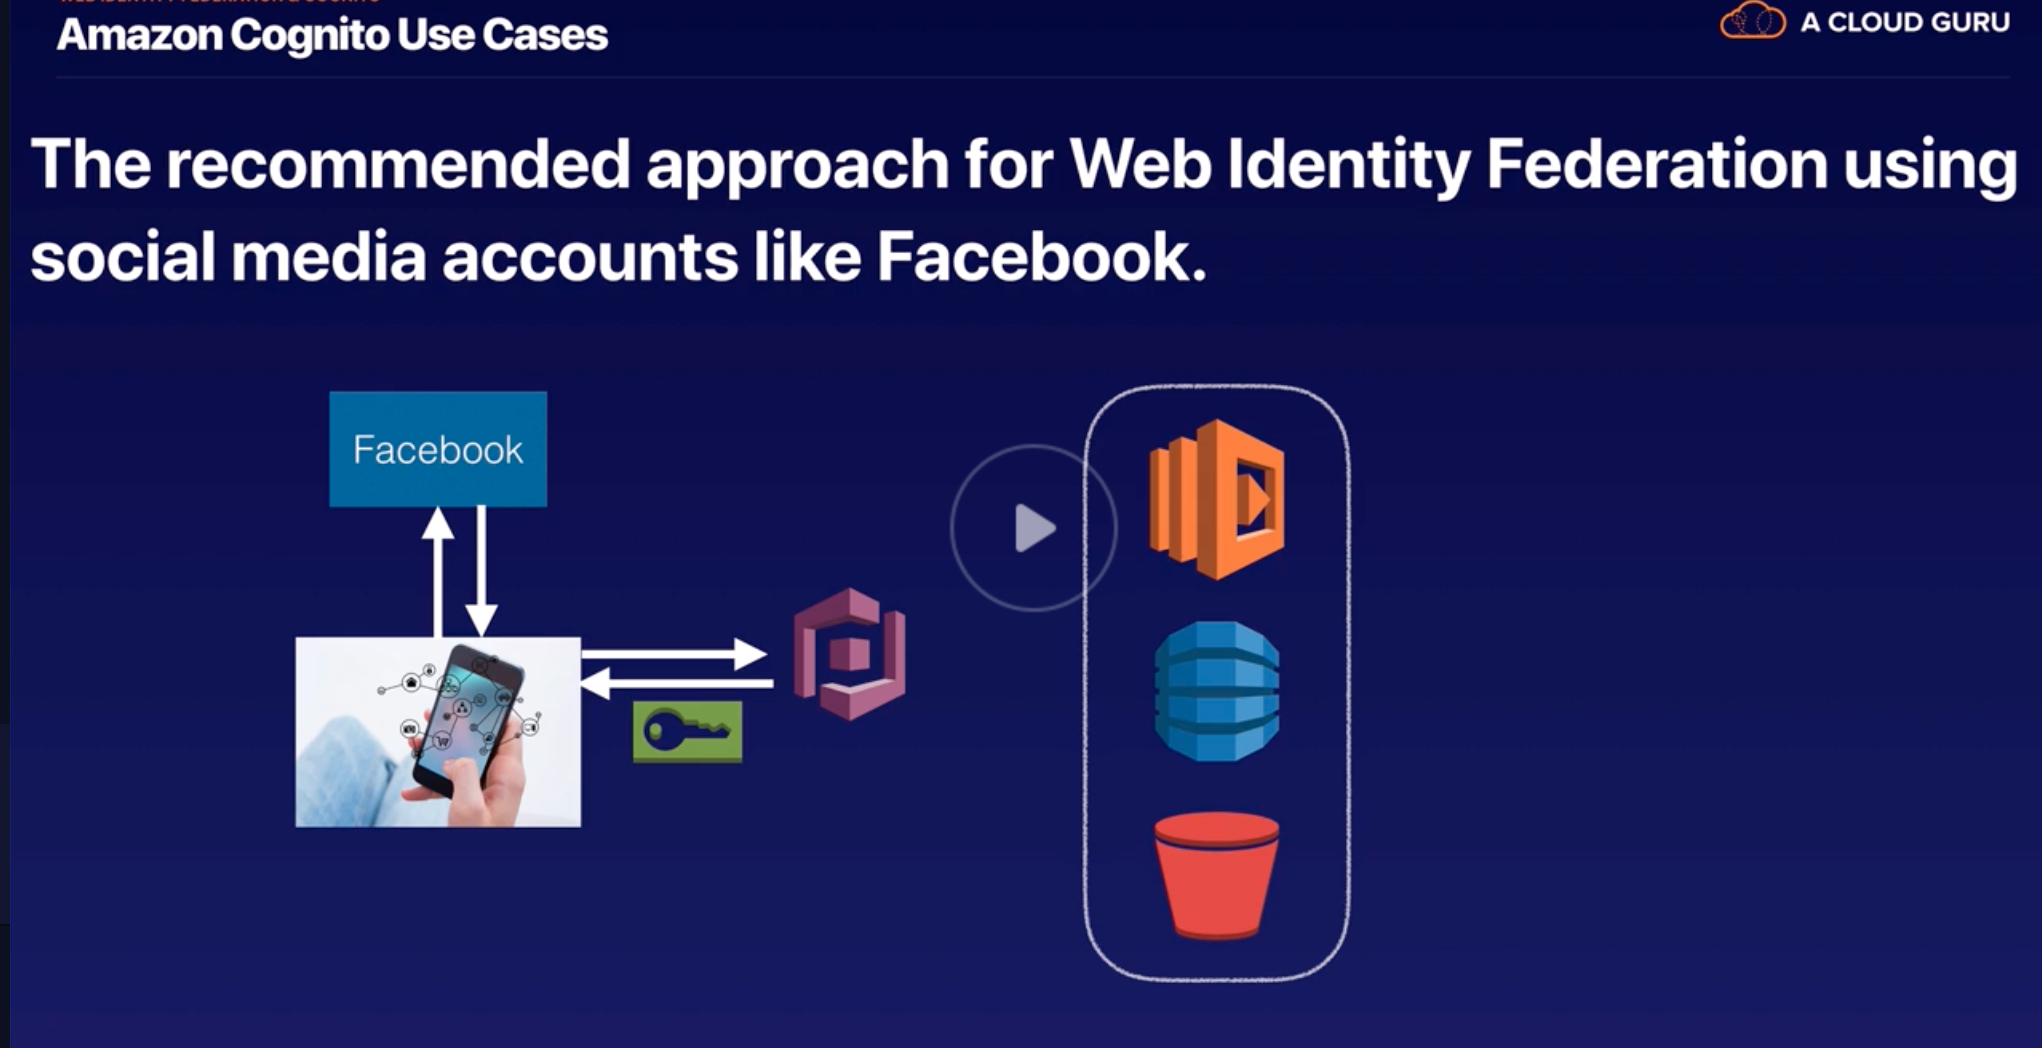
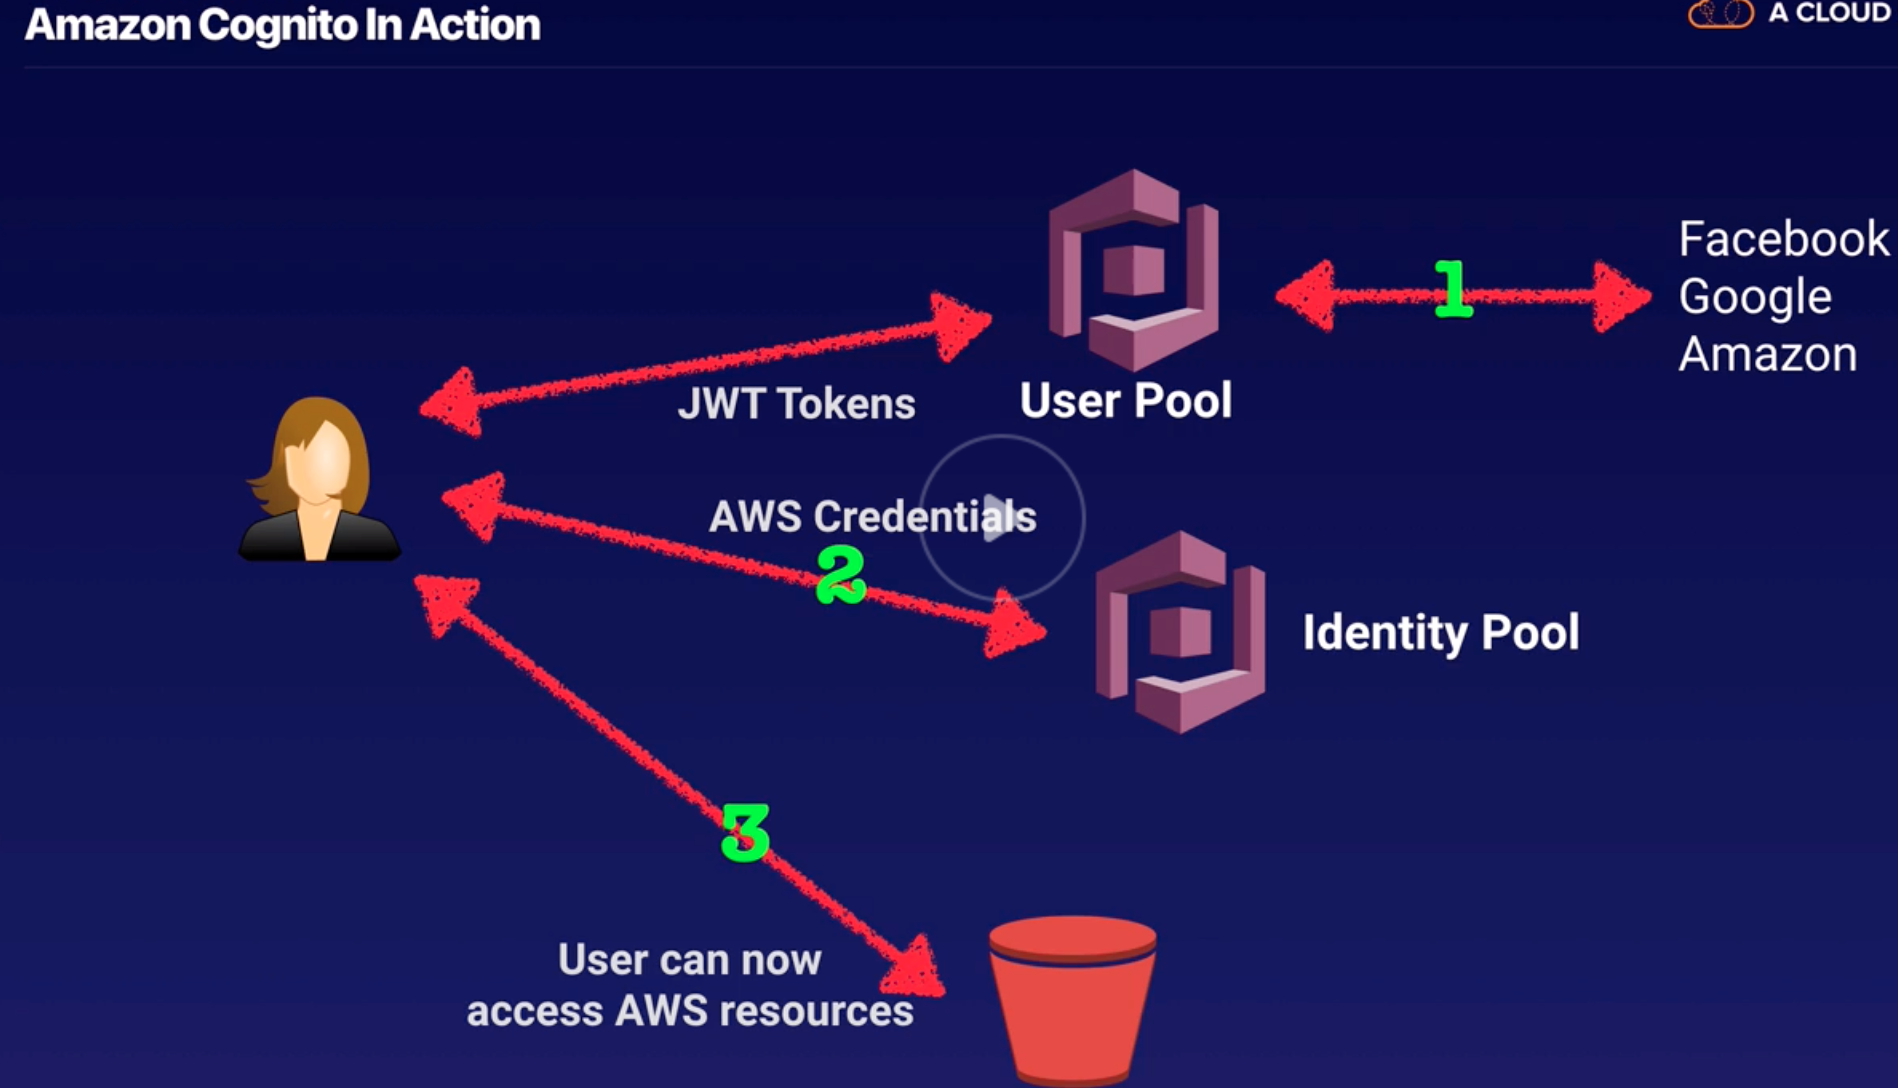
Cognito |
Lets you add user sign-up, sign-in, and access control to your web and mobile apps using social and enterprise logins. |
| 84 |
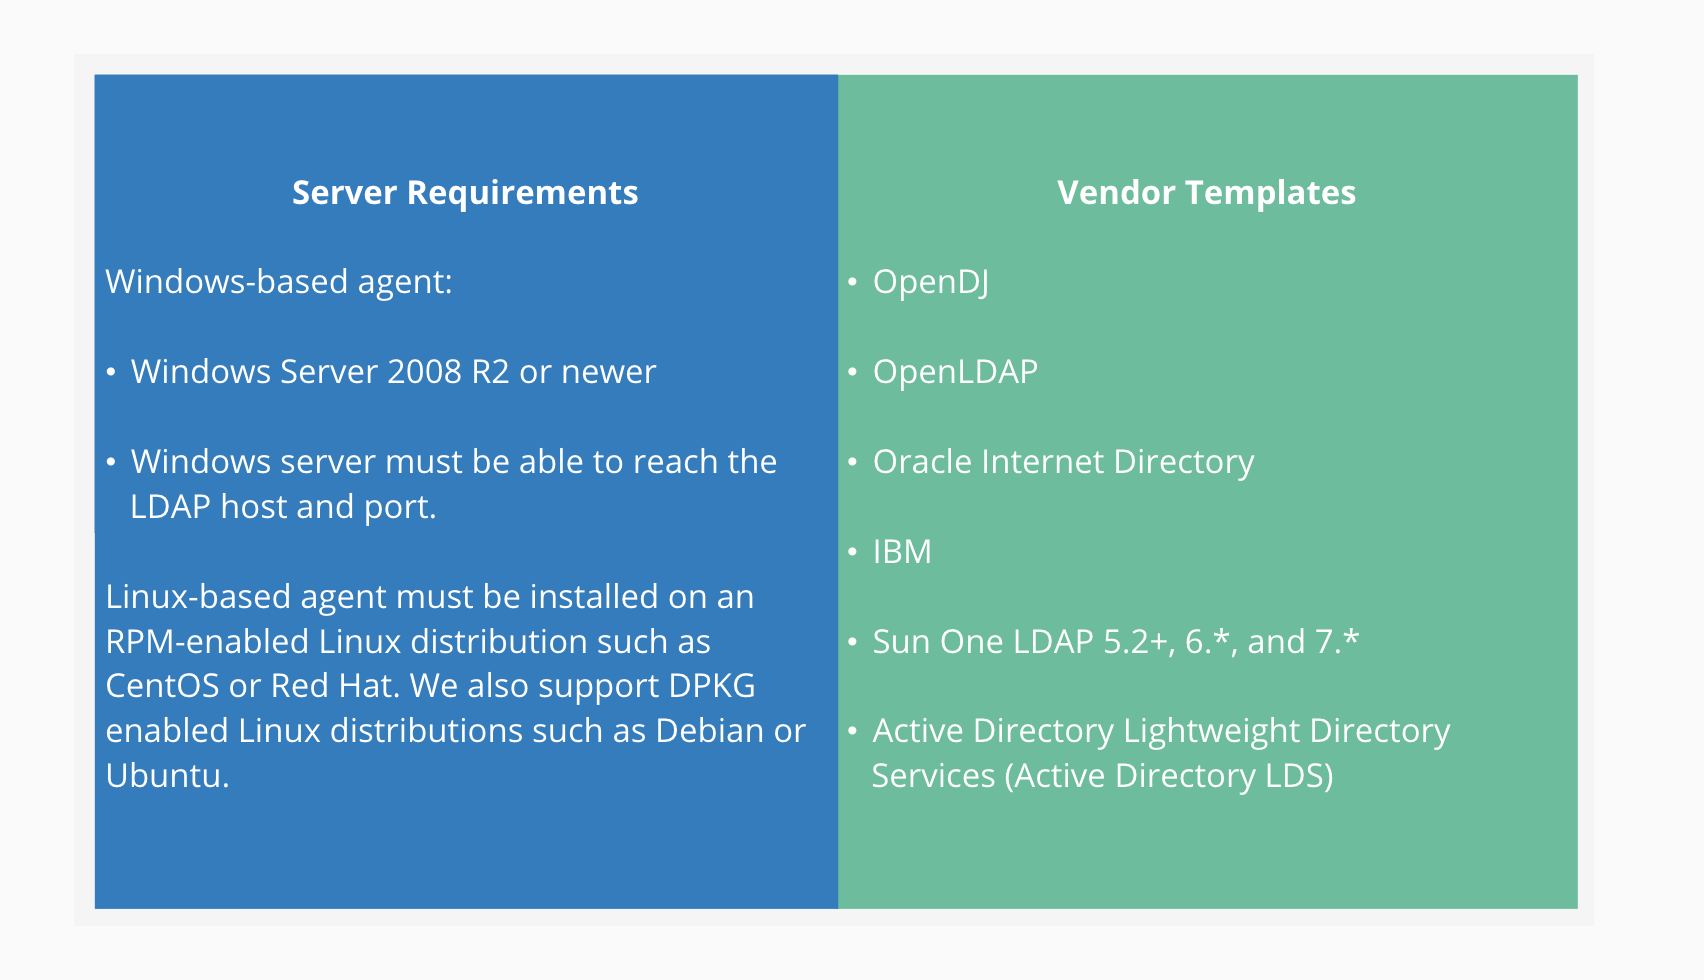
Directory Services |
- Directory Service provides multiple ways to use Amazon Cloud Directory and Microsoft Active Directory (AD) with other AWS services.
- Directory Service provides multiple directory choices for customers who want to use existing Microsoft AD or LDAP–aware applications in the cloud.
- Cloud Directory can create multiple dimensions of directories for a variety of use cases, such as organizational charts, course catalogs, and device registries.
- Automatically scales to hundreds of millions of objects and provides an extensible schema that can be shared with multiple applications.
|
| 85 |
GuardDuty |
- GuardDuty is a threat detection event based service that continuously monitors for malicious activity and unauthorized behavior to protect your AWS accounts and workloads.
- Paid service uses ML, anomaly detection, and integrated threat intelligence to identify and prioritize potential threats.
- GuardDuty analyzes tens of billions of events across multiple AWS data sources, such as AWS CloudTrail, Amazon VPC Flow Logs, and DNS logs.
|
| 86 |
Macie |
-
Identify and protect sensitive data stored in the AWS.
- Amazon Macie recognizes sensitive data such as personally identifiable information (PII) or intellectual property, and provides you with dashboards and alerts that give visibility into how this data is being accessed or moved.
|
| 87 |
KMS |
- KMS is key management service and control the use of encryption across a wide range of AWS services.
- Uses HSM that have been validated under FIPS 140-2, or are in the process of being validated, to protect your keys.
- KMS is integrated with CloudTrail to provide audit logs.
|
| 88 |
Inspector |
- Automated security assessment service (Agent and API based) for security and compliance of applications deployed on AWS.
- Inspector automatically assesses applications for exposure, vulnerabilities, and deviations from best practices (based on template/ rules).
- Then inspector produces a detailed list of security findings (via console or API) prioritized by level of severity.
|
| 89 |
SageMaker |
- ML core service.
- SageMaker is a fully-managed service that covers the entire machine learning workflow to label and prepare your data, choose an algorithm, train the model, tune and optimize it for deployment, make predictions, and take action.
|
| 90 |
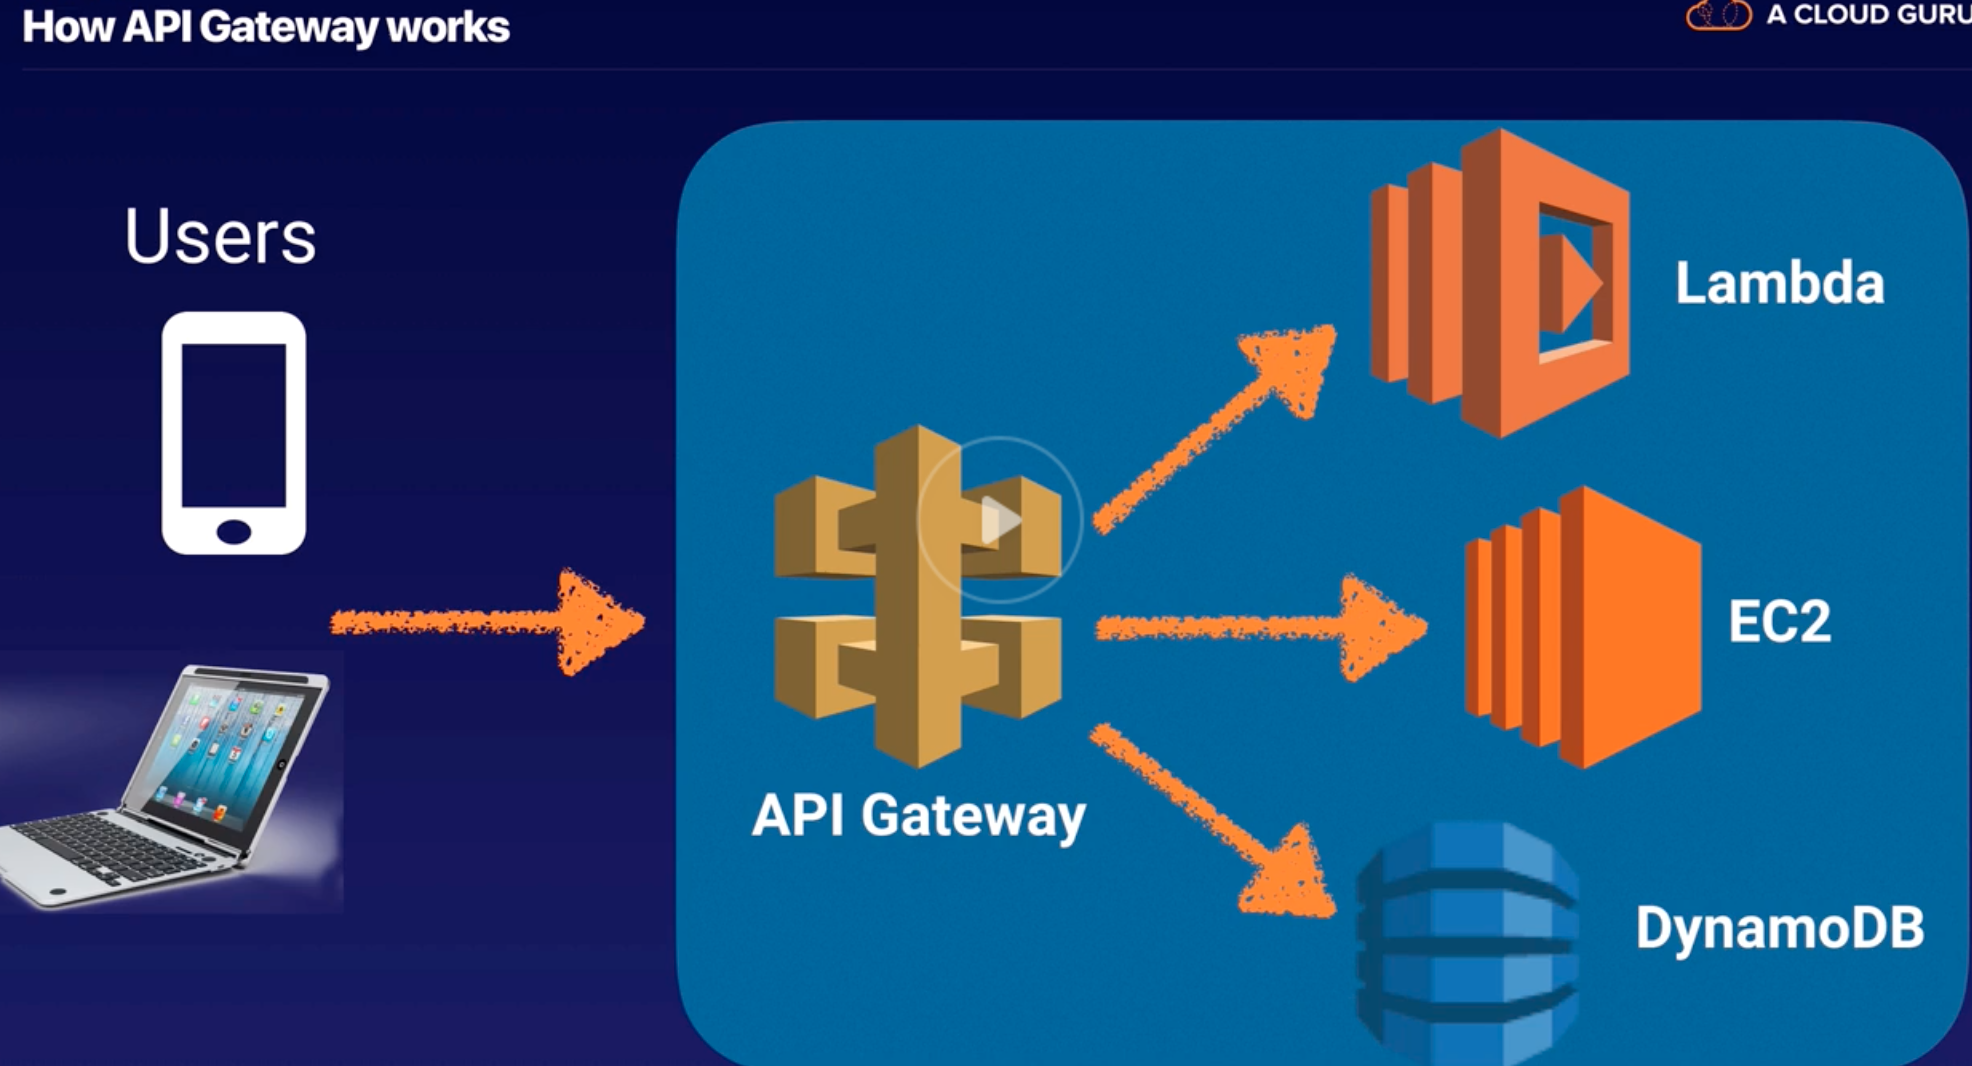
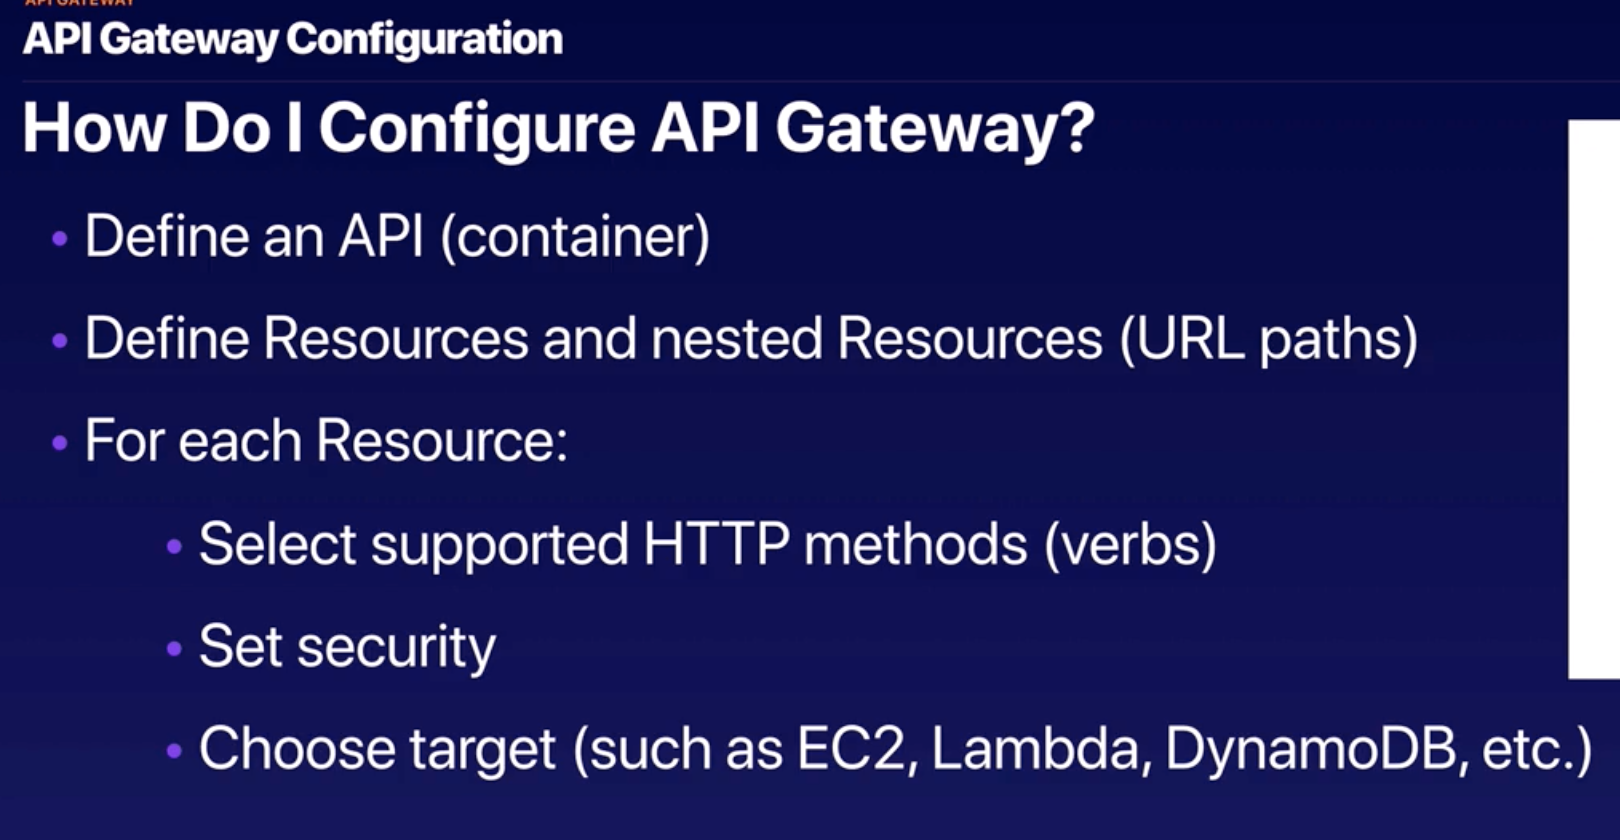
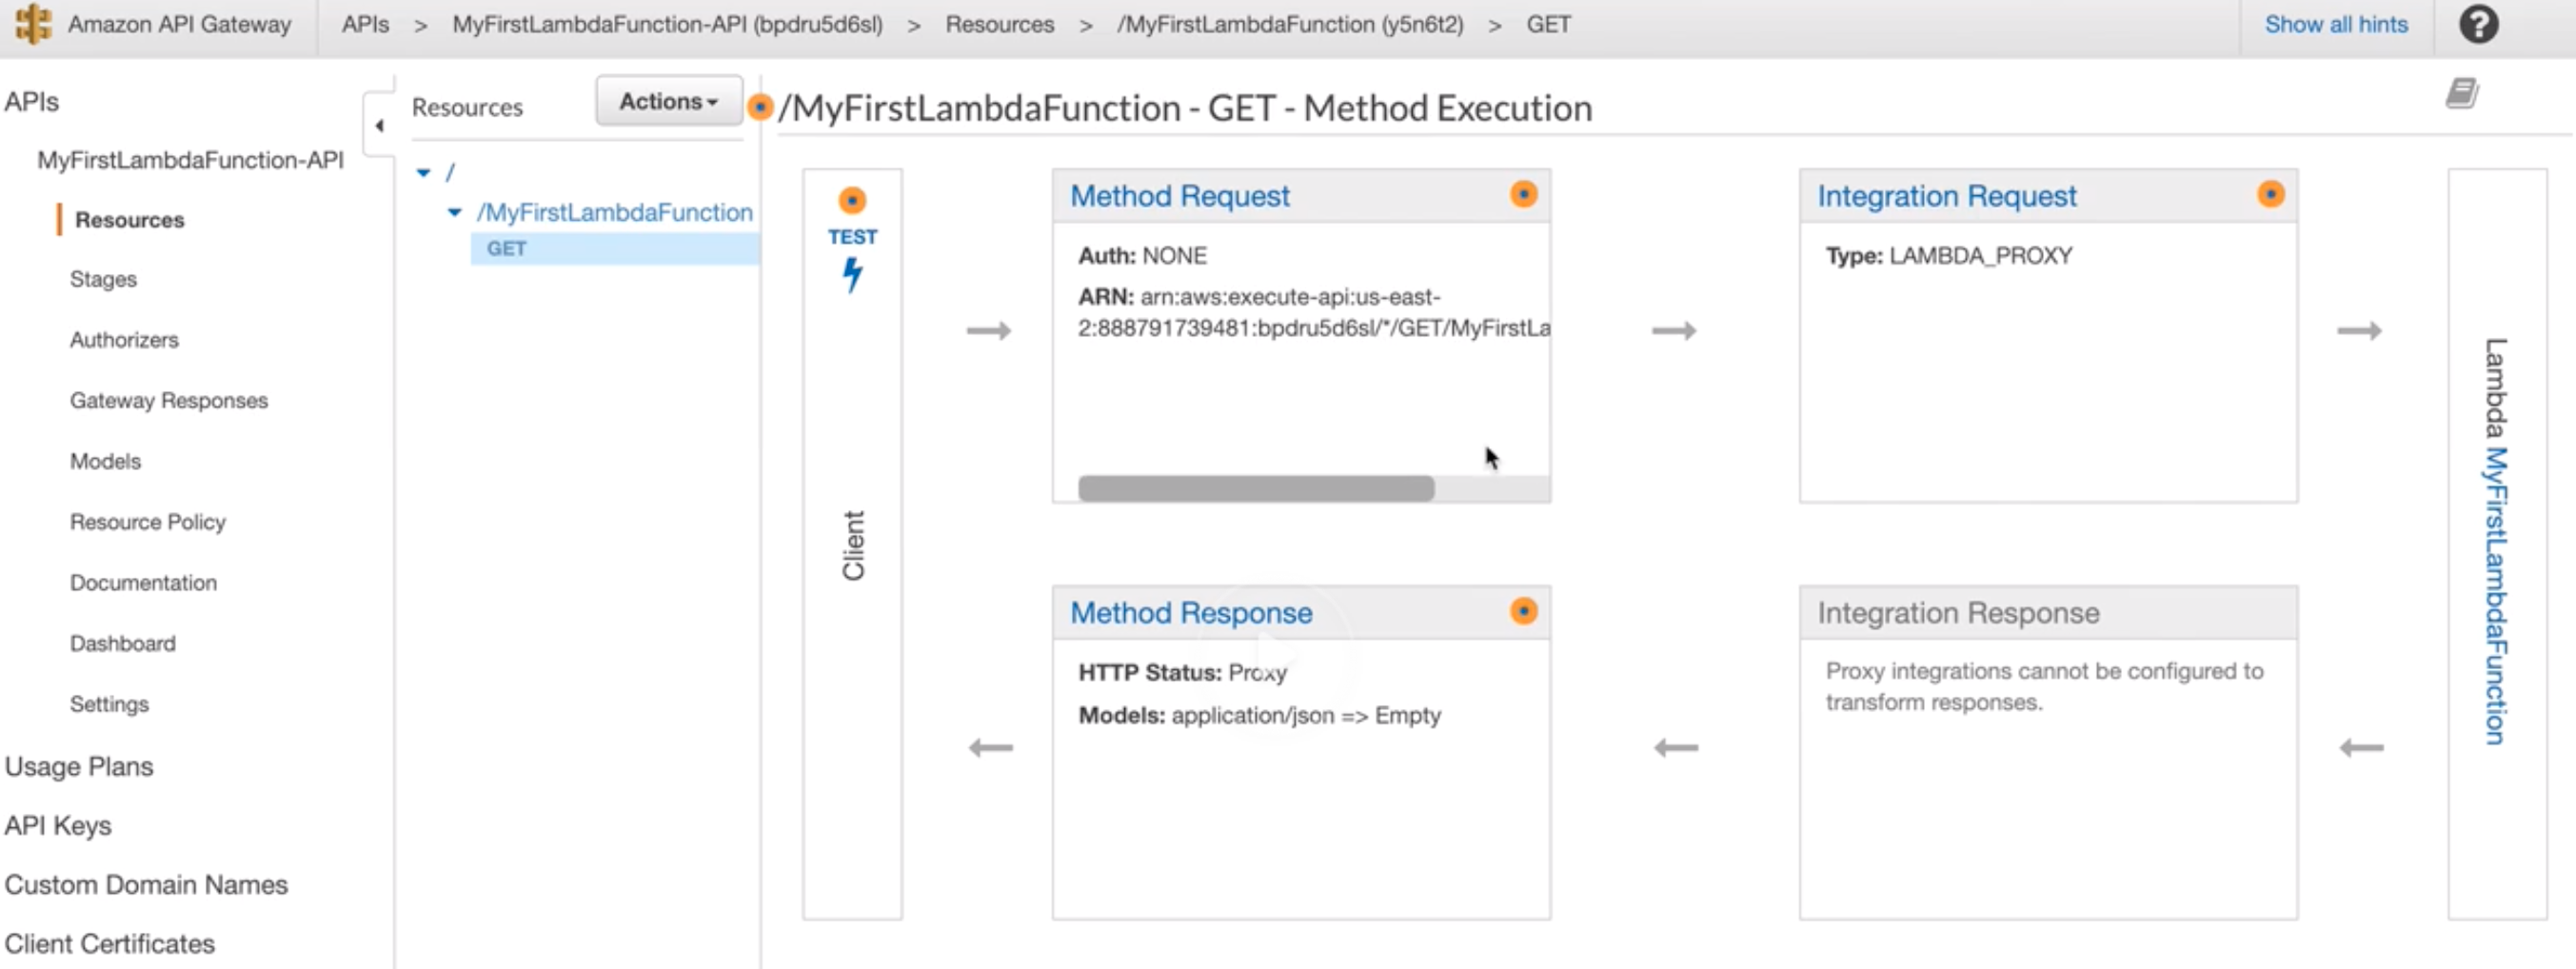
API Gateway |
- API Gateway is to create, publish, maintain, monitor, and secure APIs at any scale.
- From AWS Management Console, can create REST API and WebSocket APIs that act as a “front door” for applications to access data, business logic, or functionality from AWS backend services.
- Pay only for the API calls you receive and the amount of data transferred out and, with the API Gateway tiered pricing model.
|
| 91 |
WorkMail |
WorkMail is a secure, managed business email and calendar service with support for existing desktop and mobile email client applications. Uses IMAP protocol (receive email; stores in server and client). |
| 92 |
SES |
Simple Email Service (Amazon SES) is a cloud-based email sending service designed to help digital marketers and application developers send marketing, notification, and transactional emails. Uses SMTP protocol (sent emails). |
| 93 |
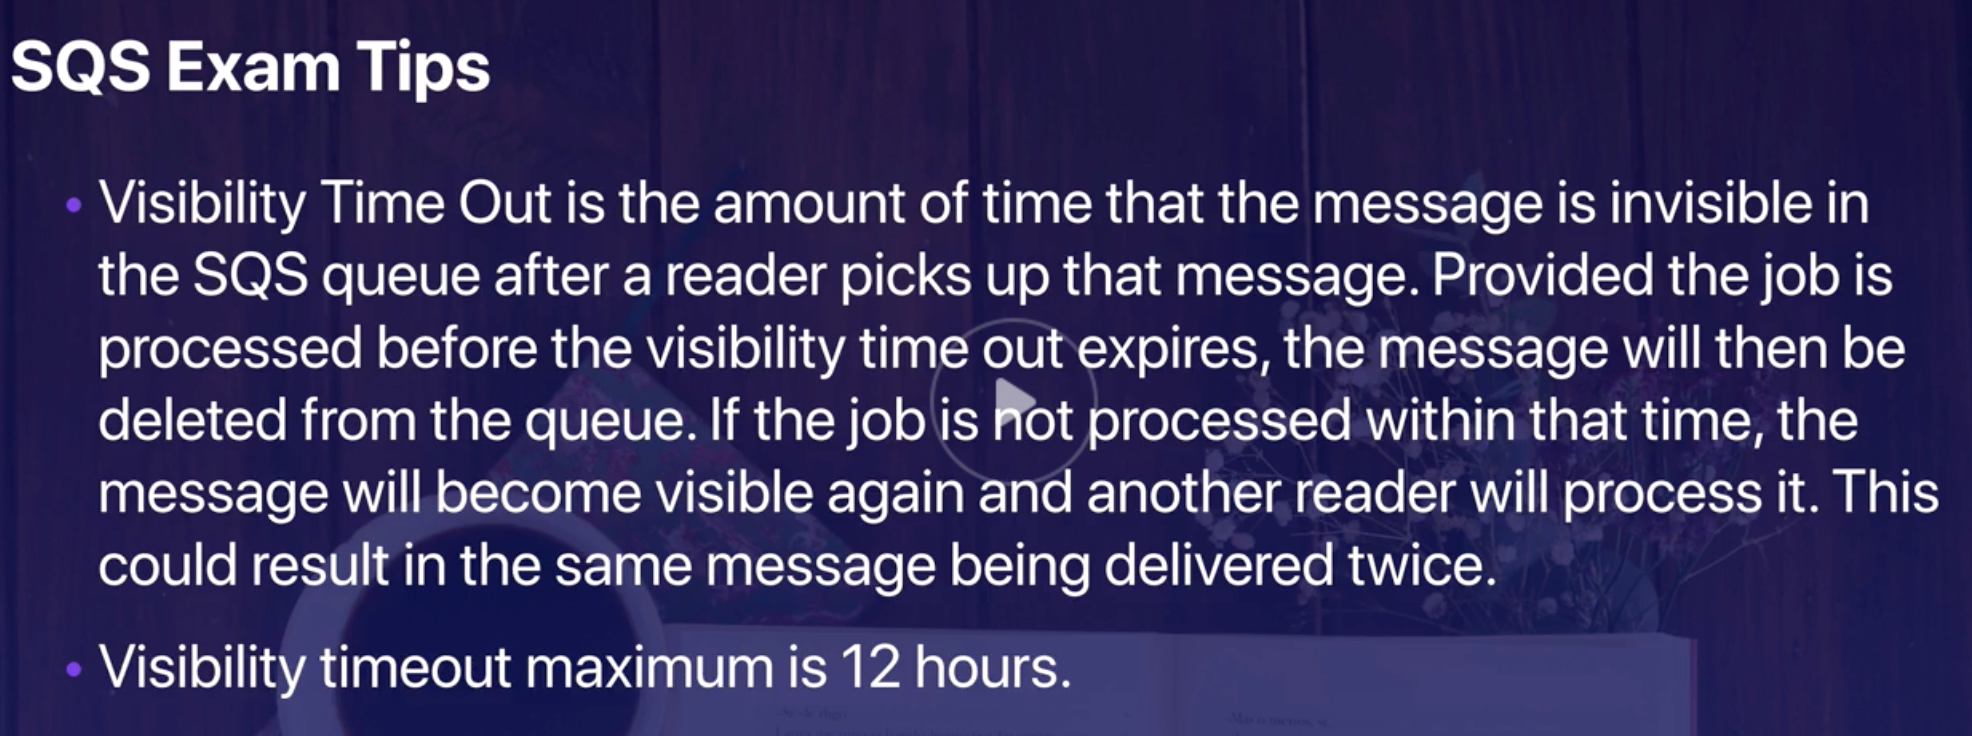
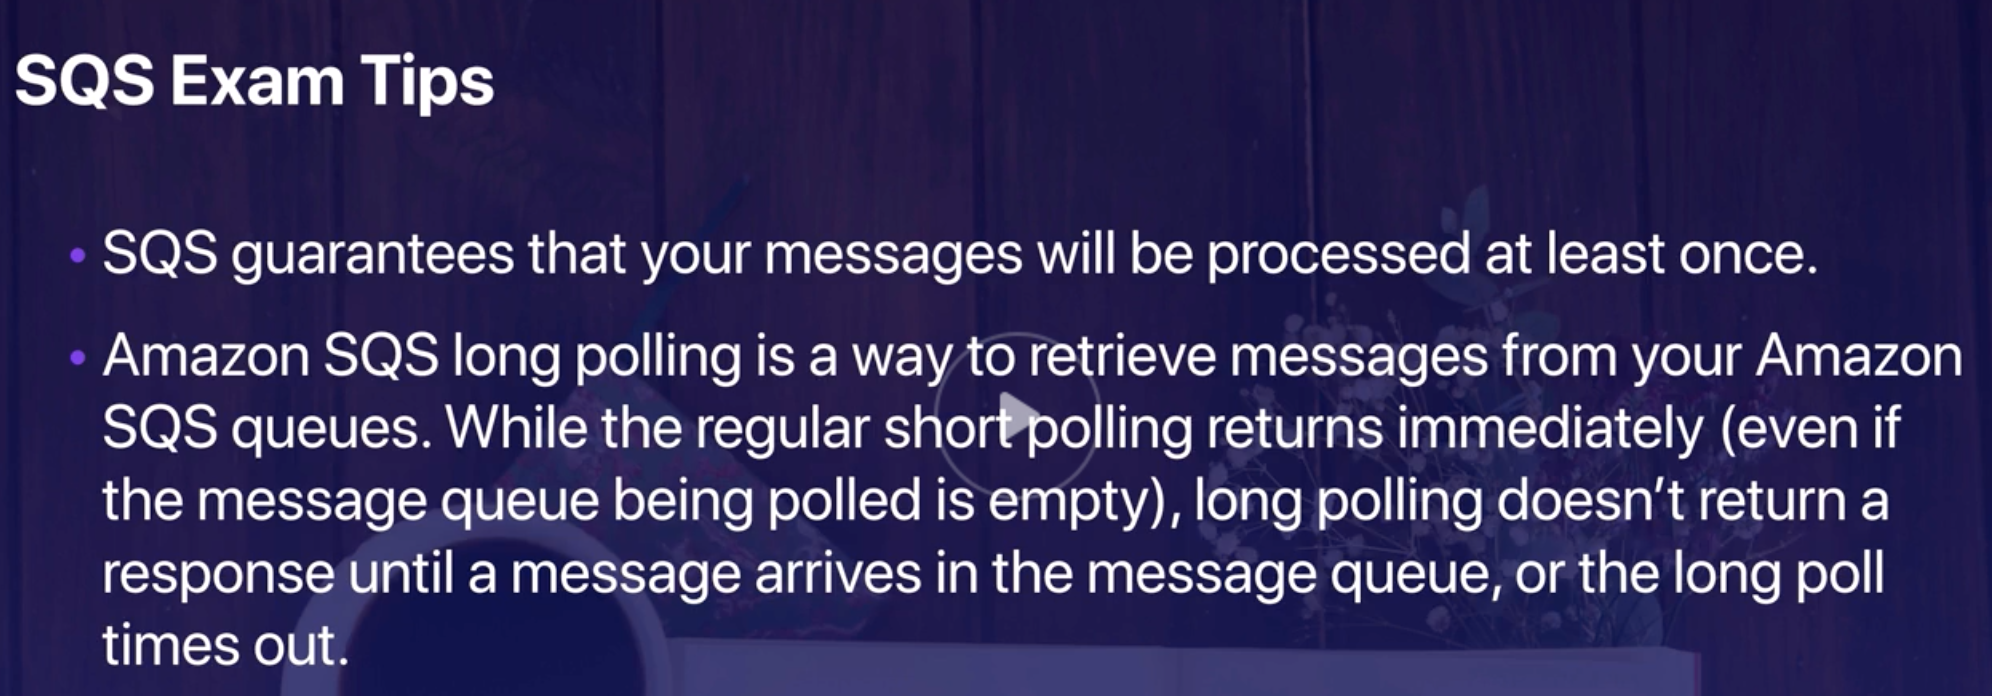
SQS |
- Simple Queue Service (SQS) is a message queuing service that enables you to decouple applications.
- Using SQS, you can send, store, and receive messages between software components at any volume, without losing messages or requiring other services to be available.
- Two types:
- Standard queues: No order and at-least-once message delivery.
- FIFO queues: Order and exactly once message delivery.
|
| 94 |
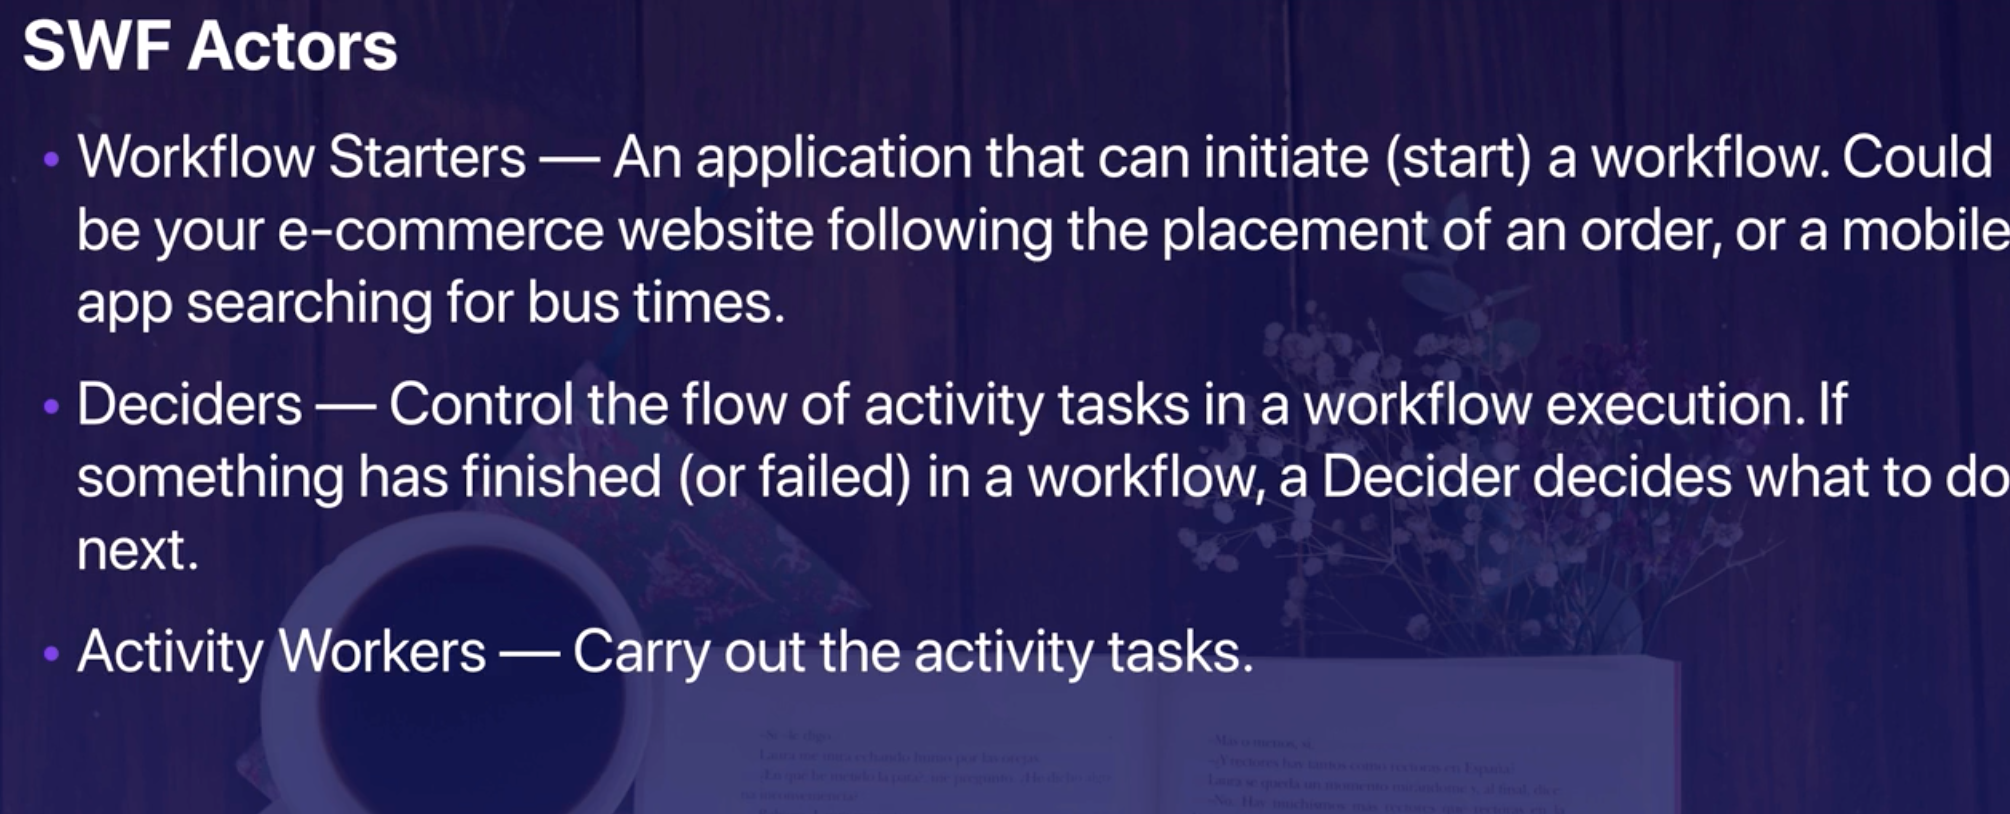
SWF |
- Simple Workflow helps developers build, run, and scale background jobs that have parallel or sequential steps.
- If your app’s steps take more than 500 milliseconds to complete, you need to track the state of processing, and you need to recover or retry if a task fails, SWF can help you.
|
| 95 |
EMR |
- Big data platform with ETL tool (MapReduce).
- Process large number of data sets using clusters of virtual servers.
- Using open source tools such as Apache Spark, Hive, HBase, Flink, and Presto.
|
| 96 |
ElasticSearch |
- Search in clusters.
- Works with Kibana, Logstash, ELK stack.
|
| 97 |
Data Lake |
A data lake is a storage repository (flat architecture instead of hierarchical fashion) that holds a vast amount of raw data in its native format until it is needed. |
| 98 |
Lake Formation |
- AWS Lake Formation set up a secure data lake in days.
- A data lake enables you to break down data silos and combine different types of analytics to gain insights and guide better business decisions.
|
| 99 |
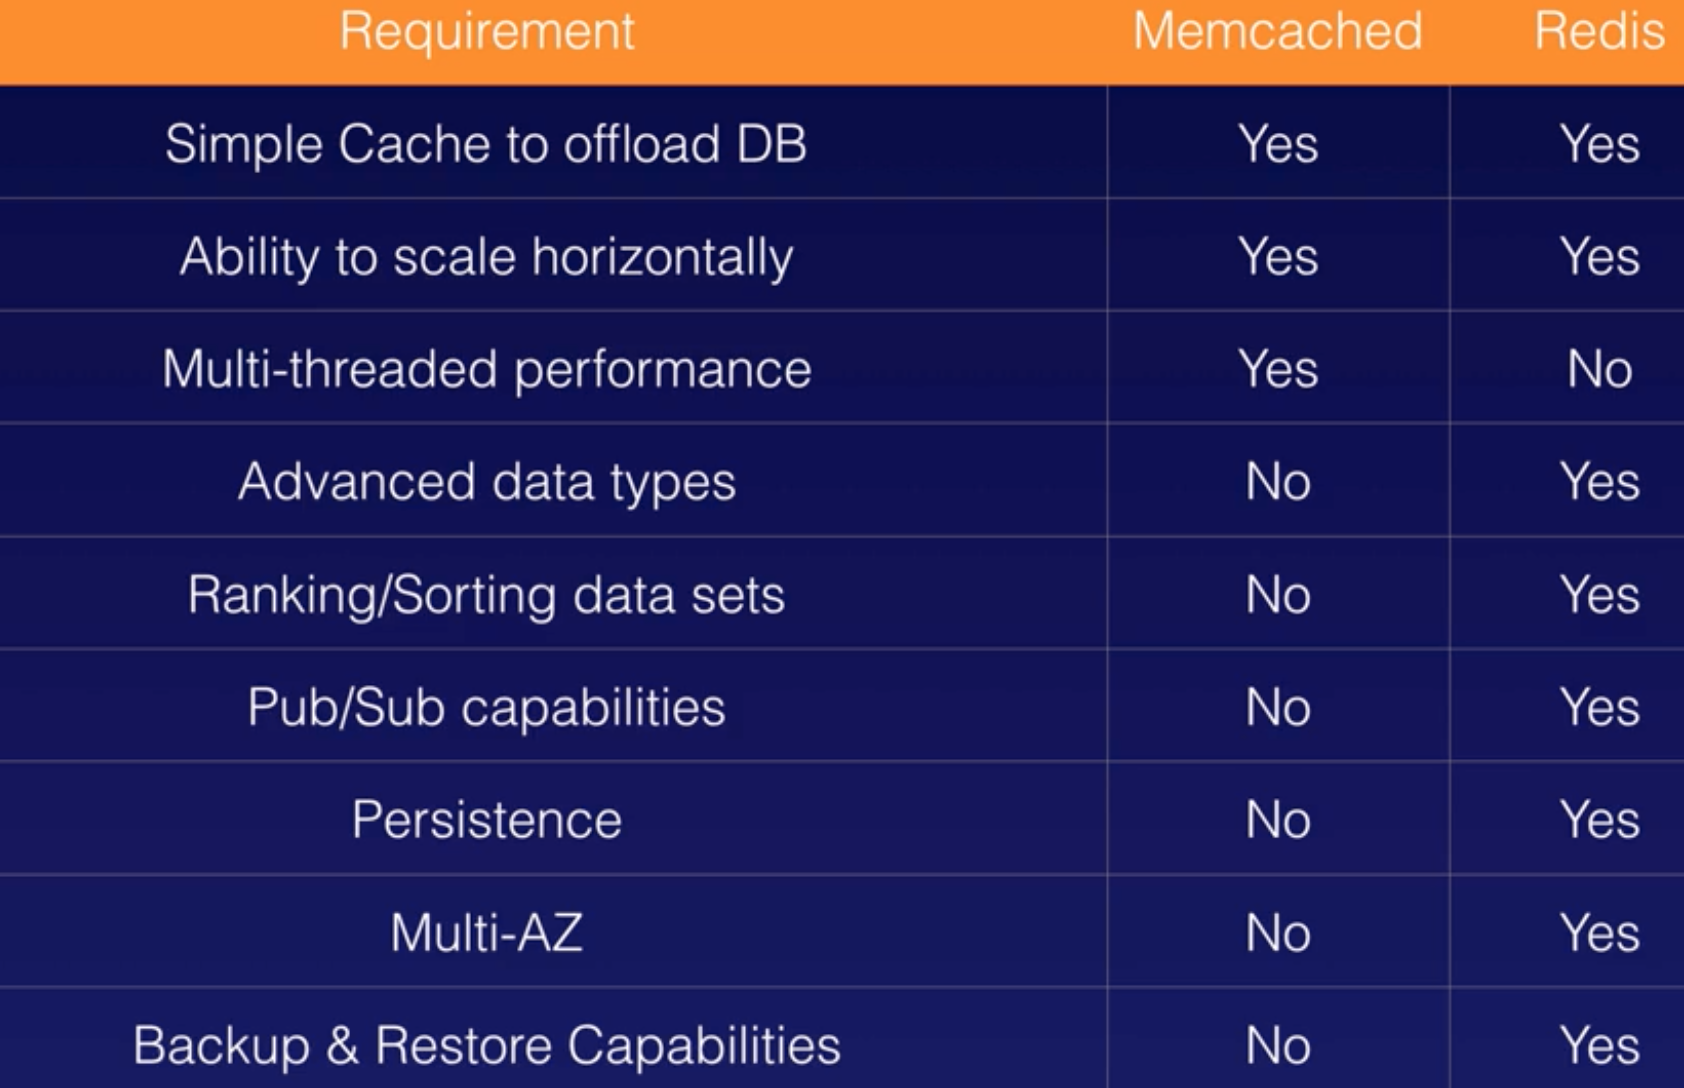
ElasticCache |
- In-memory key-value managed datastore.
- Popular choice for caching, session management, gaming, leaderboards, real-time analytics, geospatial, ride-hailing, chat/messaging, media streaming, and pub/sub apps.
- Two types:
- Redis: Remote Dictionary Server (Redis)
- Memcache
|
| 100 |
OpsWorks |
- Configuration Management Service: Chef and Puppet are automation platforms that allow you to use code to automate the configurations of your servers.
|
| 101 |
Root access keys |
AWS recommends that you delete your root access keys because you can’t restrict permissions for the root user credentials.
- If you want to manage services that require administrative access create an IAM user, grant administrator access to that user, then use those credentials to interact with AWS.
- User with root access key has unrestricted access to all the resources in your account, including billing information.
- Don’t create one unless you absolutely need to.
- Rotate (change) the access key regularly.
|
| 102 |
WAF |
- Web application firewall and works on Application-LB.
- Layer 7 content filtering to support block/allow the request
- Write rules that blocks IP address, HTTP address, URI strings.
- Rate limiting per client IP.
- Threat mitigation.
|
| 103 |
Organization |
- OU – management group for different AWS accounts.
- Create organization using the root account or master account.
- AWS Organizations has four main benefits:
- Centrally manage access polices across multiple accounts.
- Automate account creation and management.
- Control access
- Consolidate billing across multiple accounts
|
| 104 |
Assurance Programs |
- AWS is compliance at infrastructure level and customer should be compliance to the data they store there.
- Certification/ Attestation by third party/auditors.
- Laws regulations and privacy
- Alignments and frameworks
- Certifications: Cloud Security Alliance, ISO 9001, 27001, 27017, 27018, PCI DSS Level 1, SOC 1, SOC 2, SOC 3, within US (FedRAMP, FIPS, FISMA, HIPAA, ITAR, MPAA)
- HIPAA Compliance: Designed to secure Protected Health Information (PHI).
|
| 105 |
Auditing and Compliance |
- Configuration: for resources inventory, configuration history, change notifications, determine compliance against rules, enables compliance auditing, security analysis and change tracking.
- Service Catalog: manage catalogs of approved IT services, achieve consistent governance, customer defines portfolios, product, define cloud formation templates.
- Artifacts: access reports and details of security controls, on demand access to security compliance documents, demonstrate security and compliance.
- CloudTrail: records all API calls made, delivers logs to S3 buckets which include identity, source IP and request and response details, doesn’t log DB and OS system log.
- Encryption and Key management: many services use encryption.
|
| 106 |
Vulnerability and Penetration Testing |
AWS customers are welcome to carry out security assessments and penetration tests against their AWS infrastructure without prior approval for 8 services:
- EC2, ELB, CloudFront, RDS, Aurora, NAT and API Gateways, Lambda and Lambda Edge functions, Lightsail, Elastic Beanstalk environments.
|
| 107 |
Cost Management Prediction Tool |
- Cost Calculators/ Simple Monthly Calculator for expected cost. Select region, services, OS, size, billing options, it gives estimated cost. No visualize.
- Total Cost of Ownership (TCO): to calculate expected cost difference between having on-premise data center and AWS. Calculate VM, DB instances in on-prem to cloud.
|
| 108 |
Cost Management Incurred Tools |
- Cost Explorer: visualize and drill down the accrued expenses in AWS, look the cost by month, services, usage, tags.
- Cost and Usage Reports: access highly detailed billing information, CSV files save to S3 buckets, ingest reports into redshift or Quicksight for analysis, usage listed for each service, usage listed for tags, can aggregate to daily or monthly totals
- AWS Billing and Cost Management: Billing History.
|
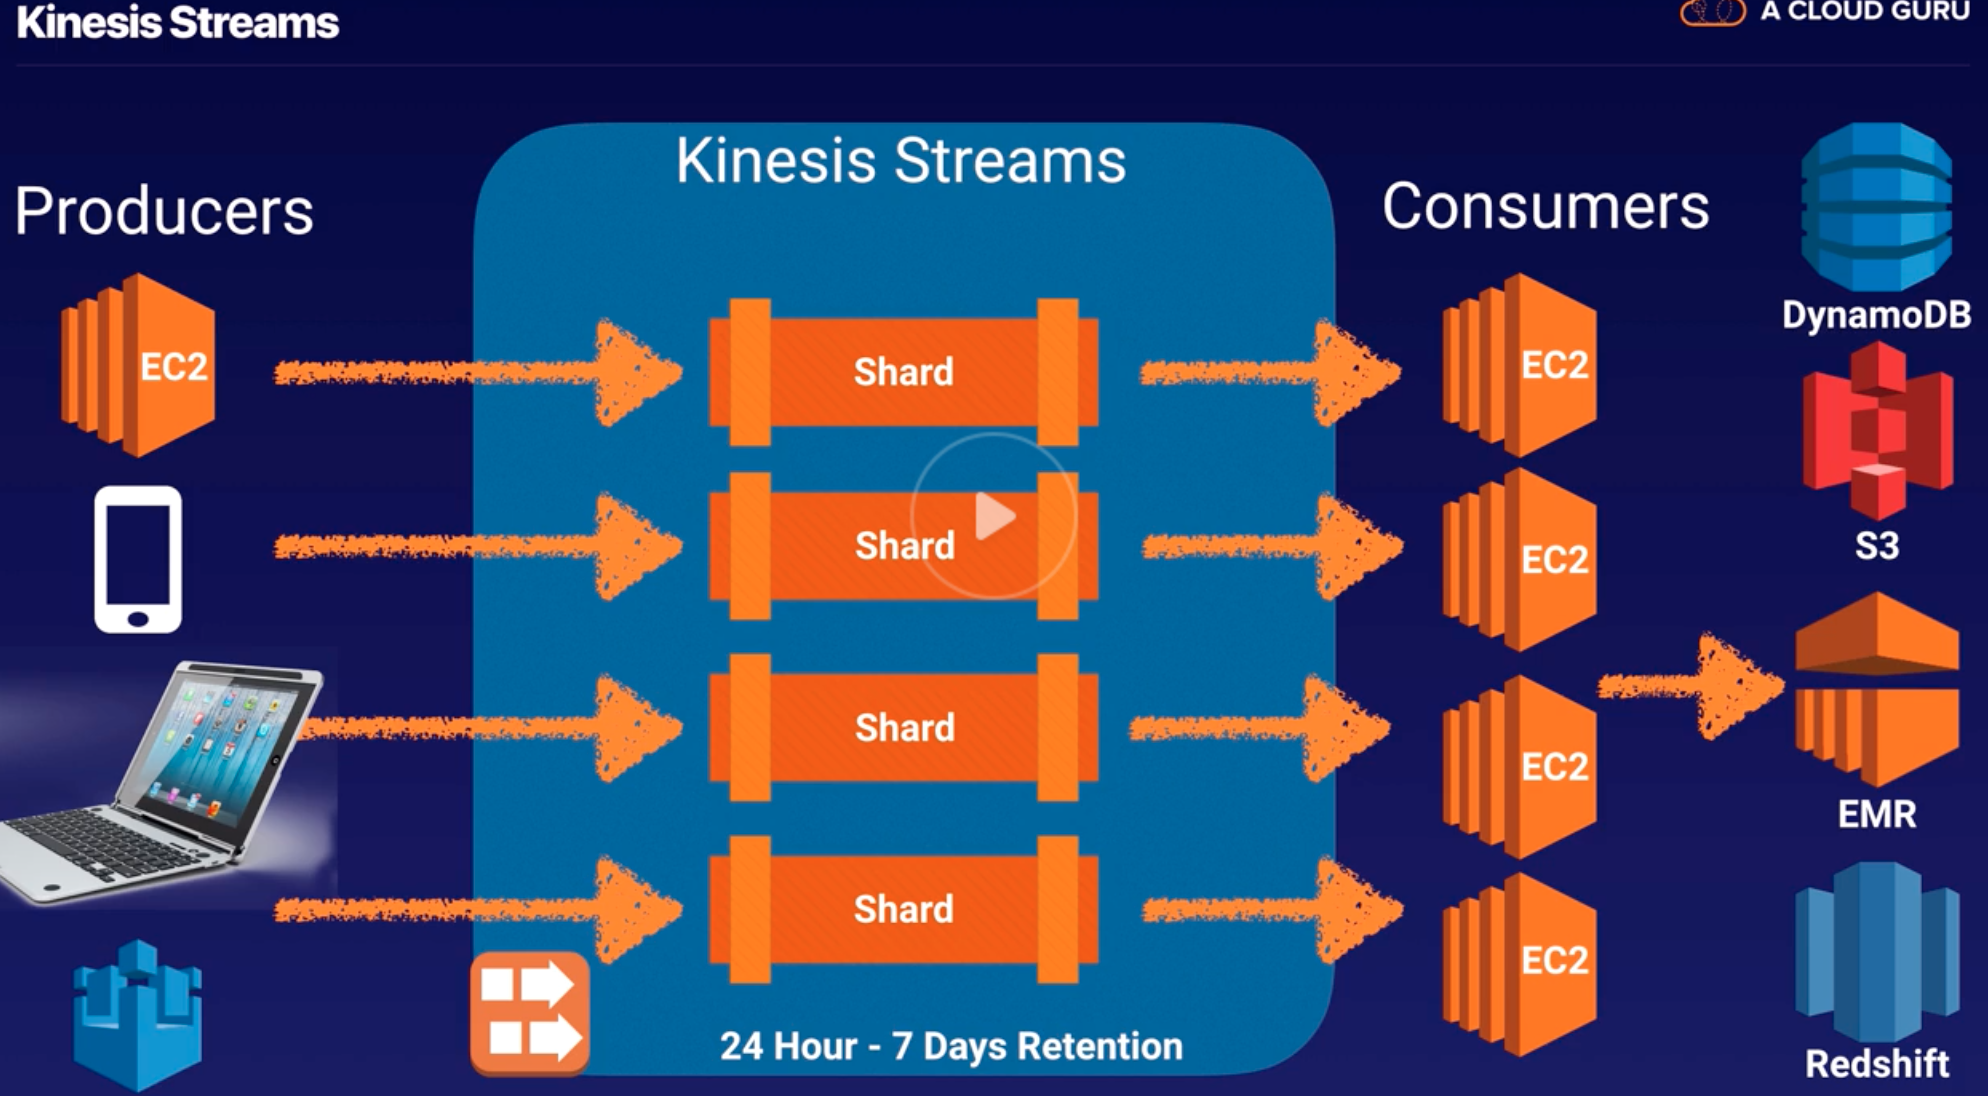
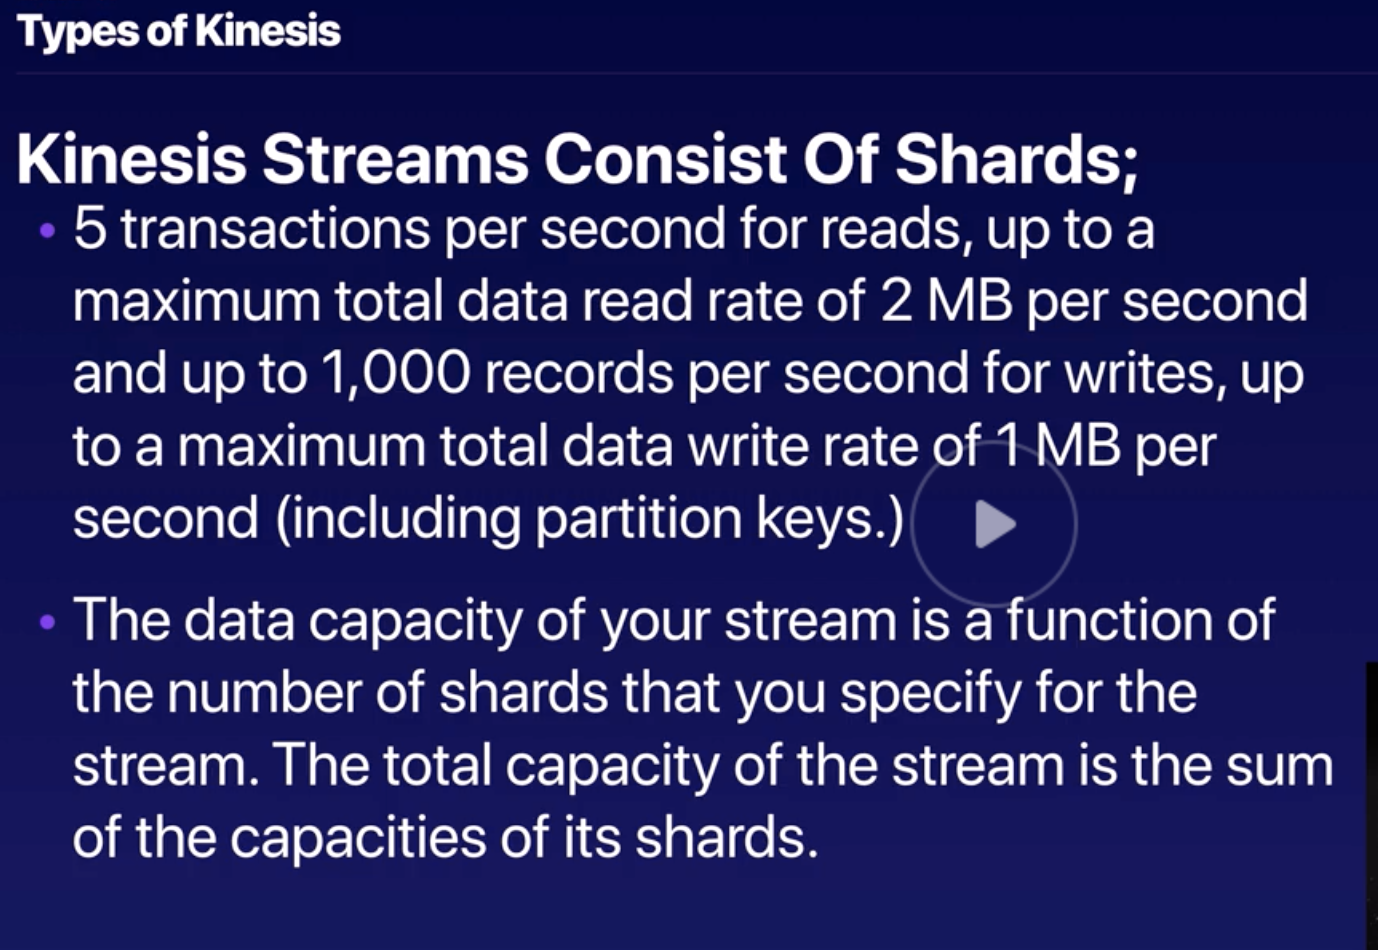
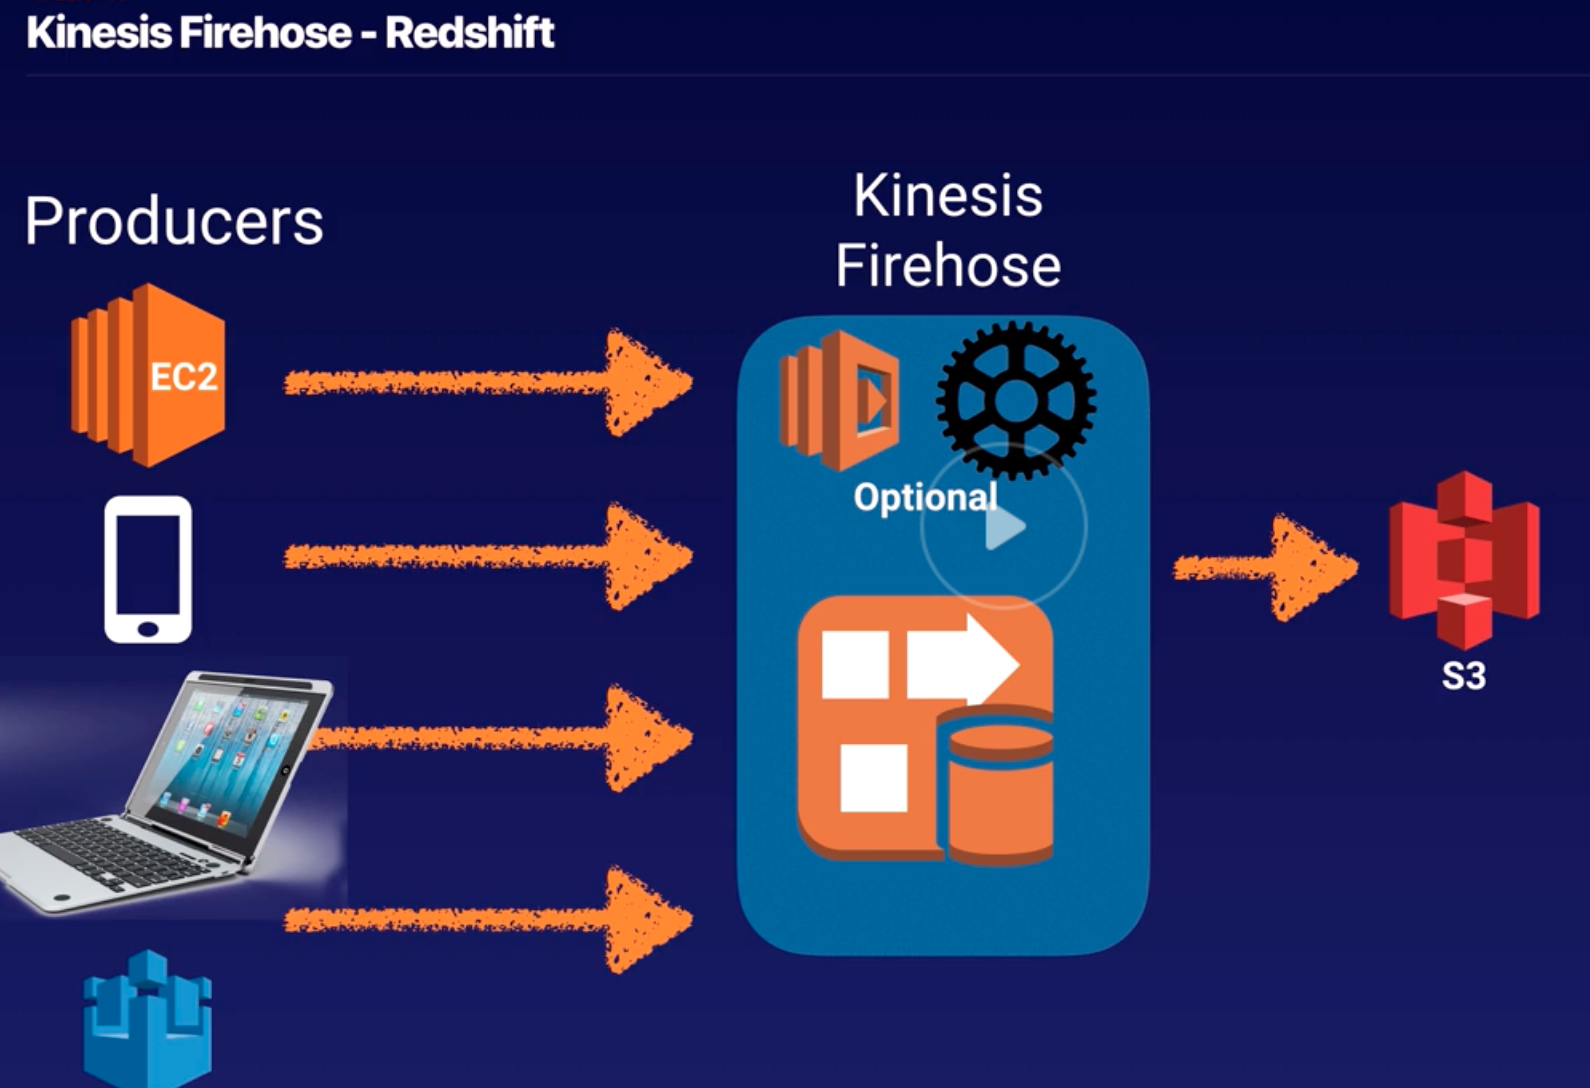
| 109 |
Kinesis |
- Kinesis collect, process, and analyze real-time, streaming data so you can get timely insights and react quickly to new information.
- Kinesis enables you to process and analyze data as it arrives and respond instantly instead of having to wait until all your data is collected before the processing can begin.
|
| 110 |
Elastic IP address |
- Static IP address, mask failure when occur an re-route traffic to healthy server.
- Doesn’t incur charges as long as the following conditions are true:
- Elastic IP address is associated with an EC2 instance.
- Elastic IP associated to EC2 is running.
- EC2 has only one Elastic IP address attached to it.
- Charged by the hour for each Elastic IP address that doesn’t meet these conditions.
|
| 111 |
|
|